Windows 8 Pricing

Windows 8 LogoBased on the blog entry from Brandon LeBlanc the Windows 8 Upgrade (via Windows.com) will probably be available for $39.99. This is quite a smart move by Microsoft as you get Apple’s Mac OS X Snow Leopard from their store for about $29.00.

If the upgrade really works from Windows XP up to Windows 7, Microsoft might be possible to shift many users to the next generation of Windows. While the price for previous Windows upgrades was quite high, many users kept their former version of Windows until they bought a new personal computer, obtaining a new OEM version of Windows.

Nowadays, computers used at homes definitely last longer than the average Windows life cycle and quite a lot personal computers outside in the wild might see at least two version of Windows until being replaced.

Therefore, personally I welcome this move by Microsoft, considering to upgrade even more than one of my licenses to the new Windows version. Even though, this might be a strategic move by Microsoft to keep market share, existing customers definitely gain by the relatively low prices by upgrading even from previous Windows version. This might be quite an advantage as one has to buy each and every Mac OS version on the way upgrading from previous versions.

Restoring NT Backups using Windows 7

After a recent data loss, I had to restore several backups from various sources. Unfortunately, some of these backups were made on a Windows Server 2003 machine. However, it seems that Windows 7 does not come with any possibility to restore these backups out of the box, though.

The Windows NT Backup – Restore Utility seems to be the solution for this issue. During installation you might get the notification to turn on Removable Storage Management – on Windows Vista.

Enable Removable Storage Management Dialog

However, this is one of the features not available in Windows 7 anymore. Fortunately, Microsoft did release another version of this tool for Windows 7. Even the tool itself is now called Windows NT Backup Restore Utility for Windows 7 and for Windows Server 2008 R2 you will find it only as Update for Windows 7 x64-based Systems (KB974674) on the Web – of course this would be the exactly what you are going to look for, yes?

Once downloaded the right bits and installed, you will see the familiar UI of the former backup tool.

Windows NT Backup Restore Utility for Windows 7 and for Windows Server 2008 R2

Simply follow the Restore Wizard to access your old backups.

Broken VMware Workstation Network Adapter

After upgrading Windows Vista to Windows 7 you might encounter an issue with VMware Workstation and its network adapter.

VMware Workstation Error Message


When setting up a NAT or bridged network connection in VMware Workstation it shows a message telling

The virtual network drivers on the host are incompatible with the installed VMware application. Expected version 5. Please reinstall the product. Failed to connect virtual device Ethernet0.

Make sure all your virtual machines are powered off and quit VMware Workstation. Open a command shell as administrator and follow the steps below.

First cd %windir%system32drivers, check for the file vmnetadapter.sys, right-click it, select Details and check its version. It should be 4.0.2.0. If the file is not there,

cd “%ProgramFiles(x86)%VMwareVMware Workstation”

rundll32 setupapi,InstallHinfSection VMnetAdapter1.Install 128 %CD%netadapter.inf

vnetlib — install devices

This will install the required adapters and devices. Do again a cd %windir%system32drivers and check for the First cd %windir%system32drivers, check for the file vmnetadapter.sys file.

vmnetadapter.sys

After a reboot of the host system, the NAT settings for the VMware network adapters should work again. Switching to bridged mode will probably result in another message.

VMware Workstation Error Message

Reason for the message saying

The network bridge on device VMnet0 is not running. The virtual machine will not be able to communicate with the host or with other machines on your network.
Failed to connect virtual device Ethernet0.

might be the missing VMware Bridge Protocol on the according host network adapter.

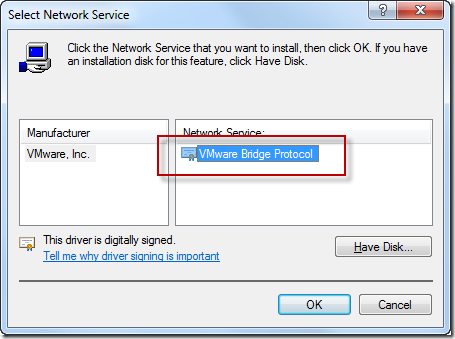
Got to Network and Sharing Center and select Change adapter settings. Choose the network connection you want to use with your VMware network adapter, right-click, select Properties, Install, Service and finally Add. This will allow you to select the VMware Bridge Protocol. In case the entry is not listed, select Have Disk… and navigate to %ProgramFiles(x86)%VMwareVMware Workstation.

VMware Bridge Protocol

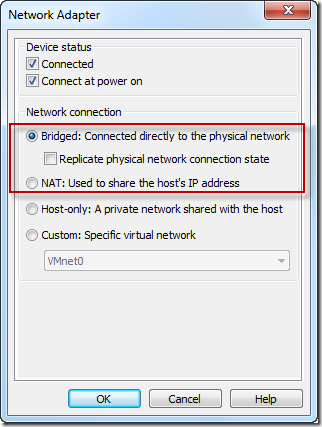
After installing the VMware Bridge Protocol restart the VMware Workstation and choose the bridged mode for the network adapter.

VMware Network Adapter

Got Root #3

In this article I provide the final steps how to virtualize a Windows Server 2008 installation.

Install Windows Server 2008

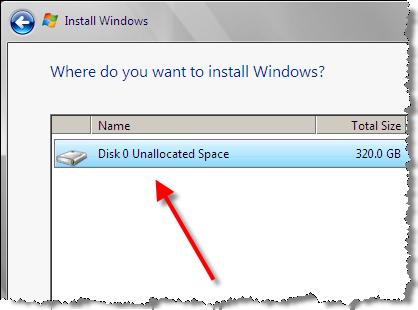
You probably run into the same problem that Windows Server 2008 won’t be able to recognize the virtual hard disk you have planned to installed it on. Get the corresponding SCSI drivers as floppy image from the VMware site. Select the image and connect the drive.

Mounted SCSI Drivers

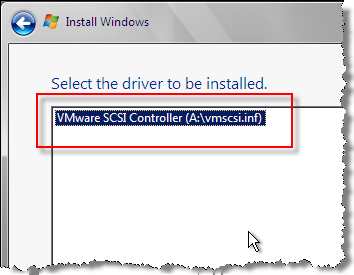
Now say ‘Browse‘ and choose drive ‘A:‘ – don’t forget: After selecting the .flp image you also have to connect the drive. Otherwise Windows cannot read the device.

VMware SCSI Drivers

Click on ‘Next‘ and after a few seconds the hard disk will be found. The currently available drivers for Windows Server 2003 seem to work fine also for Windows Server 2008.

Virtual HDD for Windows Server 2008

Installing the VMware Tools might be a good idea. You can find the image at /usr/lib/vmware/isoimages/windows.iso or just install them from the VMware management console’s menu. While the image is mounted go to ‘Device Manager‘ and install the drivers for the network adapter which probably does not work yet.

Installed Network Drivers

Got Root #2

In a previous post, I told about he first steps in virtualizing a Windows Server 2008. In this article I describe how to proceed after, the request for my own RIPE subnet was approved. Now I can concentrate on the next point: Installing VMware. Since I want to set up this machine for visualization, I have to perform a few steps first. That way, this post will be mostly about my fight with Debian Linux which is the host system.

After logging in, I just realize that updating the package database might be not the worst idea. Consequently, I do so and install some Norton Commander like tool for real men

apt-get update
apt-get install mc

This actually makes things much easier.

Now, I have to activate IP forwarding in /etc/sysctl.conf by the adding

net.ipv4.ip_forward=1

and bringing the additional IP on the host system by adding

up ip add 192.168.1.1/29 dev eth0

to /etc/network/interfaces. Additionally, I have to add some host-route (by using my gateway 192.168.0.1) so my new subnet is reachable by adding

pointopoint 192.168.0.1 

to eth0 in /etc/network/interfaces. Installing iproute by a

apt-get install iproute 

restarting the interface by calling

/etc/init.d/network restart

finally makes my IP ping-able. Quite a fight so far if you don’t do this on a regular base. Additionally I installed the powersave package and reconfigured several settings to increase the performance in /etc/powersave.

I just got the tip to put my virtual machines to the separate disc. Since I have one spare 400GB disc. I have to create some partition and to format it.

cfdisk /dev/sdb mkfs -t ext3 /dev/sdb1

Let’s create some directory for the virtual machines and mount the disc

mkdir VMs
mount -t ext3 /dev/sdb1 /Vms

Now some final tweak at /etc/fstab by adding

/dev/sdb1 /VMs et3 defaults 0 0 

and I am done.

Finally I start installing the VM. I was pointed to some German How-To written by Till Brehm which is includes quite detailed instructions.

Some prerequisites are required before I start. I do the required 220 MB update by

apt-get install linux-headers-`uname -r` libx11-6 libx11-dev x-window-system-core x-window-system xspecs libxtst6 psmisc build-essential

VMware can be downloaded from http://www.vmware.com/download/server/. I skip the management console since I will use it on my Windows workstation and focus only on the server and management interface binaries using:

wget http://download3.vmware.com/... tar xvz VMware-server-*.tar.gz cd vmware-server-distrib ./vmware-install.pl

Now, I simply accept the defaults for the following installation. only at one point I had to tell the script that my virtual machines will be located at /VMs. No I have to continuing with the management interface

tar xvfz VMware-mui-*.tar.gz
cd vmware-mui-distrib
./vmware-install.pl

The Web-based management interface seems to work perfectly after installing.

VMware Management Interface

After installing the management console on Windows I run into some trouble. During compilation of the corresponding modules, the VMware script was not able to start the inetd service. Therefore, I was not able to connect to the VMware server. After restarting the service manually it worked perfectly and I set up my virtual machine.

VMware Management Console

Now, I have to copy the installation files for the Windows Server 2008.
 

Got Root #1

Today, I finally got my root server. this article will be the first one in a series of articles showing how to virtualize a Windows Server 2008 on a remote system.

Got Root

My very first action was to request a new RIPE subnet. Unlike in your private LAN, you cannot simply assign randomly some IP to any machine. Nothing else I can do until the subnet is assigned.

Windows Search 4.0 Preview

Nick White recently announced the Windows Search 4.0 Preview. The description of the Remote Index Discovery seems to be promising.

The first positive improvement after the installation I realized is a ‘Pause’ button at the ‘Indexing options’. A tray icon, for convenient pausing the indexing, as I did know from the early versions of MSN Desktop Search or Microsoft Research’s Stuff I’ve Seen, is not provided.

WS4 Indexing Options

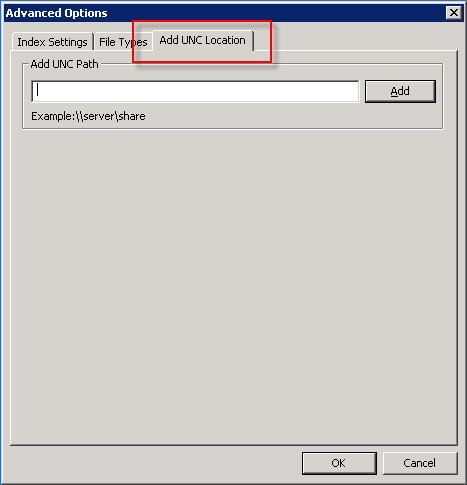
On the Windows Server 2003 installation, I find a tab at the ‘Advanced Options’ allowing me to add UNC locations. Since I had no Desktop Search running on my server before I am not sure if this is some new feature.

WS4 Advanced Option at Windows Server 2K3

So far, I haven’t found anything about the Remote Index Discovery, yet. However, I will follow up the development of the Desktop Search in the future.

powercfg – Enable Hibernate on Vista

Today, Daniel helped my to solve a long standing miracle. For some unknown reason, Vista decided not to support hibernate on my Toshiba m400 anymore. So what to do:

Start the command prompt and type

powercfg -H ON

You won’t see anything on the screen, but when going back to your advanced power potions you will see both, hibernate and hybrid sleep again.

Vista Power Options

That’s all – and you can send your machine to hibernate again.

Send to Hibernate

Microsoft Office Mobile 6.1: Upgrade

This update finally supports the new file formats of Office 2007 on your mobile device:

To allow Windows Mobile users to work with Office documents created in the Open XML formats, Microsoft has developed an upgrade for Word Mobile, Excel Mobile, and PowerPoint Mobile applications. This upgrade to the Office Mobile applications allows viewing and editing of Word documents and Excel workbooks and viewing of PowerPoint slideshows created by using Microsoft Office 2007.

Other improvements include:
• Enhanced viewing experience for charts in Excel Mobile.
• Ability to view SmartArt in PowerPoint Mobile.
• Ability to view and extract files from compressed (.zip) folders.

The update need approximately 7 Mb on your device. Therefore, I would recommend using a memory card for the installation.