I loved PowerToys for Windows 95! Now they are back. To be found on GitHub. Available summer 2019.
PowerToys is a set of utilities for power users to tune and streamline their Windows experience for greater productivity. Inspired by the Windows 95 era PowerToys project, this reboot provides power users with ways to squeeze more efficiency out of the Windows 10 shell and customize it for individual workflows. A great overview of the Windows 95 PowerToys can be found here. The first preview of these utilities and corresponding source code will be released Summer 2019.
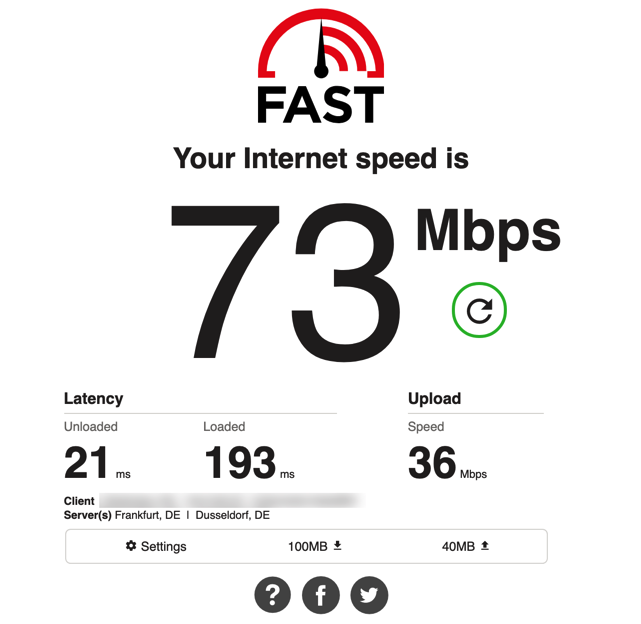
From time to time you might be interested in how fast your internet connection is. In real. There are various tools out in the wild. In Germany most of the time Speedtest ist used. Many providers also offer a speed test – which in fact ist just a branded site of Speedtest.
The issue here is the fact, the speed test servers are living behind “the internet” in some other computing centers. They never give you a real idea of your connection speed. They give you an idea of how fast the data transfer to these servers is. If the test is run repeatedly, it also provides different results. Depending on the server on the other side.
Today, I learned about fast.com which is a speed test based on the Netflix servers. It seems that if some company knows how to transport large amounts of data bypassing the restrictions of the internet, Netflix is the one. Said that it seems these Netflix servers are the ones least affected by the rest of the internet. Tests I run on fast.com is mostly appropriate, providing similar download rates I see with Xbox Live downloads while other test sides show large divergences.
Therefore, fast.com ist my recent tip if it comes to testing the speed of your internet connection.
If you master your Terminal it always looks like you are a superhero. Therefore, I always try to present a lot using terminal during my lecture, just to provide some smoke and mirrors.
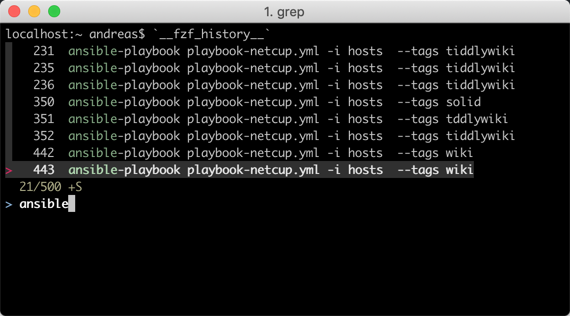
However, I am far away from mastering Terminal truly. Therefore, it comes in handy that one of my students pointed me to reverse-i-search which is available on Terminal.
Wich this reverse lookup you can search through previous commands used in Terminal before. While this is an awesome feature you can activate by control-r on macOS, it does not allow you to search for similar commands used before. It always shows just exact matches of what you typed.
To search through similar typed commands, you can use fzf, a command-line fuzzy finder available at GitHub.
It’s an interactive Unix filter for command-line that can be used with any list; files, command history, processes, hostnames, bookmarks, git commits, etc.
Installing on macOS using Homebrew
For your convenience you can install fzf using Homebrew using the command
brew install fzf
For me, the bash integration was not available after the installation. After some investigation (I might haven’t read the instruction well enough), I realized the installation script needs to be run:
/usr/local/opt/fzf/install
Eventually, the installation routines put [ -f ~/.fzf.bash ] && source ~/.fzf.bash into .bashrc. I run into this issue some time before. Reading through this article on Scripting OS X might give you an idea why it does not run.
When you open a terminal application, it does not ask for login. You will just get a command prompt. In other versions of Unix or Linux, this will not run the .bash_profile but a different file .bashrc. The underlying idea is that the .bash_profile should be run only once when you login, and the .bashrc for every new interactive shell.
However, Terminal.app on macOS, does not follow this convention. When Terminal.app opens a new window, it will run .bash_profile. Not, as users familiar with other Unix systems would expect, .bashrc.
Moving the line mentioned above into .bash_profile and deleting .bashrc eventually solved the issue. After restarting Terminal the key bindings CTRL-R and CTRL-T have been available as expected.
With this little trick the installations of fzf works quite well on macOS X Mojave.
tl;dr
Use reverse-i-search by pressing control-r on macOS to search previous commands typed in Terminal. In addition, you can use fzf, a command-line fuzzy finder to find similar commands and all other kinds of stuff.
To install run
brew install fzf
/usr/local/opt/fzf/install
copy [ -f ~/.fzf.bash ] && source ~/.fzf.bash from .bashrc into ~/.bash_profile (and remove .bashrc if not needed) or source .basrc from .bash_profile
I haven’t used feed readers a lot after Google Reader was cancelled on March 13, 2013. Before I made extensive use of it with quite a lot of resources. Personal weblogs, article feeds and so on. Once Google cancelled Reader it seemed many applications and sites stopped supporting RSS and Atom as they did before. I am not saying they did not provide feeds anymore, however, it seemed that feeds haven’t been first class citizen of the Web anymore.
Since my personal focus recently changed towards new and actual technologies (again), I started to read a lot more online articles as I did during the recent six years. So once again, I am looking for an alternative to Google Reader (again).
Feedly never seemed to work for me due to various reasons, including a monthly fee of 5$. But recently I found Inoreader to be very handy. So far, I was not aware of this service.
First of all, it is a Freemium service as well, however, with the free membership it seems you get all basic functionality needed. The very only limitation seems to be a limit of 150 sources. Once reached you can upgrade to 20$ yearly plan to set a new limit of 500 sources. This seems a absolute reasonable price I am willing to pay for this service.
So I will give it a try to keep up to date with my favourite sites, looking forward to hit the mark of 150 sources soon.
I always loved to enhance my presentations and lecture slides with visual content. At Microsoft, we used to have a Ressource DVD with hundreds of box-shots and icons to be used for marketing and other occasions. Meanwhile, I prepare a lot of educational lecture slides. However, universities usually do not provide such resources. Even most of the companies I’ve worked for did not provide a lot of these materials.
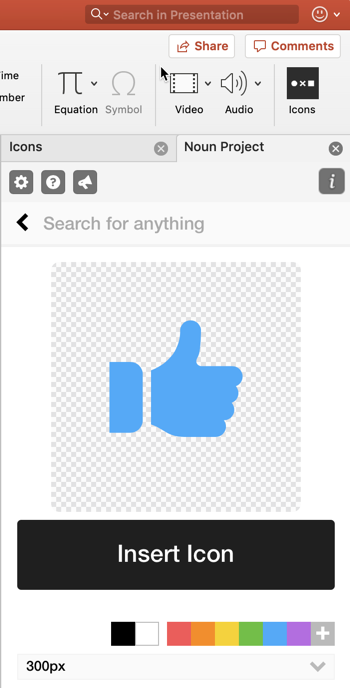
Eventually, I learned about the Noun Project where you can get thousands of high-quality icons for an absolutely fair price.
The project does provide various applications for Mac, iPhone as well as add-ons for Microsoft Word and PowerPoint. I just started to use the PowerPoint add-on being highly pleased by its functionality. You can search for icons, select from various resolutions and choose an appropriate color. Considering the time I spend to create, search for and adapt icons the price of 40 € is quite fair.
tl;dr
If you are looking for a high quality and easy to use collection of icons, you should have a look at the Noun Project.
I just realized, that recent Windows version make it very hard to customize some aspects of your desktop.
As I am using Sumatra PDF as my default PDF viewer, I do not have the typical Adobe icon on my desktop. While having these icons on my Mac as well as on my work PC, this is rather confusing.
I came along File Types Manager which actually takes away the registry fiddling.
It works with Windows XP, 7/8 and Windows 10. if you have any .ico files available it is pretty easy to change an icon for a particular file type just by assigning it.
Also there are tons of other features, I haven’t used yet.
tl;dr
If you want to change file type icons on a Windows 10 system, you ca use File Type Manager to do so easily.
Right after I just writing about Windows Snipping Tool in my previous post, my Windows 10 notebook just surprised me by telling there will be something called Snip & Sketch in the future.
It seems it has the same capabilities as Windows Snipping Toll while adding the possibility to annotate your screenshots directly using various pencil and sharing capabilities via Bluetooth and WiFi.
At my current company laptop, I am very limited when it comes to installing additional tools to improve my productivity. From a company view understandable, it is very frustrating to me. One of the tasks I do several times a day, is creating a screenshot. Unfortunately, I am not able to install tool such as my beloved SnagIt.
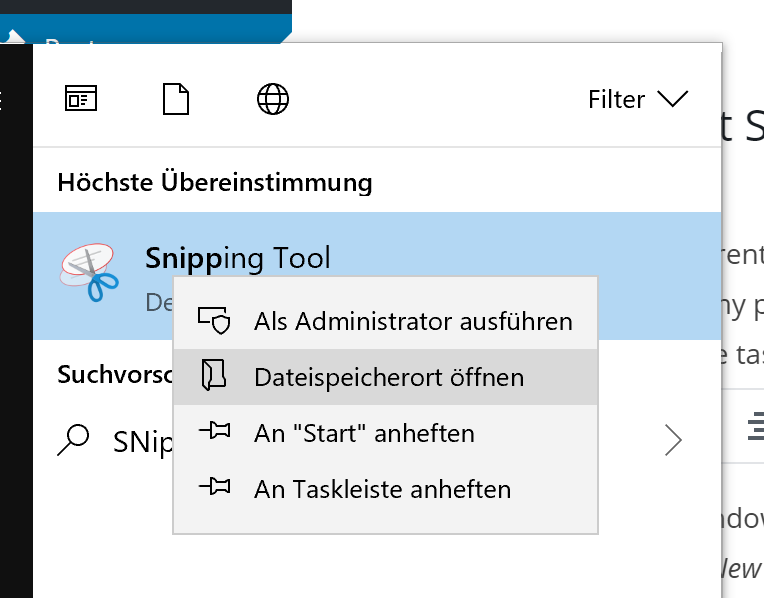
I use Windows Snipping Tool instead a lot. However, pressing Ctrl + Esc, typing Snip and then pressing New gets annoying over time. So I decided to create an Instant Snip instead when.
So head to the Snipping Tool and right click it to navigate to its location on the disc.
Copy the shortcut in this folder and rename it. In my case, I copied the shortcut to a Prg folder in my Home directory where I save programs, batch files and shortcuts.
Now right click the shortcut and do the following small changes:
Add the parameter /clip to the command line in the shortcut
Optional: Add a keyboard shortcut in case you are not happy with the Windows default (in my case Windows+Shift+I)
At the very end, I have put this shortcut to my taskbar to create instant clips with a single mouse click.
That way you can use the shortcut to create a clip directly. Using the /clip patemter you can use Snipping Tool in semi-automated processes but also the keyboard shortcut you have just defined.
In case you are only looking for the default keyboard shortcut you can use Windows+Shift+S to start the clip mode of Snipping Tool.
One point to bear in mind is the fact, when using the /clip mode, the clip is directly saved to the Windows clipboard and the Snipping Tool UI cannot be accessed right after the screenshot is made.
tl;dr
Windows Snipping Tool has a parameter /clip to create a instant clip from the command line without starting the UI dialog but also can be started using Windows+Shift+S to create such a clip.
While I worked with Microsoft, Windows LiveWriter was my favourite offline writing tool for blog posts. At one point Microsoft stopped supporting Live Writer in 2017 while the tool itself was not developed anymore since 2012. About that time I moved on to Apple and MarsEdit on macOS.
The installation file is just about 6 MB (indeed megabyte not gigabyte). It supports WordPress, SharePoint, Google Blogger and probably every other service with a proper blogging API.
Eventually, I set up my blog on Open Live Writer and this article became the very first article IO have written on a Windows machine for the past sever years.
tl;dr
Open Live Writer is a nice offline blogging tool for Windows, just in case you missed it like me.
Since WordPress cam up with the new editor, actually, writing does not spark fun anymore. Actually, I do not know why I do not like the new editor. Therefore, I recalled MarsEdit, which I used quite some time ago.
I am still not disappointed by the editor. Connection the WorPress installation worked like a charm. Looks like I can start writing blog articles again in a “traditional” manner.
Said that, this is going to be the first article written with MarsEdit for a long time.