In my current project, moving my home server from a PC Tower running Windows Server 2003 to a more energy as well as space efficient Mac mini, I need to migrate quite a bunch of tools and scripts from Windows to Ubuntu.
Said that, hMailServer served me well for years on my local network. It was easy to install, maintain and run. However, I was now looking for some more lightweight solution for the new server.
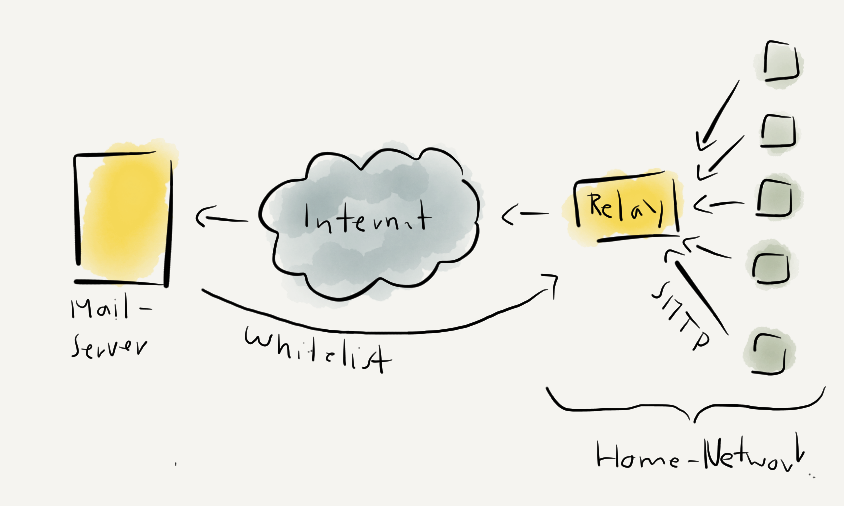
The need can be summarized quite easily:
- arbitrary devices and services on the local network need to be able to deliver mails via SMTP to the server
- local services on the server need to be able to send out mails as well
- the server needs to forward the mail to my real server
- very basic authentication is a must
- it need to run on my old 1.66 Ghz Mac mini
At all it’s as simple as the following diagram:
 After digging through all the stuff such as Sendmail, Postfix and so on, I ended up with Exim4 as the perfect solution for my needs.
Basically, after installing it via
sudo apt-get install exim4
the only thing is to quickly run through the setup.
sudo dpkg-reconfigure exim4-config
It’s sort of guided and quite easy to do as long as you have some experience with networks. However, there are quite some pitfalls which are quite annoying if you are little experienced with Exim.
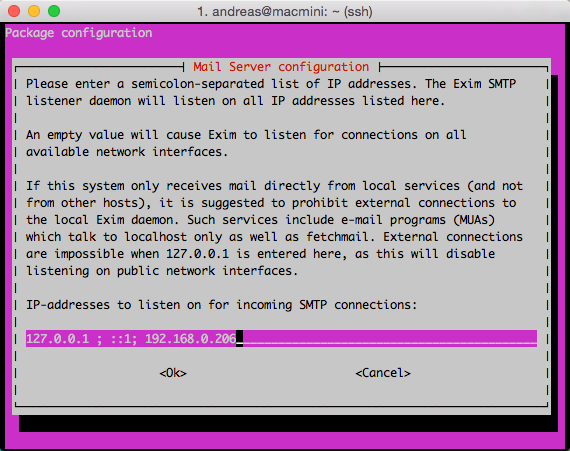
Network Interfaces
Assign all network interface IP addresses you want to listen for incoming mails as seen below.
 However, make sure providing only IP addresses from network interfaces, which are actually connected to the network. Otherwise the daemon might fail to start.
014-12-25 10:23:46 socket bind() to port 25 for address 192.168.0.205 failed: Cannot assign requested address: daemon abandoned
If the network interfaces are set up correctly, you should find the daemon listening on the network interfaces specified before:
2014-12-25 10:31:06 exim 4.82 daemon started: pid=16276, -q30m, listening for SMTP on [127.0.0.1]:25 [::1]:25 [192.168.0.206]:25
Monitoring the logs
Whenever you try to figure out what’s going wrong while connecting from any client during the setup, e.g. to check the logging information above, it might help to start tailing the log via
sudo tail -f /var/log/exim4/mainlog
The Paniclog Fail
When messing with the configuration, you might end up from time to time with the following message while starting the daemon.
ALERT: exim paniclog /var/log/exim4/paniclog has non-zero size, mail system possibly broken
Check the file, and just delete the log file after fixing the cause for the log entry.
sudo rm /var/log/exim4/paniclog
The Authentication Test
Once up and running, you might want to check the server. It might be quite convenient to check simply via Telnet by opening to your Exim server and one of the IP addresses provided before.
macbook:~ andreas$ telnet 192.168.0.206 25
 Trying 192.168.0.206...
 Connected to 192.168.0.206.
 Escape character is '^]'.
 220 macmini ESMTP Exim 4.82 Ubuntu Thu, 25 Dec 2014 11:47:43 +0100
 ehlo 192.168.0.203
 250-macmini Hello macbook [192.168.0.80]
 250-SIZE 52428800
 250-8BITMIME
 250-PIPELINING
 250 HELP
Following the SMTP protocol, you can ask the server using
ehlo <someIdentifier>
The ehlo verb provides some computer-readable information about the server’s abilities, though.
Instead of Telnet you could start Exim using
exim -bh 192.168.0.203
This will bring up Exim wit a testing session.
*** SMTP testing session as if from host 192.168.0.203
**** but without any ident (RFC 1413) callback.
**** This is not for real!

>>> host in hosts_connection_nolog? no (option unset)
>>> host in host_lookup? yes (matched "*")
>>> looking up host name for 192.168.0.203
>>> IP address lookup yielded localhost
>>> gethostbyname2 looked up these IP addresses:
>>>   name=localhost address=127.0.0.1
>>> checking addresses for localhost
>>>   127.0.0.1
>>> no IP address for localhost matched 192.168.0.203
>>> 192.168.0.203 does not match any IP address for localhost
>>> host in host_reject_connection? no (option unset)
>>> host in sender_unqualified_hosts? no (option unset)
>>> host in recipient_unqualified_hosts? no (option unset)
>>> host in helo_verify_hosts? no (option unset)
>>> host in helo_try_verify_hosts? no (option unset)
>>> host in helo_accept_junk_hosts? no (option unset)
220 macmini ESMTP Exim 4.82 Ubuntu Fri, 26 Dec 2014 11:39:25 +0100
Again ask the server using ehlo.
>>> 192.168.0.203 in helo_lookup_domains? no (end of list)
>>> host in pipelining_advertise_hosts? yes (matched "*")
>>> host in auth_advertise_hosts? yes (matched "*")
>>> host in tls_advertise_hosts? no (option unset)
250-macmini Hello 192.168.0.203 [192.168.0.203]
250-SIZE 52428800
250-8BITMIME
250-PIPELINING
250 HELP
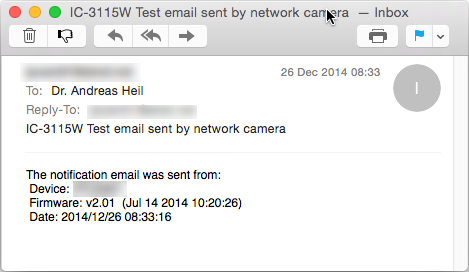
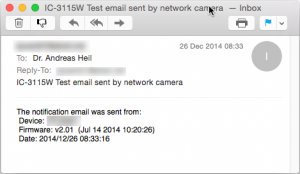
I figured this out, as one of my devices, an failed to send a status mail.
Dec 25 13:32:07 SMTP[2007]: smtp error (auth failed): 250 HELP^M
Dec 25 13:32:07 SMTP[2007]: SMTP authentication failed
The Missing Plain Auth Advertisement
So far, everything works as a charm. However, for the recent setup, I wanted to have plain authentication for most of my clients. This did cost me half a day to figure out and drove me almost mad while digging through tons of Exim docs.
First of all, activate plain authentication for the server by changing the configuration
sudo vim /etc/exim4/conf.d/auth/30_exim4-config.examples
Here you need to remove the comments from the following section
lain_server:
  driver = plaintext
  public_name = PLAIN
  server_condition = "${if crypteq{$auth3}{${extract{1}{:}{${lookup{$auth2}lsearch{CONFDIR/passwd}{$value}{*:*}}}}}{1}{0}}"
   server_set_id = $auth2
  server_prompts = :
  .ifndef AUTH_SERVER_ALLOW_NOTLS_PASSWORDS
  server_advertise_condition = ${if eq{$tls_in_cipher}{}{}{*}}
  .endif
Finally update the configuration
sudo update-exim4.conf
and restart Exim
sudo service exim4 restart
If you now walk through the tests above, the server will still omit the authentication advertisement.
Once that has been done, create (or edit if it already exists)the exim4.conf.localmacros file.
sudo touch /etc/exim4/exim4.conf.localmacros.
sudo vim /etc/exim4/exim4.conf.localmacro
Add the following line and restart the daemon once again.
AUTH_SERVER_ALLOW_NOTLS_PASSWORDS = true
If you now start the tests again, you will see the authentication advertisement of the server, though.
ehlo test
 >>> host in smtp_accept_max_nonmail_hosts? yes (matched "*")
 >>> test in helo_lookup_domains? no (end of list)
 >>> host in pipelining_advertise_hosts? yes (matched "*")
 >>> host in auth_advertise_hosts? yes (matched "*")
 >>> host in tls_advertise_hosts? no (option unset)
 250-macmini Hello test [192.168.0.203]
 250-SIZE 52428800
 250-8BITMIME
 250-PIPELINING
 250-AUTH PLAIN LOGIN
 250 HELP
Once this worked at the very end, the devices where able to send vie my Exim relay.
 Dealing with Non System Users
When dealing with non system users, you can simply create Exim users via
sudo /usr/share/doc/exim4-base/examples/exim-adduser
That’s quite easy, when dealing with plain authentication. Keep in mind, users and passwords are stored in plain text in the /etc/exim4/passwd file.
Failed to find Host
In case you get some log entries such as
2014-12-25 12:12:31 refused relay (host) to ...; from &...; H=(...) [192.168.0.203] (failed to find host name from IP address)
You need to add some host names for the corresponding IP addresses in /etc/hosts.
 There is little I can do, and I almost gave up. The logs don’t help that much, though.
 In case you are looking for the public key, pick it up here.