How to deal with GMAIL Undelivered Mail Returned to Sender

If you run your own mail server, you might end up quite frustrated because the Google relays do reject your mails.

Maybe your mails get rejected by the Google servers with the following message:

Our system has detected that this  message does not meet IPv6 sending guidelines regarding PTR records and authentication. Please review  https://support.google.com/mail/?p=IPv6AuthError for more information.

If you start reading your frustration level might even increase, due to the difficulty to deal with many of the requirements to get your mails to a Google server delivered. If you start digging into the various topics, you might end up even more frustrated as you have more questions as before.

At the very end, you just have to set up a few things to make your mails fully compliant, so even Google’s server do accept them. In addition you will get high quality mails – at least regarding the tech, content is entirely up to you.

I do run a setup of mail, Dovecot, Postfix and SpamAssasin on a Ubuntu server. Therefore, this article will cover the topic on these examples but should be able to be applied to almost any other system – as long as you replace tech X by tech Y.

Testing you Mail

The first issue is how to learn about your mails issues at all. To evaluate your mails, http://www.mail-tester.com turned out to be a perfect platform for me. As you only can evaluate three mails a day for free, you might throw in a few bucks if you in a hurry, or it might simply take some days to you to finish the tests.

How does it work? You get an unique mail address where you send your mail to. Once the mail was received any flaws in the mail will be displayed and explained (which definitely is a huge added value).

10/10 Score at mail-test.com

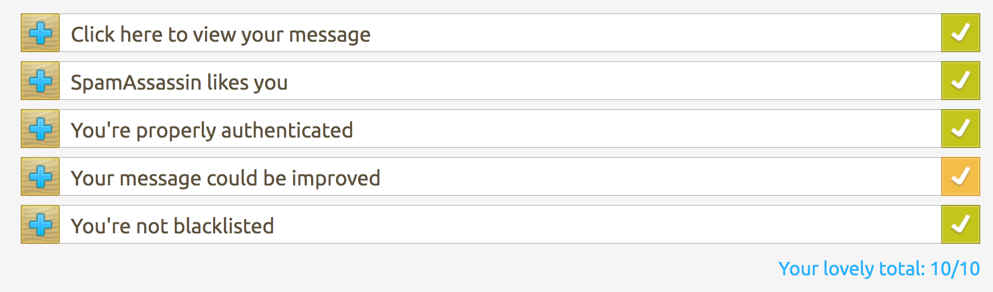
Believe me or not, I definitely haven’t had a score of 10/10 before.

SPF Record

First make sure, your DNS provides an SPF record. With no or little knowledge, I tried to create one by myself based on Google’s help page about SPF records. Did not work well at all.

I finally ended up with the following SPF entry for my DNS:

v=spf1 mx ip4:92.51.166.153 -all
  • a is just to indicate that there might be scripts sending mails
  • ip4:92.51.166.153 depicts the mails server we are talking about in the entry
  • -all means there only this mail server while the mx indicates that only domain’s MXs are allowed to send mail for the domain while all others are prohibited.

It took me a while to figure out the right (or at least something working) based in the SFP record syntax. So why do we do this? The idea behind SPF is simple, once you have published your policy, the receiving server can check if the mail is compliant with your policy. In my case, mails sent from scripts might be fine, as long as they come from my server. If someone sends a mail from server 154.354.32.2 this mail will be probably not sent by me, as it is not compliant with my policy. Google’s server do these checks, and that’s on of the reasons your mails are rejected by them.

Finally the SPF entries doe look like the following at my DNS:

DKIM – DomainKeys Identified Mail

Next, I started with DKIM. Again, if you start reading at dkim.org, you probably end up reading several IETF RFCs and a lot of question. Reading RFCs is always good and highly recommended by me, but actually did not solve my issue.

The good thing about Ubuntu is, there is an package called OpenDKIM which can be installed via

sudo apt-get install opendkim opendkim-tools

I got relatively lost, when i came to configure OpenDKIM and Postfix until I found the Postfix/DKIM site at the Ubuntu documentation.

First of all you need to add the domain to the /etc/opendkim.conf. You might want to exchange my domain aheil.de to your corresponding one.

Domain    aheil.de
KeyFile   /etc/postfix/dkim.key 
Selector   dkim

Now, I had to generate the key file.

opendkim-genkey -t -s dkim -d aheil.de

If you did it the same way as me, the file is probably located in the wrong directory. So move the file to the location provided above.

mv dkim.private /etc/postfix/dkim.key

Now I went to /etc/default/opendkim. Unlike as described in the Ubuntu documentation, I had to add the listening socket – which seems to be a standard one at Ubuntu.

SOCKET="inet:8891@localhost"

I then went back to /etc/opendkim.conf and added the same port right below the Selector entry.

Domain    aheil.de 
KeyFile   /etc/postfix/dkim.key 
Selector  dkim
Socket    inet:8891@localhost

Now, I went to the /etc/postfix/main.cf file and added the following entries:

milter_default_action = accept
milter_protocol = 2
smtpd_milters = inet:localhost:8891
non_smtpd_milters = inet:localhost:8891

For some reason, I now ended up with two DKIM entries in my outgoing mails. I had to add no_milters to the receive_override_options line in my /etc/postfix/master.cf. I had to fiddle a little bit with the master.cf until everything worked again.

-o receive_override_options=no_header_body_checks,no_unknown_recipient_checks,no_milters

Wherever you have created the keyfile, there will be an additional dkim.txt file. It will contain something like

dkim._domainkey IN TXT ( "v=DKIM1; k=rsa; t=y; "
 "p=MIGfMA0GCSqGSIb3DQEBAQUAA4GNADCBiQKBgQCZFYWrNHupXvZHvWJAo6aGB6sXYf+kpUIJv+BcP6NFiF9GBy26oYZKt6/ngCXmNAIY9+yReY8UxG5GIm/QnInbXWxwDXyD0MHD8HrhHyVa6JVqTncexm29M5Bbp/u0JI4ToOQwIQqpgTr0t9ADP8i76pbelYQ5IQDOwJRJQ2N1iQIDAQAB" ) ; ----- DKIM key dkim for aheil.de

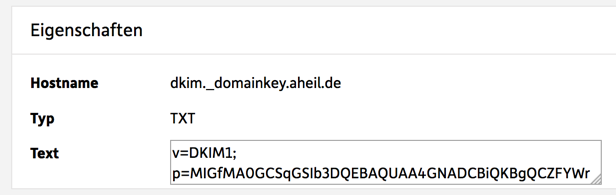
Creating the corresponding DNS entry out of this seemed to be the most challenging part. You need to create an TXT entry similr to dkim._domainkey.aheil.de, of course using your domain. and you simply need the follwowing text in there

v=DKIM1;
p=MIGfMA0GCSqGSIb3DQEBAQUAA4GNADCBiQKBgQCZFYWrNHupXvZHvWJAo6aGB6sXYf+kpUIJv+BcP6NFiF9GBy26oYZKt6/ngCXmNAIY9+yReY8UxG5GIm/QnInbXWxwDXyD0MHD8HrhHyVa6JVqTncexm29M5Bbp/u0JI4ToOQwIQqpgTr0t9ADP8i76pbelYQ5IQDOwJRJQ2N1iQIDAQAB

No quotes, no brackets, no nothing beside the above. This took me quite a while especially as DNS replication is nothing that works in real time.

For me the entry does now look like the following.

Once this is done, start OpenDKIM and restart Postfix so the changes will apply.

sudo service opendkim start
sudo service postfix restat

So far what does this actually mean? When a mail server receives your mail, it now will be signed with a DKIM key. If you check your mail headers, the will look similar to the following one.

By checking the dkim._domainkey DNS entry created before, the mail receiver now can check if the mail signature is authentic. Any mail server not in possession of the private key will probably not be able to sign the mail though, and could be thought of a spam server.

DMARC – Domain-based Message Authentication, Reporting & Conformance

Finally, it is necessary to create a DMARC record. Once SPF and DKIM are setup as above, you proceed similar as with the DKIM DNS entry.

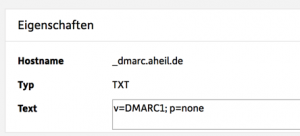
Again you create a TXT revord for your DNS. This time the record is named _dmarc.domain.TDL, e.g. _dmarc.aheil.de in my case.

I created a relatively simple record:

v=DMARC1; p=none

I.e. p=none: the I do not requests any specific action be taken on mail that fails DMARC authentication and alignment.

At the very end, it looks like this for my DNS:

Summary

To get Google accepting mails from your own mail server, only a few steps are necessary. Setting up SPF, DCIM and DKIM are basically all which might be needed if Google rejects mails from your handcrafted mail server. You might want polish your SPF and DMARC records to align your policies with your very personal goals. If you are interested further in e-mail architecture, the book from Kevin Thomas called Email Architecture, Design, and Implementations might be something for your.

Getting Exim4 Done the Job

In my current project, moving my home server from a PC Tower running Windows Server 2003 to a more energy as well as space efficient Mac mini, I need to migrate quite a bunch of tools and scripts from Windows to Ubuntu.

Said that, hMailServer served me well for years on my local network. It was easy to install, maintain and run. However, I was now looking for some more lightweight solution for the new server.

The need can be summarized quite easily:

  • arbitrary devices and services on the local network need to be able to deliver mails via SMTP to the server
  • local services on the server need to be able to send out mails as well
  • the server needs to forward the mail to my real server
  • very basic authentication is a must
  • it need to run on my old 1.66 Ghz Mac mini

At all it’s as simple as the following diagram:

Exim4 SetupAfter digging through all the stuff such as Sendmail, Postfix and so on, I ended up with Exim4 as the perfect solution for my needs.

Basically, after installing it via

sudo apt-get install exim4

the only thing is to quickly run through the setup.

sudo dpkg-reconfigure exim4-config

It’s sort of guided and quite easy to do as long as you have some experience with networks. However, there are quite some pitfalls which are quite annoying if you are little experienced with Exim.

Network Interfaces

Assign all network interface IP addresses you want to listen for incoming mails as seen below.

Ecim4 Mail Server configurationHowever, make sure providing only IP addresses from network interfaces, which are actually connected to the network. Otherwise the daemon might fail to start.

014-12-25 10:23:46 socket bind() to port 25 for address 192.168.0.205 failed: Cannot assign requested address: daemon abandoned

If the network interfaces are set up correctly, you should find the daemon listening on the network interfaces specified before:

2014-12-25 10:31:06 exim 4.82 daemon started: pid=16276, -q30m, listening for SMTP on [127.0.0.1]:25 [::1]:25 [192.168.0.206]:25

Monitoring the logs

Whenever you try to figure out what’s going wrong while connecting from any client during the setup, e.g. to check the logging information above, it might help to start tailing the log via

sudo tail -f /var/log/exim4/mainlog

The Paniclog Fail

When messing with the configuration, you might end up from time to time with the following message while starting the daemon.

ALERT: exim paniclog /var/log/exim4/paniclog has non-zero size, mail system possibly broken

Check the file, and just delete the log file after fixing the cause for the log entry.

sudo rm /var/log/exim4/paniclog

The Authentication Test

Once up and running, you might want to check the server. It might be quite convenient to check simply via Telnet by opening to your Exim server and one of the IP addresses provided before.

macbook:~ andreas$ telnet 192.168.0.206 25
 Trying 192.168.0.206...
 Connected to 192.168.0.206.
 Escape character is '^]'.
 220 macmini ESMTP Exim 4.82 Ubuntu Thu, 25 Dec 2014 11:47:43 +0100
 ehlo 192.168.0.203
 250-macmini Hello macbook [192.168.0.80]
 250-SIZE 52428800
 250-8BITMIME
 250-PIPELINING
 250 HELP

Following the SMTP protocol, you can ask the server using

ehlo <someIdentifier>

The ehlo verb provides some computer-readable information about the server’s abilities, though.

Instead of Telnet you could start Exim using

exim -bh 192.168.0.203

This will bring up Exim wit a testing session.

*** SMTP testing session as if from host 192.168.0.203
**** but without any ident (RFC 1413) callback.
**** This is not for real!

>>> host in hosts_connection_nolog? no (option unset)
>>> host in host_lookup? yes (matched "*")
>>> looking up host name for 192.168.0.203
>>> IP address lookup yielded localhost
>>> gethostbyname2 looked up these IP addresses:
>>>   name=localhost address=127.0.0.1
>>> checking addresses for localhost
>>>   127.0.0.1
>>> no IP address for localhost matched 192.168.0.203
>>> 192.168.0.203 does not match any IP address for localhost
>>> host in host_reject_connection? no (option unset)
>>> host in sender_unqualified_hosts? no (option unset)
>>> host in recipient_unqualified_hosts? no (option unset)
>>> host in helo_verify_hosts? no (option unset)
>>> host in helo_try_verify_hosts? no (option unset)
>>> host in helo_accept_junk_hosts? no (option unset)
220 macmini ESMTP Exim 4.82 Ubuntu Fri, 26 Dec 2014 11:39:25 +0100

Again ask the server using ehlo.

>>> 192.168.0.203 in helo_lookup_domains? no (end of list)
>>> host in pipelining_advertise_hosts? yes (matched "*")
>>> host in auth_advertise_hosts? yes (matched "*")
>>> host in tls_advertise_hosts? no (option unset)
250-macmini Hello 192.168.0.203 [192.168.0.203]
250-SIZE 52428800
250-8BITMIME
250-PIPELINING
250 HELP

I figured this out, as one of my devices, an failed to send a status mail.

Dec 25 13:32:07 SMTP[2007]: smtp error (auth failed): 250 HELP^M
Dec 25 13:32:07 SMTP[2007]: SMTP authentication failed

The Missing Plain Auth Advertisement

So far, everything works as a charm. However, for the recent setup, I wanted to have plain authentication for most of my clients. This did cost me half a day to figure out and drove me almost mad while digging through tons of Exim docs.

First of all, activate plain authentication for the server by changing the configuration

sudo vim /etc/exim4/conf.d/auth/30_exim4-config.examples

Here you need to remove the comments from the following section

lain_server:
  driver = plaintext
  public_name = PLAIN
  server_condition = "${if crypteq{$auth3}{${extract{1}{:}{${lookup{$auth2}lsearch{CONFDIR/passwd}{$value}{*:*}}}}}{1}{0}}"
   server_set_id = $auth2
  server_prompts = :
  .ifndef AUTH_SERVER_ALLOW_NOTLS_PASSWORDS
  server_advertise_condition = ${if eq{$tls_in_cipher}{}{}{*}}
  .endif

Finally  update the configuration

sudo update-exim4.conf

and restart Exim

sudo service exim4 restart

If you now walk through the tests above, the server will still omit the authentication advertisement.

Once that has been done, create (or edit if it already exists)the exim4.conf.localmacros file.

sudo touch /etc/exim4/exim4.conf.localmacros.
sudo vim /etc/exim4/exim4.conf.localmacro

Add the following line and restart the daemon once again.

AUTH_SERVER_ALLOW_NOTLS_PASSWORDS = true

If you now start the tests again, you will see the authentication advertisement of the server, though.

ehlo test
 >>> host in smtp_accept_max_nonmail_hosts? yes (matched "*")
 >>> test in helo_lookup_domains? no (end of list)
 >>> host in pipelining_advertise_hosts? yes (matched "*")
 >>> host in auth_advertise_hosts? yes (matched "*")
 >>> host in tls_advertise_hosts? no (option unset)
 250-macmini Hello test [192.168.0.203]
 250-SIZE 52428800
 250-8BITMIME
 250-PIPELINING
 250-AUTH PLAIN LOGIN
 250 HELP

Once this worked at the very end, the devices where able to send vie my Exim relay.

Test Mail from IC 3115W CameraDealing with Non System Users

When dealing with non system users, you can simply create Exim users via

sudo /usr/share/doc/exim4-base/examples/exim-adduser

That’s quite easy, when dealing with plain authentication. Keep in mind, users and passwords are stored in plain text in the /etc/exim4/passwd file.

Failed to find Host

In case you get some log entries such as

2014-12-25 12:12:31 refused relay (host) to ...; from &...; H=(...) [192.168.0.203] (failed to find host name from IP address)

You need to add some host names for the corresponding IP addresses in /etc/hosts.


RDP from Mac to Ubuntu

I am currently in the progress of moving my entire home automation server from Windows 2003 to a Ubuntu LTS. However, connecting to the new server via SSH is quite painful. As I am using openHAB including the Eclipse-based editor, I would prefer to connect to the server from Windows and Mac via RDP.

I tried quite a while using XRDP, but almost gave up as I always had trouble, either not being able to connect or having no desktop at all.

Therefore, kudos to Mike Rehner, who came up with a step by step guide how to install and cofigure XRDP on Ubuntu.

20 minutes absolutely worth watching, especially as he comes up with two or three hints, I haven’t foundon any other tutorial so far such as

  • you are going to need a 2D desktop such as MATE Desktop Environment
  • you need to connect several times using the RDP as the first or second attempt might fail
  • how to change the XRDP settings to be able to connect to previous session

The proof, I was able to connect to the Ubuntu via my Mac, though:

XRDP Mac OS X Ubuntu


Ubuntu: Setting up Oracle JDK

Since Oracle’s Java SDK is not part of Ubuntu, there are some steps required to get Java set up on a Ubuntu system. Especially running a 64-bit version of Ubuntu requires one tiny additional step driving you crazy in case do not speak Ubuntu fluently.

There are quite some scripts and tutorials out there how to get Oracle’s Java working on a Ubuntu system, however, there are only a few steps necessary to do so:

Pick the bits from Oracle’s download site and extract the archive using tar. In my case we use the 32-bit version of the JDK

tar -xvf ~/Downloads/jdk-7u15-linux-i586.tar.g

Create a folder and move all the stuff over there

sudo mkdir -p /usr/lib/jvm/jdk1.7.0 
sudo mv jdk1.7.0_15/* /usr/lib/jvm/jdk1.7.0/

Now set up the symbolic links for java, javac and javaws.

sudo update-alternatives --install "/usr/bin/java" "java" "/usr/lib/jvm/jdk1.7.0/bin/java" 1
sudo update-alternatives --install "/usr/bin/javac" "javac" "/usr/lib/jvm/jdk1.7.0/bin/javac" 1
sudo update-alternatives --install "/usr/bin/javaws" "javaws" "/usr/lib/jvm/jdk1.7.0/bin/javaws" 1

Now, create a Bourne script to set the JAVA_HOME variable and update the PATH variable. In case you haven’t used Vim yet, get it using

sudo apt-get install vim

and then create the file

sudo vim /etc/profile.d/java7.sh

edit the file file and add the following export statements

export JAVA_HOME=/usr/lib/jvm/jdk1.7.0
export PATH=$PATH:$JAVA_HOME/bin

Finally execute the script

source /etc/profile

and try to call java. If you run a freshly set up Ubuntu such as mine, you probably will end up the system telling you

bash: /usr/bin/java: No such file or directory

What happened? Actually, we installed a 32-bit version of the JDK, however as mentioned at the beginning running a 64-bit version of Ubuntu and therefore we come back to this very tiny bit missing. One additional package is required to run the 32-bit version: libc6-i386.

“This package includes shared versions of the standard C library and the standard math library, as well as many others. This is the 32bit version of the library, meant for AMD64 systems.”

Said that, get it

sudo apt-get install libc6-i386

and try to run java one more time. It should work now fine.