Finally, I found some minutes to set up my website with SSL encryption. The issue here, many hosters demand a fortune for certificates.
Applying Let’s Encrypt
Let’s Encrypt is a free alternative, providing certificates, accepted by most of the browsers.
While manually installing a certificate can be a real pain, Let’s Encrypt utilizes Certbot to do on your behave. Once installed you can select the sites to protect and let do Certbot its work. There is a crisp description on the Let’s Encrypt page which explains how this actually works.
To be honest, applying SSL certificate using this setup makes it absolutely easy for everybody to do so – as long as you have shell access on your server. After downloading the packages – which are provided for a variety of OS and Web server software – Certbot even takes care of the configuration. You also can configure the sites in a way, that all HTTP requests are automatically are forwarded to HTTPS.
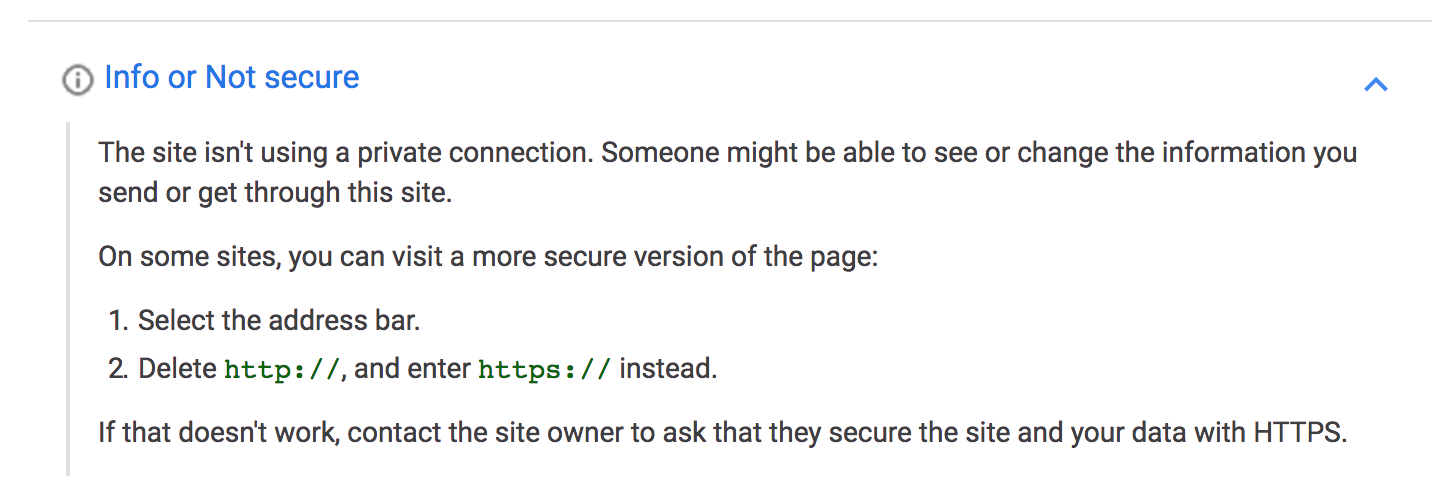
Once done, the site was already available via HTTPS. Unfortunately, Chrome told me the connection is still not secure.
![]()
The help provided did not help much either.
Further investigation eventually showed all images within posts did not use HTTPS even after the base URL of the site was changed in WordPress settings.
The links are not created on the fly – the are actually stored in the text. In the database. At least for internal resources (aka images from your own server), I expected something like relative links or similar. To be honest, I have never looked that much at the WordPress internals.
Altering the Database
To change this quickly, I decided to alter all not secure URLs in the database. As changing the protocol from HTTP to HTTPS is changing base URLs as when changing the domain, you could make use of tools to do so.
I found Misha Rudrastyh’s Query Generator very useful to create all SQL queries for changing the database content.
When moving WordPress websites from one domain to another, this tool is a great time saver. Just generate the queries and run them in MySQL.
In my case, I ended up with the following six statements.
UPDATE wp_options SET option_value = REPLACE(option_value, 'http://www.aheil.de', 'https://www.hack-the-planet.net') WHERE option_name = 'home' OR option_name = 'siteurl';
UPDATE wp_posts SET post_content = REPLACE (post_content, 'http://www.aheil.de', 'https://www.hack-the-planet.net');
UPDATE wp_postmeta SET meta_value = REPLACE (meta_value, 'http://www.aheil.de','https://www.hack-the-planet.net');
UPDATE wp_comments SET comment_content = REPLACE (comment_content, 'http://www.aheil.de', 'https://www.hack-the-planet.net');
UPDATE wp_comments SET comment_author_url = REPLACE (comment_author_url, 'http://www.aheil.de','https://www.hack-the-planet.net');
UPDATE wp_posts SET guid = REPLACE (guid, 'http://www.aheil.de', 'https://www.hack-the-planet.net') WHERE post_type = 'attachment';
Once done the next request already ended up in a valid and secure HTTPS request.
![]()
Warning: Do a backup (apply mysqldump) before altering your WordPress database, in case you brick it for whatever reason.
tl;dr
Using certificates issued by Let’s Encrypt you can automatically apply these by using Certbot to secure your website. While doing this I experienced some issues with WordPress as all URLs are stored as plain text in the database. With generated scripts from Misha Rudrastyh’s Query Generator altering the WordPress content to apply HTTPS instead of HTTP is quite easy.