Overdue Theme Update

Unfortunately, during the last few weeks, I did not find a lot of time to update the blog. My backlog of interesting posts is increasingly growing, but I did not find the time to write them down. I also spend a ridiculous amount of time to browse through potential WordPress themes to find a suitable theme for a blog.

Most themes provide an insane overload of visuals – which does not come in handy when dealing with code snippets, screenshots and so on.

I also did not want to customize the theme as I did for our podcast site, where I had to write several hundred lines of CSS code to get the theme properly working with the content.

Eventually, I found a theme that provides a suitable set of features without a graphical overload with a clean layout, which is called Melos Minimal which is worth a try.

Link: https://wordpress.org/themes/melos-minimal/

Fixing Podlove Cron Jobs in WordPress Docker Containers

While we were publishing the first episode of our Podcast, I came across some issues with WordPress, though.

First of all: We are using the Podlove Publisher and therefore WordPress to host our Podcast.

Unfortunately, I encountered an issue with the required cron jobs. The Podlove WP Cron Diagnostics showed, that there was nothing set up.

PHP Constant
ALTERNATE_WP_CRON: not definde
DISABLE_WP_CRON: not defined

As a result, any attempt to connect to running cron jobs failed. After checking Google I found a helpful hint here. All you have to do is to add

define('ALTERNATE_WP_CRON', true);

in your wp-config.php.

And here the fun begins. I am using the official WordPress Docker container and Ansible to deploy it on my servers. So you need a way to add this line to a wp-config.php file on your server using an Ansible script… I think you get it. Some years ago, you would have simply logged into your server, changed the line in the file and eventually restart your webserver.

Now everything becomes more difficult. First of all I try such things manually. To do so (as well as to verify the changes on the server) I bash into the running WordPress container

docker exec -i -t {containerId} /bin/bash

just to realize there is neither vim or even vi on this container available. Also less did not work. At least I was able to read the file using more.

Again I looked for some hints and found a great hint on Stackoverflow:

You can make use of the WORDPRESS_CONFIG_EXTRA environment variable to define any other config values in the wp-config.php file.

With this environmental variable, you can literally add anything to your wp-config.php file in the prebuild WordPress image without fiddling with own containers and so on.

environment:      
  WORDPRESS_DB_HOST: db:1234
 WORDPRESS_DB_USER: wp
 WORDPRESS_DB_PASSWORD: topsecret
 WORDPRESS_CONFIG_EXTRA: |
   define('ALTERNATE_WP_CRON', true);
    define( 'DISABLE_WP_CRON', true );

Looking into your wp-config.php now should reveal the following line:

// WORDPRESS_CONFIG_EXTRA
 define('ALTERNATE_WP_CRON', true);
 define( 'DISABLE_WP_CRON', true );

Also running the diagnostics in the Podlove plugin now should come up with some better news:

Write WordPress Posts in Markdown

I recently started to write quite a lot of stuff on my laptop down in plain Markdown. It comes handy when I need to put the information on a Web page or in other documents. Also using a revisioning system like Git is much more convenient when using Markdown. Therefore, I was looking for a possibility to write my blog articles also in Markdown.

Jetpack Approach

With Jetpack there is a possibility to enable Markdown syntax in your WordPress editor. To do so, navigate to Jetpackand then select Writing.

Scroll down and toggle Write posts or pages in plain-text Mardown syntax.

Markdown in Comments

In addition, you might want to enable Markdown for comments in the Diskussion section by toggling Enable Mardown use for comments.

If you now head to the WordPress editor, you will realize that Markdown is still not supported. To use Markdown you actually have to add a Markdown block. And here comes the drawback.

The Drawback

While you can now wite Markdown in the block, you will end up with a mix of different types of blocks in your editor. That way Markdown did not help me a lot to simplify my writing of blog articles.

Conclusion

While you can add Markdown support to WordPress with ease, it is rather unsatisfying. I have different goals in mind where I have to dig a bit deeper, as I want

  • to write blog articles offline in Markdown syntax
  • push them to git repository – including images –
  • and post them in WordPress.

There are probably some solutions out there, I haven’t found yet.

Google XML Sitemaps

I started to learn a bit about Google Webmaster Tools and how to increase the findability of one’s website. First of all, I was looking for a flexible sitemap generator for WordPress where I ended up with Google XML Sitemaps.

Google XML SItemap Plugin

This plugin generates a sitemap file which can be consumed by search engines like Google or Bing. To do so, you have to verify your website with the various providers. Usually, this is done by adding some meta tags to your HTML pages to prove you have full control over the server. Currently, this can be achieved by WordPress’ Jetpack. That way you don’t have to fiddle with the header.php file of your WordPress installation.

WordPress Jetpack Site verification

You don’t have to, but you can sign into the Google Webmaster Tools to check the verification status of your site.

Bing Webmaster Center

Also Bing Webmaster Center will provide you a Meta tag you can provide Jetpack to verify your site and to improve the discoverability of your site.

WordPress Level Up – Applying Let’s Encrypt to Self-Hosted WordPress

Finally, I found some minutes to set up my website with SSL encryption. The issue here, many hosters demand a fortune for certificates. 

Applying Let’s Encrypt

Let’s Encrypt is a free alternative, providing certificates, accepted by most of the browsers.

While manually installing a certificate can be a real pain, Let’s Encrypt utilizes Certbot to do on your behave. Once installed you can select the sites to protect and let do Certbot its work. There is a crisp description on the Let’s Encrypt page which explains how this actually works.

To be honest, applying SSL certificate using this setup makes it absolutely easy for everybody to do so – as long as you have shell access on your server. After downloading the packages – which are provided for a variety of OS and Web server software – Certbot even takes care of the configuration.  You also can configure the sites in a way, that all HTTP requests are automatically are forwarded to HTTPS.

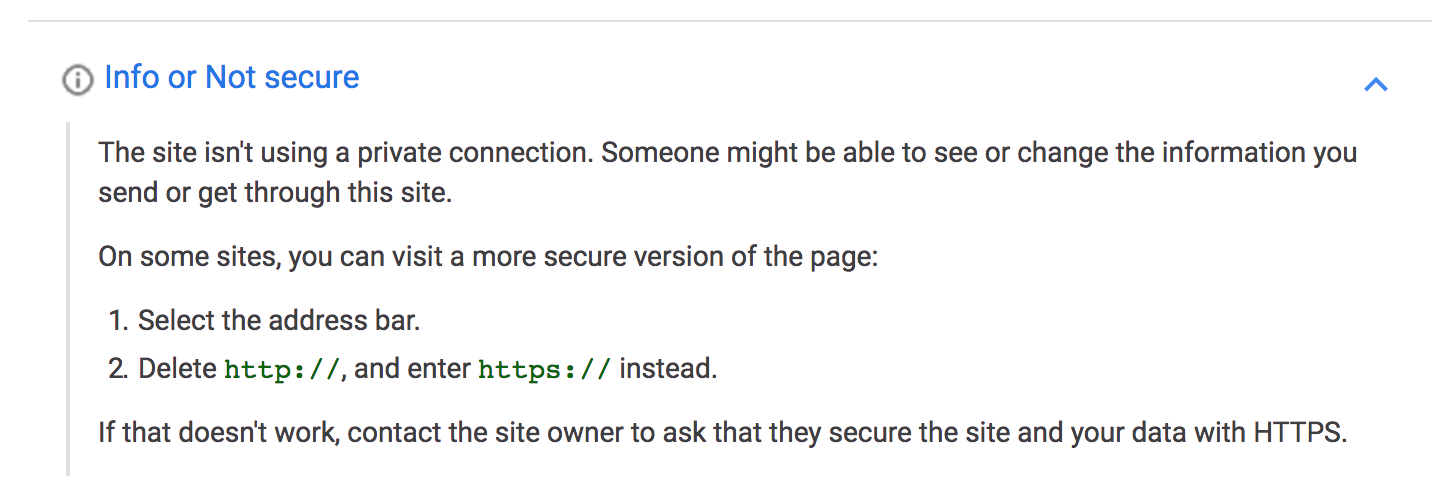
Once done, the site was already available via HTTPS. Unfortunately, Chrome told me the connection is still not secure.

The help provided did not help much either.

Further investigation eventually showed all images within posts did not use HTTPS even after the base URL of the site was changed in WordPress settings.

The links are not created on the fly – the are actually stored in the text. In the database. At least for internal resources (aka images from your own server), I expected something like relative links or similar. To be honest, I have never looked that much at the WordPress internals.

Altering the Database

To change this quickly, I decided to alter all not secure URLs in the database. As changing the protocol from HTTP to HTTPS is changing base URLs as when changing the domain, you could make use of tools to do so.

I found Misha Rudrastyh’s Query Generator very useful to create all SQL queries for changing the database content.

When moving WordPress websites from one domain to another, this tool is a great time saver. Just generate the queries and run them in MySQL.

In my case, I ended up with the following six statements.

UPDATE wp_options SET option_value = REPLACE(option_value, 'http://www.aheil.de', 'https://www.hack-the-planet.net') WHERE option_name = 'home' OR option_name = 'siteurl';
UPDATE wp_posts SET post_content = REPLACE (post_content, 'http://www.aheil.de', 'https://www.hack-the-planet.net');
UPDATE wp_postmeta SET meta_value = REPLACE (meta_value, 'http://www.aheil.de','https://www.hack-the-planet.net');
UPDATE wp_comments SET comment_content = REPLACE (comment_content, 'http://www.aheil.de', 'https://www.hack-the-planet.net');
UPDATE wp_comments SET comment_author_url = REPLACE (comment_author_url, 'http://www.aheil.de','https://www.hack-the-planet.net');
UPDATE wp_posts SET guid = REPLACE (guid, 'http://www.aheil.de', 'https://www.hack-the-planet.net') WHERE post_type = 'attachment';

Once done the next request already ended up in a valid and secure HTTPS request.

Warning: Do a backup (apply mysqldump) before altering your WordPress database, in case you brick it for whatever reason.

tl;dr

Using certificates issued by Let’s Encrypt you can automatically apply these by using Certbot to secure your website. While doing this I experienced some issues with WordPress as all URLs are stored as plain text in the database. With generated scripts from Misha Rudrastyh’s Query Generator altering the WordPress content to apply HTTPS instead of HTTP is quite easy.

WordPress Internal Server Error 500 for Uploaded Images

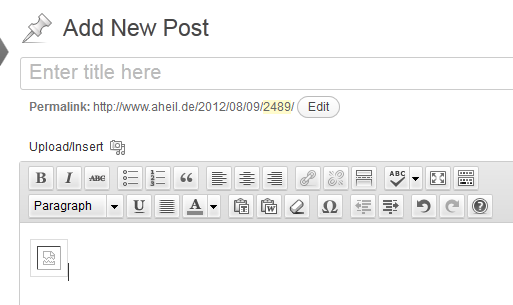
After upgrading WordPress on my Windows Server 2008 to version 3.4.1, I encountered a quite strange behavior. Using the Add New Post functionality, images, uploaded by multi-file-uploader have not been displayed anymore, neither in the editor nor in the post itself.

Add New Post Editor

Once you finished your article, your blog will end up with a Internal Server Error 500. However, all thumbnails created by WordPress can be requested without any problems.

500 - Internal Server Error Message

Eventually, I started to do some research on this issue, ending in a quite exhaustive digging down to the metal of Windows, however, with a quite surprisingly outcome. In this article I’ll try to give an overview of this issue, explaining why this occurs on Windows and how to solve this with almost a  single click.

There are quite a lot of blog entries and stackoverflow answers about this topic with more or less useful steps. If you are just looking for the quick answer, without the need of understanding what causes this particular problem, here it comes:

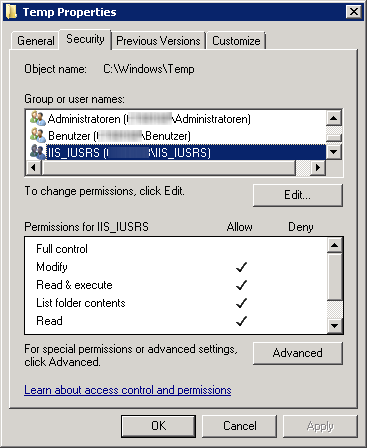
Change the system’s default temp folder (C:\Windows\temp) rights by granting rights for IIS_IUSRS user and you are probably done.

Temp Properties

The WordPress image upload is using the standard PHP functionality, using the temporary upload folder specified in your php.ini file.  By default, PHP is using the system’s temporary directory (e.g. c:\windows\temp) for uploading the initial image.

php.ini File Uploads Settings

Eventually, using the system’s temp folder is the root cause of the issue described in this article. When uploading the image to the temp folder, the file is initially created on the system. Consequently, the file is inheriting the folder’s security settings. After uploading, the original file is copied into the destination folder, e.g. \wp-content\uploads\2012\08.  Here all thumbnails are generated from the original file. As they are being created in the destination folder, they will inherit the security settings from this folder resulting in two different sets of permissions applied to the original file and the thumbnails. This explains why you will only receive an error with error code 500 for the original file, while all the thumbnails can be requested without any problems. 

In case you have already images the destination folder causing an error code 500, you can reapply the actual rights of the wp-content folder which will probably fix the problem.

In case changing the permissions of the system’s temp folder does not fix the issue, check your php.ini file if another upload folder is specified in the file uploads section. Baer in mind that PHP will use the system’s temp file for uploads also as backup in case PHP has no access rights for the folder specified in the php.ini  file. 

If you consider granting IIS_IUSRS as a security risk to access the system’s default temp folder you might want to specify an alternate upload folder anyway.

Hello world, again!

After running my own blog for several years on a self-hosted Windows server, I finally decided to move my software engineering blog to wordpress.com. For both, security and maintenance reasons, I decided to use the WordPress service instead of running my own installation.

Over time, maintaining the WordPress installation just turned out as quite time consuming tasks. Frequent updates on WordPress itself, the plugins and themes, the hosting operating system, the Perl, PHP and .NET packages almost became a full time job.

At the time, I set up my own server, there were only little possibilities to host all the services I used on the Web (or let’s say meanwhile cloud). While I used to host my own Web Servers (IIS and Tomcat), SVN repository, SMTP server and various databases you can find most of these nowadays offered by third parties, most of the time for free. Most of these offers are sufficient for the experiments you perform to keep up to date with the technology or to experiment with new approaches.

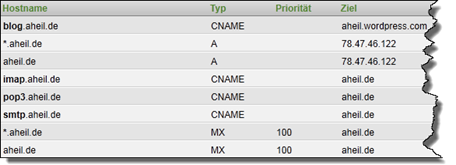
As a fist step. I decided to purchase the domain mapping feature from wordpress.com to use my own subdomain http://www.hack-the-planet.net. Following the technical documentation and Matthias’ post, all you have to do is to set up a CNAME entry with your current registrar (if you just want to map a subdomain). As I use domainFactory as my registrar, this was pretty easy using their Web interface.

31.07
Moving to wordpress.com, I hope to free up more time for researching and blogging in the future again.

Migrating dasBlog to WordPress

Over the last couple of years, I run my blog using the dasBlog engine. As I started hosting the blog in 2004 on my own server, I choose dasBlog as it did not need any database on the backend, saved everything in XML and did a great job on the full text search over the XML content. Beside that, a blog engine running on ASP.NET seemed the right choice being familiar with the technology. Eventually, I did several fixes and hacks on my installation over the last few years. Unfortunately, there was no new release since March 2009. As I like playing with alternative technologies from time to time and WordPress comes with a rich set of features I miss at dasBlog, I decided to migrate to WordPress. In this article I will describe the steps moving forward to WordPress hosted on a Windows Server 2008.

Overview

Moving forward to the new platform includes several steps. First of all the server has to be prepared to host the new platform. After the new blog engine is set up, the content needs to be migrated. Finally, the old engine needs to be shut down and the server needs to be set up to forward requests to the old engine to the new one.

Installing WordPress

Installing WordPress should be relatively easy as it is available through the Microsoft Web Platform Installer 2.0. However, you might encounter issues during the process on machines running IIS 7 as the required Windows Update KB980363 causes the installation process to hang. The update process only hangs when started from within the Web Platform Installer, so pick it from the Microsoft Download Page and install the hotfix beforehand. Before installing WordPress you need to install PHP on the server. In addition to the instructions how to configure PHP on IIS 7, Ruslan Yakushev provides a very good tutorial how to set up FastCGI on Windows Server 2008.

Migrating from dasBlog to WordPress

Originally, I planned to use BlogML to migrate the content from dasBlog to Worpress. Instead I found dasBLogML which is a simple GUI wrapper around the original BLogML. First you download the content of the old blog to your local machine.

dasBlogML

To import the BlogML data, you might want to follow Edgardo Vega’s article. In order to avoid potential problems during the import, also have a look at Daniel Kirstenpfad’s tip about replacing all   occurrences in the XML file. Using the BLogML Importer plug-in you can finally import the previously exported XML file.

Import BlogML

Redirecting dasBlog

In the final step I had to redirect the requests from the old blog to the new one. There are several issues to think about: First of all, all binaries are still referred from the old blog. Consequently it is not possible to just shut it down. Furthermore, there are many entries that are linked from several places all over the web.

My solution is to create a IIS module using managed code, and the ASP.NET server extensibility APIs. First of all I had a look at the schemes of the permalinks or URIs I have chosen for the old blog

http://www.blog.old/yyyy/mm/dd/articletitle.aspx

and the new one

http://www.blog.new/yyyy/mm/dd/article-title/

Consequently the HTTP module has to perform several steps: Replace the domains, remove the technology specific information in form of the .aspx file extension (technology specific information isn’t good practice anyway based on Tim Berner-Lee’s article about cool URIs) and finally add some hyphens. While the later is an somehow impossible task, there is an easy workaround. The scheme for permalinks I have chosen in WordPress will list all articles on a given day if you omit the article title in the URI. Consequently, the requested URI will be rewritten by the module to

http://www.blog.new/yyyy/mm/dd/

and sent back in the response with HTTP status code 301 (moved permanently) base on RFC 2616:

“The requested resource has been assigned a new permanent URI and any future references to this resource SHOULD use one of the returned URIs. Clients with link editing capabilities ought to automatically re-link references to the Request-URI to one or more of the new references returned by the server, where possible. This response is cacheable unless indicated otherwise.

The new permanent URI SHOULD be given by the Location field in the response. Unless the request method was HEAD, the entity of the response SHOULD contain a short hypertext note with a hyperlink to the new URI(s).“

Additional URIs that need to be processed are in the form of

http://www.blog.old/CategoryView,category,categoryname.aspx

Also this one is relatively easy as WordPress expects the category in form of

http://www.blog.new/category/categoryname/

Finally, the selection from the calendar in dasBlog looks like

http://www.blog.old/default,date,yyyy-mm-dd.aspx

and needs to be transformed into

HttpApplication application = (HttpApplication)sender;
HttpContext context = application.Context;

context.Response.StatusCode = 301;
context.Response.RedirectLocation = GetRedirectLocation(context.Request);
context.Response.Cache.SetCacheability(HttpCacheability.Public);

if (!context.Request.Equals("HEAD"))
{
    ...
}

To create the redirect locations I use a set of Regex objects that cover the most important URI types.

Regex singleUriPattern
  = new Regex("http://" + OLD_DOMAIN
  + "/[0-9]{4}/[0-9]{2}/[0-9]{2}/([\w-_\%+]+)*.aspx");
Regex categoryUriPattern
  = new Regex("http://" + OLD_DOMAIN
  + "/CategoryView,category,([\w-_\%+]+)*.aspx");
Regex dateUriPattern
  = new Regex("http://" + OLD_DOMAIN
  + "/default,date,[0-9]{4}-[0-9]{2}-[0-9]{2}.aspx");

Now everything beside the content can be deleted from the old dasBlog installation. In order to avoid any requests not covered by the previously deployed module, the custom error page for status code 404 is set to the corresponding URI on the news blog.

After deploying the module (into the bin folder of the dasBlog installation) it needs to be added to the web.config. Therefore you just have to add it to the httpModules section.

<httpModules>
  <add name="UriRedirector" type="RedirectModule" />
</httpModules>

Edit Custom Error Page Dialog

If the application pool is running in Classic mode, the custom error pages do not cover any ASP.NET content. Therefore add the customError section into to web.config file. Now all requests that do not request any content from the old blog or which a are not redirected by your module are covered by the new WordPress blog.

<customErrors mode="On">
     <error statusCode="404" redirect="http://www.blog.new/404/" />
</customErrors>

Conclusion

Now the content from the old dasBlog instance are displayed on the new WordPress blog, the most important links to your old dasBlog pages are covered by the URI redirection to the new blog and all the rest is caught by the WordPress blog as well. You might want to extend the redirect module with further regular expressions (e.g. to cover CommentView.aspx or other dasBlog pages).