NGINX WordPress Rewrites

After moving my blog to its new domain try-catch-finally.net there was one major issue open: Search engines. Google, Bing, DucDuckGo and whatever have their indices. Eventually, I want to make sure when you hit one of the search results, you will end up with the proper site.

Using NGINX allows you to do this with a few files. Using the location section let you match against path segments and applying a rewrite rule.

The trick is done by the two parameters $1 and $1. While the $1 is the content in the first paratheses, $2 is the rest of the path segment from your request which is in the second paratheses. Once I got this pattern, It was easy to write the below rule.

server {   
  ...   
  location location ~ /(2004|2005|2006|2007|2008|2009|2010|2011|2012|2013|2014|2018|2019|feed|comments|tag|author|category)/(.*) {
    return 301 https://www.hack-the-planet.net/$1/$2;     
  }   
  ... 
}

In addition to just forwarding your request, the client will receive the HTTP status code 301, that way there is a good chance search engines get the information about the change for this particular URL.

Time to Switch off SSLv3

You probably have heard of the SSL 3.0 vulnerability aka Poodle. So if you haven’t or if you have and haven’t done anything about it, it’s definitely time to switch it off.

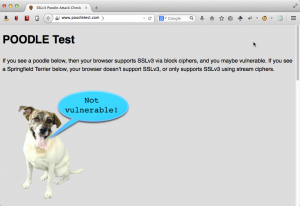
I simply went though my browsers and turned it of, as nowadays it should not be used anymore. To check if your browser is vulnerable, just check out the Poddle Test. If it does look like below, follow the instructions to make it look different.

Poodle TestFirefox

In Firefox you simply type in

about:config

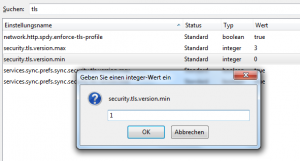
in the address bar of the browser. In the configurations settings you now need to set the value for security.tls.version.min to 1.

Firefox TLS 1Once done, you should be safe, I was told. However, using Firefox ESR 31.1.1, the Poodle Test above still indicates vulnerability.

However, with version 32.0.3 on Mac OS X, setting the minimum TLS version works as a charme.

Poodle TestInternet Explorer

For IE, you should check out Microsoft Security Advisory 3009008 giving a workaround how to turn SSL 3.0 off.

Tools / Internet Options / Advanced got ot the Security category and uncheck Use SSL 3.0 and check Use TLS 1.0, Use TLS 1.1, and Use TLS 1.2.

IE TLS SettingsAgain this should at least give you the feeling of security.

Check and Fix the Shellshock Exploit on Mac OS X

Since I switched to Mac in 2011, I do not keep that much track of vulnerabilities as I did running Windows as my main system. However, the recently announces Shellshock exploit got my attention. As Apple has no patch in place by today, I went for a manual path of the bash shell. Only precondition is Apple’s Xcode being installed on your system.

First, checking whether your  system is vulnerable, you simply need the following bash script being run:

env x='() { :;}; echo not' bash -c 'echo safe'

In my case, unfortunately, I got a

not
safe

on my shell, running Mac OS X 10.9.4. Checking the version is simple done as following:

bash --version
GNU bash, version 3.2.51(1)-release (x86_64-apple-darwin13)
Copyright (C) 2007 Free Software Foundation, Inc.

In case you passed the check, you should run a second one, as since Thursday, there is a second attack vector knwon

env X='(){(a)=>\' bash -c "echo date"; cat echo; rm -f echo

The good news, not vulnerability from this vector.

date
cat: echo: No such file or directory

In case one would get the current date and time, there would be vulnerability, too.

As there is no patch from Apple right now, there is an possibility to build an update manually from the GNU repositories.

mkdir bash-fix
cd bash-fix
curl https://opensource.apple.com/tarballs/bash/bash-92.tar.gz | tar zxf -
cd bash-92/bash-3.2
curl https://ftp.gnu.org/pub/gnu/bash/bash-3.2-patches/bash32-052 | patch -p0
cd ..
sudo xcodebuild

In case you are vulnerable to the second vector, there is a another path to be applied:

mv build/bash.build/Release/bash.build/DerivedSources/y.tab.* bash-3.2/
cd bash-3.2
curl https://ftp.gnu.org/pub/gnu/bash/bash-3.2-patches/bash32-053 | patch -p0
cd ..
sudo xcodebuild

By running

bash-fix/bash-92/build/release/bash --version 
bash-fix/bash-92/build/release/sh --version

you should be able to verify the version of the fix.

GNU bash, version 3.2.52(1)-release (x86_64-apple-darwin13)
Copyright (C) 2007 Free Software Foundation, Inc.

Before replacing the old version, I backup the original bits.

sudo cp /bin/bash /bin/bash.3.2.51.bak
sudo cp /bin/sh /bin/sh.3.2.51.bak

Now you can replace the original ones by

sudo cp bash-fix/bash-92/build/Release/bash /bin
sudo cp bash-fix/bash-92/build/Release/sh /bin

Once this is done, you can check for the exploit again

env x='() { :;}; echo not' bash -c 'echo safe'
bash: warning: x: ignoring function definition attempt
bash: error importing function definition for `x'
safe

Once verified, you can get rid of the bash-fix folder and your system should be safe from this exploit.


The McGyver GIT Survival Guide

Working with version control system is one of the elementary skills for each and every software engineer. Over the years, I worked with CVS, Subversion, SourceSafe, Perforce as well as Mercurial. Within Microsoft, I worked a lot with Source Deport and Microsoft Team Foundation Server. At home I run my dedicated SVN repository. In fact, I don’t feel comfortable when not being able to check in source code at all.

For my personal projects, Git especially Github works quite well, however, since the openHAB project moved from Google Code (Mercurial) to GitHub, I deal with quite a lot of issues within Git over and over. Currently we have more than 50 60 forks and more than frequent pull requests. Therefore, keeping your local branch permanently in sync is quite inevitable.

Abstraction None
The worst thing about Git is the fact, the user interface and console commands seem to reflect the Git implementation bit by bit. Personally, I have the feeling there is zero abstraction for the user. Even worse, when used to non distributed systems like SVN or TFS doing simple syncs and commits, the concepts behind Git might drive one mad.

Small Steps
This seems obvious, however, try to make only small commits to the repository. The more collaborators you have, the more challenging it might become to merge. At the same time, the less experienced you are with Git, the smaller your checkins should be. Commit single files, minor changes as isolated as possible. This will make you life just so much easier.

Daily Routine Conflicts
As daily routine, fetching and merging the local branch should be done via

git fetch upstream
git merge upstream/master

Usually, this should work quite well unless there are changes on local files that should not be merged at all or you have done changes not to be merged yet.

Updating e21a751..349468b
error: Your local changes to the following files would be overwritten by merge:
        foo/bar/buzz.ext
Please, commit your changes or stash them before you can merge.
Aborting

To just avoid the merge stash the changes via

git stash

Do the merge, and than pull the stash.

git stash pop

Again, usually this should work fine unless the merge results in a conflict which cannot be resolved automatically.

Auto-merging foo/bar/buzz.ext
CONFLICT (content): Merge conflict in foo/bar/buzz.ext

Simply run

git mergetool

to solve the issues and try to pull the stash again.

Delete from Repository only
To remove a file from the repository whilst keeping it locally just performa a

git rm --cached myfile.c

Bear in kind, this git will realise this file immediately as a new. rm works on folders as well, though. Anyway, this will become very handy once you accidentally check in files that are not intended to be checked in.

Backup early – Backup often
Just in case you don’t know what’s going to happen e.g. due to a larger refactoring – move the current state into a new brach as backup right after a commit

git branch my-backup-work

Reset to Remote
Ok, this one gave me quite a hard time, as I had changes checked in my forks but needed to reset particular files to the current revision of the original repository (not your local branch and neither your fork).

To do so, reset your working copy to the upstream master:

git remote update
git reset --hard upstream/master

Afterwards push this new branch-head to your origin repository, ignoring the fact that it won’t be a fast-forward:

git push origin +master

you might have something like

Fetching origin
Fetching upstream
remote: Counting objects: 685, done.
remote: Compressing objects: 100% (336/336), done.
remote: Total 507 (delta 249), reused 321 (delta 87)
Receiving objects: 100% (507/507), 6.57 MiB | 146.00 KiB/s, done.
Resolving deltas: 100% (249/249), completed with 64 local objects.
From https://github.com/aheil/example
   f55f8b0..e060456  master     -> upstream/master
macbook-pro:example andreas$

Reverting to a specific Revision
This one is easy, you simply need to tell git the hash of the revision you want to check out. This works quite well, however, you always need to consider the visibility of the branch you want to check out. To understand the reachability in git, you might want to read this article.

git checkout e095 -- somefolder/somefile

Conclusion
In my very personal opinion, Git is s**t if you are used to centralised repositories. If you worked a lot with Mercurial, Git is simply to complex. Git is not abstract enough. When working on code, I want spend 99% on the code and 1% on the revisioning system, not the other way around. When working on the open source projects, I currently waste a major part of my time on Git.

I probably will never setup and run a personal git server (I do run a SVN server and did run CVS before) and I probably will not maintain any Git servers (I did at work maintain Microsoft TFS, SVN and CVS servers, though).

Git is great when it comes to some kind of mass collaboration (but I haven’t found anything so far Mercurial won’t offer for the same purpose). While everybody plays nicely together, it works just great.

As there is much more to learn about Git, you eventually want to pick Pro Git to get some insights.

Removing Failed Thecus Moule Installations

For whatever reason it might happen, a module installation on a Thecus NAS Server won’t succeed. In such a case even removing the module might fail. In my case, I had to troubleshoot my Thecus N4200PRO with the latest 32-bit firmware 5.03.01.

Symptoms

Symptoms included a module which did not start at all with the message

Module[Mail Server]: Enable Fail.

and uninstalling the module stopping with the message

Module[Mail Server]: Uninstall Fail.

Even worse, re-installing the module was not possible as the server assumed the module already was installed and uploading the module manually failed as well.

To solve this kind of Mexican standoff you probably need to dig somewhat into the Thecus, though.

Prerequisitees

First of all make sure the SSH module (HiSSH) is installed and enabled.

HiSSH Module

You need to log in via the user root using the same password provided for your admin user, though.

macbookpro:~ andreas$ ssh 192.168.1.254 -l root
root@192.168.0.101's password:
root@127.0.0.1:~#

Cleaning Up

Depending what failed during your installation, only some of the following steps might be necessary to clean up the module.

Files related to the module might be found in the following three directories and need to be removed.

/raid/data/module/cfg/module.rc/
/raid/data/module/
/img/htdocs/module/

In case anything related to your module can be found there (such as Mailserver in my very case), you can remove them with one of the following commands.

rm -rf "/raid/data/module/cfg/module.rc/Mailserver.rc"
rm -rf "/raid/data/module/Mailserver"
rm -f "/img/htdocs/module/Mailserver"

Once all related files have been removed, you now head for the database and clean up the two affected tables. As sqlite won’t give any feedback about succeeded operations, makew sure entries are there before cleaning up and are gone afterwards.

root@127.0.0.1:~# /opt/bin/sqlite /raid/data/module/cfg/module.db "SELECT * FROM module WHERE name = 'Mailserver'"
Mailserver|2.00.02|Mail Server|No||md_mailServer.png|User|www/index.htm|User

root@127.0.0.1:~# /opt/bin/sqlite /raid/data/module/cfg/module.db "DELETE FROM module WHERE name = 'Mailserver'"

root@127.0.0.1:~# /opt/bin/sqlite /raid/data/module/cfg/module.db "SELECT * FROM module WHERE name = 'Mailserver'"

If the deletion works well, you should experience some delay after the delete statement was executed.

root@127.0.0.1:~# /opt/bin/sqlite /raid/data/module/cfg/module.db "SELECT * FROM mod WHERE module = 'Mailserver'"
Mailserver|1|type|Install
Mailserver|1|ModuleRDF|Install
Mailserver|1|ModuleRDFVer|1.0.0
Mailserver|1|Name|Mail Server
Mailserver|1|Version|2.00.02
Mailserver|1|Description|Mail Server
Mailserver|1|Key|Mailserver
Mailserver|1|Authors|Davide Libenzi
Mailserver|1|Thanks|XMail by Davide Libenzi
Mailserver|1|WebUrl|http://www.xmailserver.org/Readme.txt
Mailserver|1|UpdateUrl|
Mailserver|1|Reboot|No
Mailserver|1|Icon|md_mailServer.png
Mailserver|1|Mode|User
Mailserver|1|HomePage|www/index.htm
Mailserver|1|MacStart|
Mailserver|1|MacEnd|
Mailserver|1|Show|0
Mailserver|1|Publish|1
Mailserver|1|Login|1
Mailserver|1|UI|User
Mailserver|4|type|NAS
Mailserver|4|TargetNas|Thecus
Mailserver|4|NasProtol|N7700
Mailserver|4|NasVersion|5.00.00.12
Mailserver|5|type|NAS
Mailserver|5|TargetNas|Thecus
Mailserver|5|NasProtol|N5200
Mailserver|5|NasVersion|5.00.00.12
Mailserver|6|type|NAS
Mailserver|6|TargetNas|Thecus
Mailserver|6|NasProtol|N4100PRO
Mailserver|6|NasVersion|5.00.00.12
Mailserver|8|type|DependCom
Mailserver|8|DependName|MySQL_5
Mailserver|8|DependVer|2.0.0
Mailserver|8|DependUrl|

root@127.0.0.1:~# /opt/bin/sqlite /raid/data/module/cfg/module.db "DELETE FROM mod WHERE module = 'Mailserver'"

root@127.0.0.1:~# /opt/bin/sqlite /raid/data/module/cfg/module.db "SELECT * FROM mod WHERE module = 'Mailserver'"

Once both tables are cleaned, you might want to reboot the NAS.

Conclusion

The Mail Server module failed for me, as I did not install the MySQL Module before. Unfortunately, the installation did break somewhere in the middle leaving some tries in the database for me without the files being copied to the corresponding directories. Therefore, the uninstall.sh script was missing to get rid of the bricked module. As the Thecus user interface won’t let you re-install the module nor uninstalled it due to the missing script, there is only litte you can do without knowing about the internals of the server. With the few steps provided above, unblocking most of the modules should work as long as you are able to install the SSH module on you NAS.

Confluence Math Formula Macro

As we are dealing quite a lot with mathematics in our current development and using Atlassian’s Confluence as our documentation system, we were looking for a elegant way to document our mathematics in any better way than E=mc^2.

We found the Math Formula macro originally written and tested against Confluence version 3.5, not playing well with the latest Confluence version, we are using.

After following the installation steps there it was, the incompatibility note:

“There are user macros without any metadata configured in their template. They have been highlighted below. For these macros to be available for use in content they require parameter information. See the Guide to User Macro Templates.”

Check out the highlighted macros, and click Edit.

Installed User Macros

In the Template field add the following as the very first line of the template:

## @param size:title=Font Size|type=int|default=150|desc=Font size for formulas in percentage

Within the template, the the font size is referred as $paramsize, however, in the metadata description you denote the param just as size.

Once these changes are made, you can use the macro to create your formulas…

Math Formular Macro


Handbrake Xbox 360 Streaming Error 69-C00D10E0

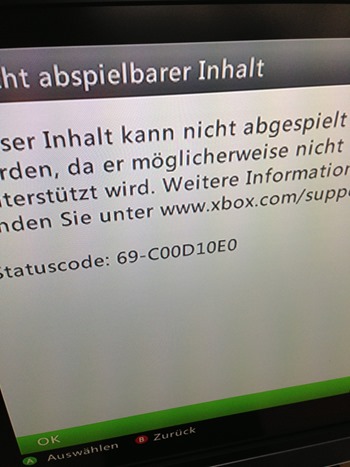
Recently, I started to convert some of my old media files using Handbrake to be streamed using a TwonkyMedia Server to my Xbox 360. After converting some of the files, I realized my Xbox won’t play the files due to a status code 69-C00D10E0:  

Statuscode: 69-C00D10E0

The Xbox support forum provides an entry exactly for this issue, however, the information given there is not quite helpful. That’s what they say (to be honest, that’s what I already had in mind):

Error code 69-c00D10E0 is preceded by the following message:

Unplayable Content
Status Code: 69-c00D10E0

Problem

If you’re seeing this message and error code, it means that the file is too large for streaming, the file may be corrupted, or the codec needed to play the file is missing.

More helpful would be a list of supported video and audio codecs, a list of not supported combinations or similar. Therefore, I had to dig somewhat deeper and to figure out how to work around this issue.

Choosing the Right Preset

I used a earlier version of Handbrake before, providing a dedicated Xbox preset. Version 0.9.8 of Handbrake does not provide such an default preset anymore. Instead you can chose Normal or High Profile from the Regular section for playback with Xbox 360.

Handbrake Presets

Normal should work fine with he Xbox 360 System Player. If you are looking for a better video quality, choose the High Profile, though. Using High Profile, by default, the checkbox for Large file size is enabled. Eventually, that’s the problem, Xbox 360 System Player cannot play the streamed file as files generated with this flag contain 64-bit pointers, allowing a file size larger than 4GB, which the player simply cannot deal with. Therefore, just uncheck this one to generate Xbox 360 System Player compatible files.

Lage file size disabled

Choosing the Right Audio Track Order

Another issue with the Xbox 360 Player is its inability to let you choose the audio track to play. I was wondering quite a while, why some encoded videos where played using the wrong audio track and – even worse – Xbox does not let you choose another track.

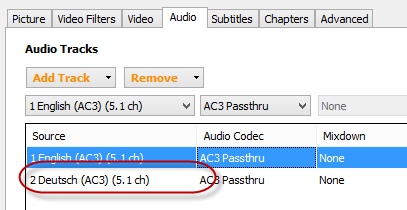
After some trial and error, I figured out, Xbox is playing the last track in the list of audio tracks encoded by Handbrake. You maybe haven’t realize this at all as native speaker only interested in the English track anyway.

Audio Tracks order

Eventually, the secret how to use Handbrake to encode media files or you Xbox is to put the audio track you want to play on Xbox System Player on the very bottom of the list.

Keeping these two settings, you generate perfectly streamable media files to be played with Xbox 360’s System Player.

Boot Camp Windows 8 – Me haz Drivers?

Works on my MachineYou own a MacBook Pro? You run Boot Camp? You run Mac and Windows? You want to upgrade to Windows 8 but you still hesitate because Apple has not released a new Boot Camp version supporting Windows 8? First of all: I did it. I have to admit, I haven’t spent a single though on drivers before I upgraded to Windows 8 – and still I just blog from Windows 8 on my MacBook Pro.
What happens when I upgrade?

If you upgrade, some devices will work some won’t.Even if the Microsoft Upgrade Assistant does not show any incompatibilities with any of the MacBook’s devices in its report, they probably won’t work.

Windows 8 Upgrade Assistant Report

After installing, Windows 8 will show various devices in the Devices list indicating, there are no drivers available. Other’s simply won’t be detected at all, e.g. Windows8 won’t be able to detect the MacBook Pro’s WiFi at all. Function key, keyboard backlight won’t work and the graphics chipset might reset the screen resolution between the MacBook’s native resolution and something about 800×600 from time to time.

Where to get the Windows 8 drivers for my MacBook Pro?

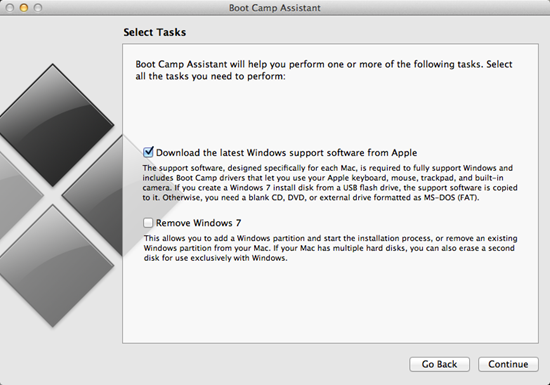
To solve the driver issues, you simply start the Boot Camp Assistant from your Mac OS and follow the instructions until you find yourself faced with the following dialog.

Boot Camp Assistant Task

Chose Download the latest Windows support software from Apple and continue. In the following step follow the on screen instructions either burning a DVD/CD or copying the files to a USB drive or any folder accessible from Windows (don’t drop the files to the Mac OS’s partition, though).

Will it blend work?

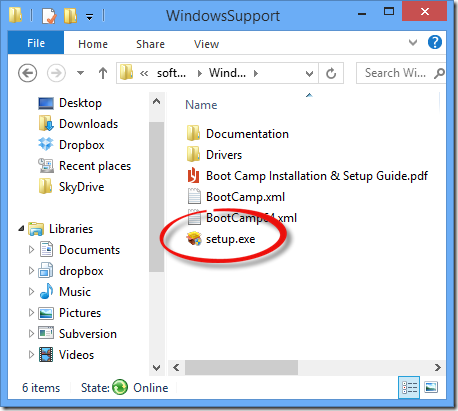
Restart Windows 8 and insert the disc, stick and select the setup.exe in the WindowsSupport folder. This will install a whole bunch of drivers.

Boot Camp Windows Drivers

Based on Apple’s Boot Camp 4.0 FAQ , the Windows Support Files contain the following drivers

  • Apple Bluetooth
  • Apple Keyboard Support
  • Apple Remote Driver
  • Apple Trackpad
  • Atheros 802.11 Wireless
  • ATI Graphics
  • Boot Camp control panel for Microsoft Windows
  • Boot Camp System Task Notification item (System Tray)
  • Broadcom Wireless
  • Intel Chipset Software
  • Intel Integrated Graphics
  • iSight Camera
  • Marvel Yukon Ethernet
  • nVidia Graphics
  • Cirrus Logic Audio
  • Realtek Audio
  • SigmaTel Audio
  • Startup Disk control panel for Microsoft Windows

Once installed and the machine restarted, everything seems to work fine, the Windows Bluetooth and Boot Camp icons are shown in the notification area, light sensor, FaceTime camera and sound work perfectly and the graphics card runs smooth like butter.

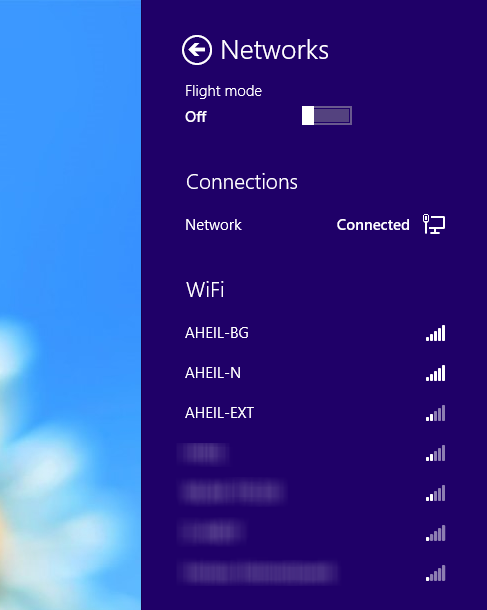
Windows Networks under Boot Camp

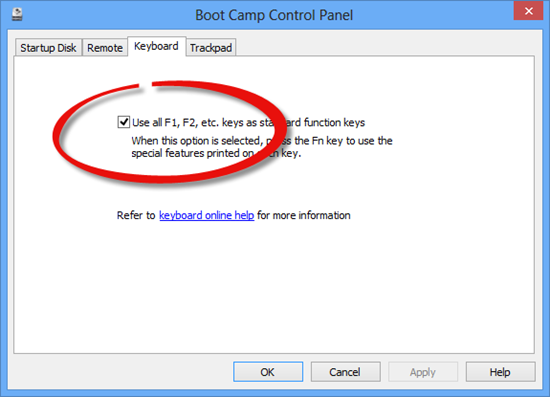
One last word on function keys – they won’t work out of the box. You have to start the Boot Camp Control Panel from the tray and switch to the Keyboard tab.There check the Use all F1, F2… box.

Boot Camp Control Panel

Windows 8 on the MacBook Pro is a great experience even without touch display and retina. Upgrading without checking for the drivers of course was a greenhorn mistake. However, I hoped (yes I know indeed, hope is not a strategy) during the inplace upgrade, Windows will keep the drivers. However, the fact that all drivers still work, clearly shows that the driver architecture from Windows 7 to Windows 8 did not change at all. That’s good as manufacturers do not need to update drivers in a hurry based on a new architecture, but on the other side it shows that there are not that many improvements how Windows deals with the hardware. But again, maybe this is not necessary at all.

Before you upgrade to Windows 8, run a backup! I did so using Acronis True Image 2013. Even without thinking about drivers, I was not sure whether the upgrade process with Boot Camp on the machine will maybe brick my box. Also run a backup of you Mac OS partition using Time Machine.

Said that kids, please bear in mind, that this worked fine on my machine, and might fail on yours. Also there is probably no support from Apple for Boot Camp 4.0 running Windows 8.

Because you’ve been so impatient with the Upgrade Assistant – How to get the Windows 8 ISO File

Windows 8 is there. Two days are gone and after waiting so long, you probably already purchased and downloaded Windows 8, as Microsoft came along with a time limited offer for a great price model, if you already have a PC running Windows XP, Vista or Windows 7

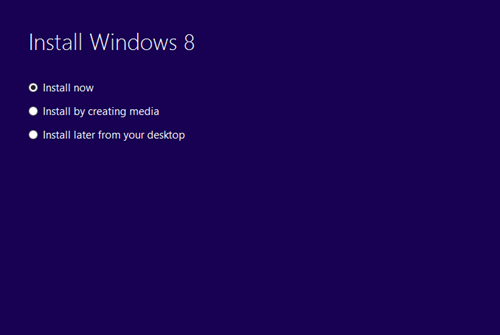
Once you run through the purchase process (they accept credit card or PayPal), at one point after the download finished, the Windows Upgrade Assistant comes up with the following dialog:Install Windows 8

Because you’ve waited for so long you are quite impatient and go straight  for the first option because you think you can create the media later one… If done so, the Upgrade Assistant will install Windows 8. Eventually, there won’t be any option to create the media later on.

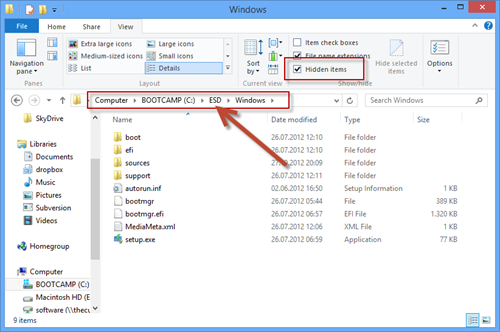
What now? If you just need the files, you can turn on hidden files in Windows Explorer (it’s now in the Ribbon). You will see a folder ESD on the root of your drive containing a Windows folder with the downloaded installation files. Go ahead and make a backup if required.

Hidden ESD Folder

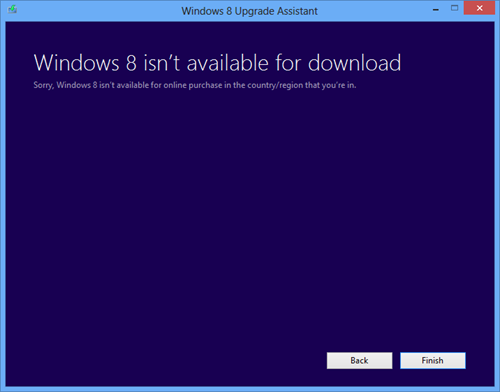
If you try to create an .iso file using the Upgrade Assistant again, you probably fail by getting the following result.

Windows 8 isn't available for download

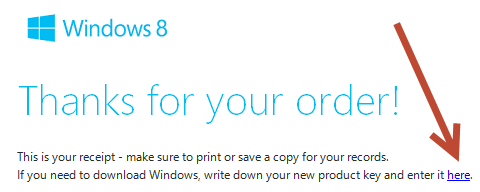
In case you still need (or just want) the .iso file, there is a way to obtain it. First of all, check your mail for the order confirmation of your Windows 8 copy. At the very top of the mail, you will find a link to download Windows again.

Thanks for your order

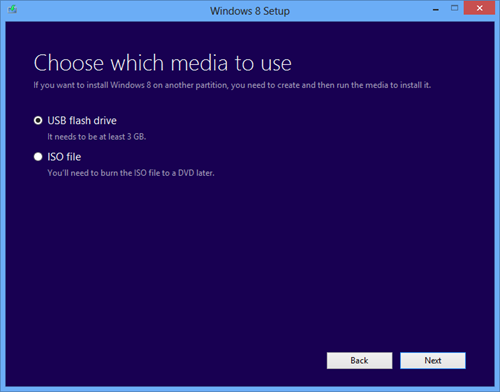
Following the link, you will download the Windows 8 Setup (windows8-setup.exe). Once started this will straight let you choose whether to install, download or to postpone the installation as seen above. Chose Install by creating a media and either choose to burn a DVD to to copy the files on a USB stick (3GB required, though).

Choose which media to use

You will be asked to choose the place where to save the .iso file, after which the download process starts immediately.

That’s all you have to do. Whether you have been impatient, clicked to fast, did not read carefully or just clicked ‘next’, ‘next’, ‘next’, there is still a way to get the .iso file afterwards.

MacBook Pro’s Bluetooth Gone Fishin’

Today, I spend literally hours in trying to fix a hardware problem on my MacBook Pro as the Bluetooth suddenly went fishing without saying anything to me. Said that, I run Apple’s Booot Camp with Mountain Lion and Windows 7 which makes troubleshooting sometimes easier, sometimes harder. As I turned on my MacBook Pro this morning my Microsoft Wireless Notebook Presenter Mouse 8000 (great device but a way too long name) mouse was – let’s say – working but not working. Left and right button and mouse movements worked fine but the mouse wheel as well as the middle button did not work at all. I followed some simple debugging rules from David Agan’s book Debugging The 9 Indispensable Rules for Finding Even the Most Elusive Software and Hardware Problems how to analyze faults in systems.

For the Impatient Ones

Jump to the very end of this article, do not learn anything, do not improve your analytic skill by one but see how to fix it.

Check The Plug

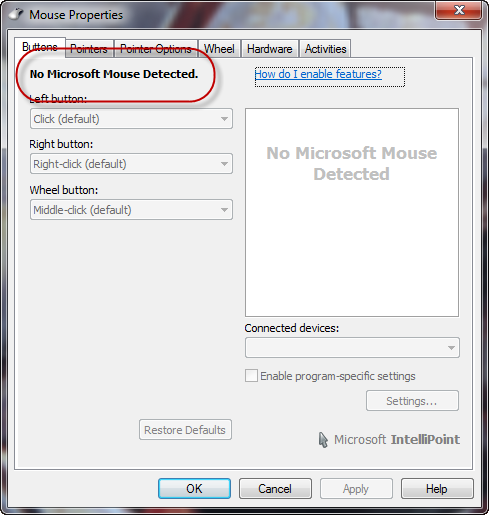
First, I checked the Microsoft IntelliPoint software (Still working? Latest version?) and it said there is no Microsoft Mouse connected.

No Microsoft Mouse Detected

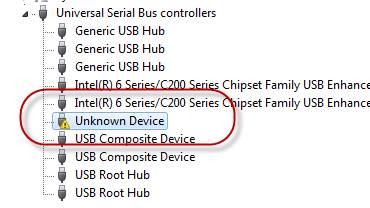
Next step, I checked Windows Device Manager telling me here is a unknown device. Maybe Windows did not know, but I was pretty sure the device Windows did not want to know anymore today was the MacBook Pro’s Bluetooth chip.

Unknown Device

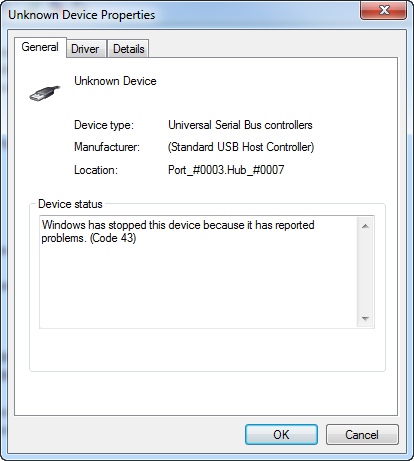
I checked the device properties and found that

“Windows has stopped this device because it has reported
problems. (Code 43)”

What kind of problems, you’ll probably never known.

Unknown Device Properties

If you dig a bit you’ll probably come along the TechNet entry for Error Code 43 saying

“A device driver notified the operating system that the device failed.”

With some years of experience in this kind of business, I tried of course

  • kicking the laptop (most of the time works quite fine with other people’s hardware)
  • rebooting several times
  • un- and re-installing the device drivers
  • running Windows’s Hardware and Device troubleshooting

Make it Fail

As nothing worked out for me, I rebooted into OS X to figure out if the device fails here as well and found a similar situation – Bluetooth went into its weekend saying

“Bluetooth: Not Available”

Eventually, that’s no driver issue, that’s definitely a hardware problem. One machine, two operating systems, different drivers (well module in OS X) resulting in a similar failure. Saturday noon and a not that satisfying Apple Store density in Germany, there is little one could do before next Monday. Hardware dies; usually at the most unpleasant moment you can imagine and nothing you can do about that.

Bluetooth: Not Available

Get a Fresh View

I did not follow the debugging rules in their given order, but I always try to keep the rule Get a Fresh View in mind. Often one is biased by some ideas in ones mind, some posts read while doing research or personal previous experience.

Eventually, I remembered what I have learned about power cycles during studies and realized that rebooting nowadays is not a hard reset of your machine anymore – there have been times (I do still remember) when PCs provided a (at least by me frequently used) reset button causing the device to hard reboot by turning the power of and on again.

So what’s the difference by rebooting the laptop several times, or booting into another OS? Right, this is no cold start and probably all devices keep their previous (faulty) state even after the reboot. As a consequence, plug out the power source, turn of the machine – leave it for a few seconds and turn it on again. Bluetooth is up and running again for both, Windows and Mac OS.