NGINX WordPress Rewrites

After moving my blog to its new domain try-catch-finally.net there was one major issue open: Search engines. Google, Bing, DucDuckGo and whatever have their indices. Eventually, I want to make sure when you hit one of the search results, you will end up with the proper site.

Using NGINX allows you to do this with a few files. Using the location section let you match against path segments and applying a rewrite rule.

The trick is done by the two parameters $1 and $1. While the $1 is the content in the first paratheses, $2 is the rest of the path segment from your request which is in the second paratheses. Once I got this pattern, It was easy to write the below rule.

server {   
  ...   
  location location ~ /(2004|2005|2006|2007|2008|2009|2010|2011|2012|2013|2014|2018|2019|feed|comments|tag|author|category)/(.*) {
    return 301 https://www.hack-the-planet.net/$1/$2;     
  }   
  ... 
}

In addition to just forwarding your request, the client will receive the HTTP status code 301, that way there is a good chance search engines get the information about the change for this particular URL.

Preview as PDF Viewer for LaTeX Workshop on Visual Studio Code on macOS

After switching to Visual Studio Code as LaTeX editor, I installed the LaTeX Workshop extension to gain decent support for editing LaTeX files on Code.

After fiddling around with the settings, I still was not able to use Preview on macOS.

First of all, make sure external PDF viewers are enabled in the user settings.

"latex-workshop.view.pdf.viewer": "external"

Furthermore, set Preview es external viewer. The trick here is, don’t think about Preview as a viewer, actually, it is the open command.

Just set up the viewer as you would start preview on a terminal.

open -a preview mybook.pdf
This command used for user settings eventually ends in the following section.
"latex-workshop.view.pdf.external.command": {
    "command": "open",
    "args": [
        "-a",
        "preview",
        "%PDF%"
    ]
}
With these settings, Preview will spawn with the created PDF right out of Visual Studio Code.

I do not want to see this web content on Yosemite

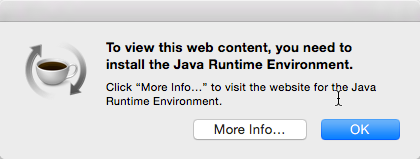
For a couple of weeks I now this really annoying message during the start up  of my Yosemite installation.

To view this web content, you need to install the Java Runtime Environment.

If I do follow the instructions of the pop up, I usually land on the Java site.

To view this web content, you need to install the Java Runtime Environment.As I develop on a regular base, I have the latest version of Java already installed (right no it should be version 8u25). Therefore, nothing to do.

I case you thought of installing Apple’s Java version for Mac. That’s  IMHO not the way to solve the issue. You might cure the symptoms, however, you will not fix the root cause for this issue.

To get rid of the message, you need the find the root cause. In my case it was the attempt to try Facebook’s video chat some weeks ago. That was the only one installation I performed since I receive this message. Even though, I disabled the add-on in Firefeox, the message kept showing at start up.

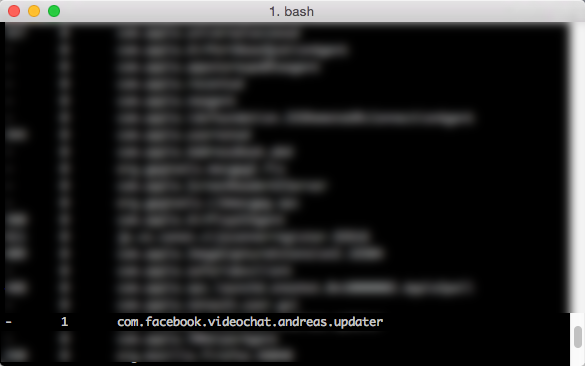
To get finally rid of the message head straight to the terminal and enter

launchctl list

In case you wonder that launchctl does, check the manpage which says

launchctl interfaces with launchd to load, unload daemons/agents and generally control launchd. launchctl supports taking subcommands on the command line, interactively or even redirected from standard input. These commands can be stored in $HOME/.launchd.conf or /etc/launchd.conf to be read at the time launchd starts.

Anyway, you shot not get a list of off all jobs loaded into launchd. There ckeck if you can find com.facebook.videochat.{username}.updater in this list. Wondering what this is? It’s some kind of Facebook-collects-your-data thing. Honestly, I don’t want to know much more about what it does, I just want to get rid of it.

com.facebook.videochat updater

Check out

ls ~/Library/LaunchAgents/ | grep facebook

You should get something like com.facebook.videochat.{username}.plist.
Now run

launchctl unload ~/Library/LaunchAgents/com.facebook.videochat.{username}.plist

followed by

launchctl remove ~/Library/LaunchAgents/com.facebook.videochat.{username}.plist

You might want to run the following command instead

launchctl remove com.facebook.videochat.{username}.updater

You now can delete the property list file

rm ~/Library/LaunchAgents/com.facebook.videochat.{username}.plist

Now check for the FacebookUpdate application  via

ls ~/Library/Internet\ Plug-Ins/ | grep Facebook

Again, you should fine something like FacebookVideoCalling.bundle. Send it to /dev/null via

rm ~/Library/Internet\ Plug-Ins/FacebookVideoCalling.bundle

Now there still something to get rid of by calling

rm -R ~/Library/Application\ Support/Facebook/

Et voiá, your are done. The cause for the message should be gone by now.

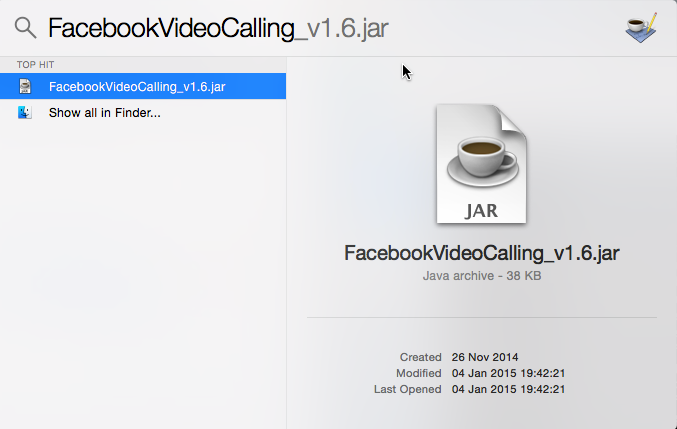
To get rid of the JAR file itself use Spotlight to looking for FacebookVideoCalling. You should find something like FacebookVideoCalling_v1.6.jar. Use Finder then to get rid of it.

Finding FacebookVideoCalling_v1.6.jar That is, by the way, the only thing Facebook suggest to uninstall the videochat. Not only, the sort of infect you with the above updater, they also do not provide useful information for uninstalling the stuff.

The fact, Facebook’s add-on installed this nasty updater is quite annoying. Adding a job to the launchd for an Firefox add-on is quite questionable. Even more annoying that this one slipped through the cracks.

Confluence Math Formula Macro

As we are dealing quite a lot with mathematics in our current development and using Atlassian’s Confluence as our documentation system, we were looking for a elegant way to document our mathematics in any better way than E=mc^2.

We found the Math Formula macro originally written and tested against Confluence version 3.5, not playing well with the latest Confluence version, we are using.

After following the installation steps there it was, the incompatibility note:

“There are user macros without any metadata configured in their template. They have been highlighted below. For these macros to be available for use in content they require parameter information. See the Guide to User Macro Templates.”

Check out the highlighted macros, and click Edit.

Installed User Macros

In the Template field add the following as the very first line of the template:

## @param size:title=Font Size|type=int|default=150|desc=Font size for formulas in percentage

Within the template, the the font size is referred as $paramsize, however, in the metadata description you denote the param just as size.

Once these changes are made, you can use the macro to create your formulas…

Math Formular Macro


Handbrake Xbox 360 Streaming Error 69-C00D10E0

Recently, I started to convert some of my old media files using Handbrake to be streamed using a TwonkyMedia Server to my Xbox 360. After converting some of the files, I realized my Xbox won’t play the files due to a status code 69-C00D10E0:  

Statuscode: 69-C00D10E0

The Xbox support forum provides an entry exactly for this issue, however, the information given there is not quite helpful. That’s what they say (to be honest, that’s what I already had in mind):

Error code 69-c00D10E0 is preceded by the following message:

Unplayable Content
Status Code: 69-c00D10E0

Problem

If you’re seeing this message and error code, it means that the file is too large for streaming, the file may be corrupted, or the codec needed to play the file is missing.

More helpful would be a list of supported video and audio codecs, a list of not supported combinations or similar. Therefore, I had to dig somewhat deeper and to figure out how to work around this issue.

Choosing the Right Preset

I used a earlier version of Handbrake before, providing a dedicated Xbox preset. Version 0.9.8 of Handbrake does not provide such an default preset anymore. Instead you can chose Normal or High Profile from the Regular section for playback with Xbox 360.

Handbrake Presets

Normal should work fine with he Xbox 360 System Player. If you are looking for a better video quality, choose the High Profile, though. Using High Profile, by default, the checkbox for Large file size is enabled. Eventually, that’s the problem, Xbox 360 System Player cannot play the streamed file as files generated with this flag contain 64-bit pointers, allowing a file size larger than 4GB, which the player simply cannot deal with. Therefore, just uncheck this one to generate Xbox 360 System Player compatible files.

Lage file size disabled

Choosing the Right Audio Track Order

Another issue with the Xbox 360 Player is its inability to let you choose the audio track to play. I was wondering quite a while, why some encoded videos where played using the wrong audio track and – even worse – Xbox does not let you choose another track.

After some trial and error, I figured out, Xbox is playing the last track in the list of audio tracks encoded by Handbrake. You maybe haven’t realize this at all as native speaker only interested in the English track anyway.

Audio Tracks order

Eventually, the secret how to use Handbrake to encode media files or you Xbox is to put the audio track you want to play on Xbox System Player on the very bottom of the list.

Keeping these two settings, you generate perfectly streamable media files to be played with Xbox 360’s System Player.

The GPHWStatus Hack for the WWAN 5520 on a Dell D830

I just got a new (old) WWAN 5520 3G/UMTS card/modem for my Dell D830. Eventually, the card did not work out of the box without a hack. In the following  I will show what you need to do, if you want to get the card running in your Dell D830 (or maybe also any other older Dell Latitude or XPS machines).

WWAN 5520 First you need the card of course. Your Dell Latitude D830 (and many other older Dells) already has an empty slot for this card. Opening the cover (i.e. removing the keyboard) will reveal the slot for the card on the lower left of the case. The antenna cables should be already there, probably with a small protection on their end. It took me a few moments to realize which cable to plug where. One is marked white and the other is marked black, and the connectors show a large white and black arrow (actually, this was so obvious that I haven’t realized this right away).

Plug it in, close the lid and turn the computer on again (hopefully you did shut it down before). After starting Windows (if you read this blog you know we area talking about Windows 7 64-bit), Windows Update will take over – or at least it will try and glorious fail in finding any drivers.

Driver Software Installation

Never give up, never surrender as we are talking about Dell here. And as I learned recently about the missing touchpad driver, there might be a driver for everything else as well. Once again we go for a 64-bit driver for Windows Vista. In this case the Wireless Mobile Broadband MiniCard driver for Windows Vista 64-bit will do the job.

SNAGHTML7fabea

At Dell’s download site for communication drivers, there is a whole bunch of carrier specific drivers (Vodafone, Cingular, Telus and other carriers, I have never heard about before). It is not related to any carrier, so ignore anything with a carrier name in it.  Just to be sure, the driver we are looking for here is R159896.EXE.

The SIM card lives directly in the battery slot as you can see at Dell’s D830 Service Manual. Make sure the cut off corner goes the correct orientation and if you are using a contact (pay monthly) card, make sure the card is protected by a PIN. The battery slot is not secured, and if you don’t watch your laptop all the time… well, you never know. Maybe worth to know, the SIM in your Dell does not support hot-swapping, i.e. unlike e.g. the iPhone 3GS, you have to shut down your laptop before you insert the card.

Once built in, installed and inserted every bits and pieces, the Dell Mobile Broadband Card Utility will let you know:

No Service
SIM Not Found – Check Orientation

No, don’t turn off the laptop again, the orientation probably is right. There is a (not so obvious) solution to that.

No Service

Start the Registry Editor (regedit.exe) and navigate to

ComputerHK_LOKAL_MACHINESOFTWAREWow6432NodeNovatel WirelessNextGenCommon

and change GPSHWStatus to 1. This means, the GPS chip on the card gets activated. For whatever reason, the chip is deactivated by the Dell drivers by default. However, if you activate the GPS chip, the entire card will be activated. It might be interesting to dig a bit deeper here, but for now it’s enough to know that it works.

GPSHWStatus Hack

Either reboot, or just quite and start the Broadband Card Utility again.

GPS-Status

By applying this GPHWStatus hack, not only the 3G card/model will now work, also the GPS hardware will be enabled and should available from the tool.

Dell D830 – The Missing Touchpad Driver

Since moving forward to Windows 7 x64 on my Dell Latitude D830, I had to live with the default behavior of the Touchpad and Pointing Stick of the D830 as there are no 64-bit drivers for Windows 7.

Finally, I found the right drivers for my system. You can pick it up at the Dell drivers and download page for the Dell Latitude D430. The is no explicit Windows 7 driver, however, the 64-bit driver for Windows Vista worked fine for me.

Dell Touchpad on D830 with  Windows 7 x64

To make sure you oick up the right driver, the file name is R157047. The driver gives you full access to the Touchpad and Pointing Stick functionality, including the click feature of the stick.

R157047.exe - 64-bit Driver working on Windows 7

Download: Drivers & Downloads for Latitude D430

Adobe PDF Preview for Windows 64-bit

Microsoft’s Windows 7, Outlook 2007 and Adobe’s Acrobat just do not play well together on 64-bit systems. After receiving a PDF document via email, Outlook usually cannot display the PDF.

Outlook PDF Preview

When selection Preview File, you will simply get the message PDF Preview Handler for Vista (Vista!?) caused an error.

Outlook PDF Preview Handler for Vista


For now, the only way to view the PDF file is to open it in an external PDF reader. Leo Davidson provides a fix that finally solves this issue. Just get the fix, and run the Adobe Reader preview handler x64 fixer.exe which is included in the file.

Leo Davidson's Preview Handler Fix

After applying the fix, both, the 32-bit AppID as well as the 64-bit AppID will show the value as correct.

Leo Davidson's Preview Handler Fix

No reboot required, just go back to Outlook (worked even without restarting the application) and et voilà.

Fixed Outlook PDF Preview

Thanks to Leo Davidson, who provides this outstanding fix. Well played.

Put your own Search Providers into Internet Explorer 7

Another nice feature, unrevealed in Internet Explorer 7: Adding your own search providers is quite easy. When you select the drop down menu at your search box, you can select your currently installed search providers.

Search Providers Menu

To add more, select Find More Providers… from the menu.

Add Search Providers to Internet Explorer

Now, go to your favorite search engine and perform a search for TEST. I did this for the Beolingus translation provider. Paste the URL from the previous source and specify a name for your new search provider.

Create your own Search Provider

That’s the XML used for the installation. Press install and can directly access this search provider using the search box in IE 7.

<OpenSearchDescription xmlns="http://a9.com/-/spec/opensearch/1.1/">
  <ShortName>Beolingus</ShortName>
  <Description>Beolingus provider</Description>
  <InputEncoding>UTF-8</InputEncoding>
  <Url type="text/html" template="http://dict.tu-chemnitz.de/dings.cgi?lang=en&service=deen&opterrors=0&optpro=0&query={searchTerms}&iservice=&comment=" />
</OpenSearchDescription>

If you want to modify the settings later, you can do so using Tools / Internet Options / Change Search Defaults Settings.

It was the first time I played with these settings of Internet Explorer and I am quite surprised in a positive way about it.

Change Search Defaults Dialog

Keep Your Blogroll Up-to-date

It’s quite annoying to keep the Blogroll on your weblog up-to-date while using offline readers. Using RSSBandit and dasBlog brings a quite handy solution to you. First of all, open your dasBlog configuration and check the ‘Enable Config Web Service’ option.

Enable Config Web Service

Now open the ‘Options’ dialog of RSSBadit and select the ‘Remote Storage’ pane. Here check ‘Use remote storage’, select ‘dasBlog’ from the drop-down list and fill out the required login credentials. Your API usually is located at something like http://YouBlog/ConfigEditingService.asmx’.

RSSBandit Options

To sync, simply select the ‘Upload Feeds…’ or ‘Download Feeds…’ command from the tools menu.

Upload and Download Feeds Option

No idea, why I haven’t seen this, yet. But this option finally allows my keep my online Blogroll up-to-date with a few mouse clicks.

Sync'ed blogrolls