Keep Calm and use WSL from VS Code

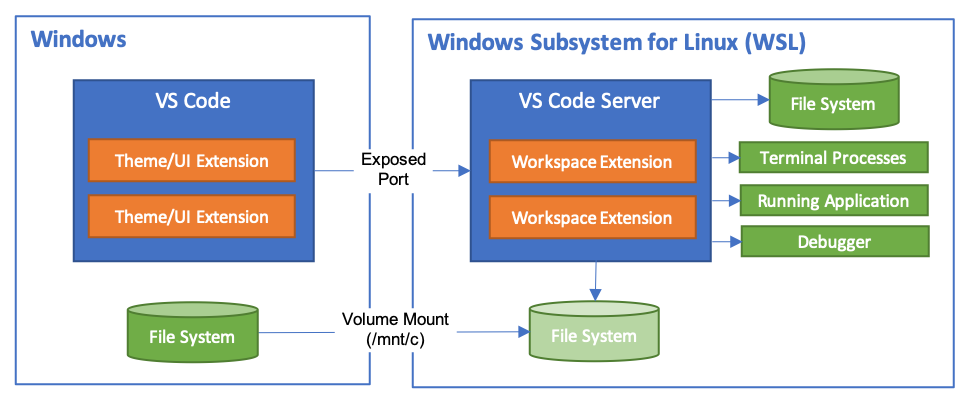
In case you did not know: You can use WSL (Windows Subsystem for Linux) as your shell in Visual Studio Code. This comes in very handy if you did mod the hell out of your WSL, as I did.

The Visual Studio Code Remote – WSL extension lets you use the Windows Subsystem for Linux (WSL) as your full-time development environment right from VS Code. You can develop in a Linux-based environment, use Linux-specific toolchains and utilities, and run and debug your Linux-based applications all from the comfort of Windows.

Link: https://docs.microsoft.com/windows/wsl

Powerline Fonts in Windows WSL

Just in case you like modding your environment as I do, you might end up as well in a situation where you SSH into a remote server or using WSL requiring Powerline Fonts. And just in case, if you are wondering what Powerline is? Here you go:

Powerline is a statusline plugin for vim, and provides statuslines and prompts for several other applications, including zsh, bash, tmux, IPython, Awesome and Qtile. 

The problem arises if your host system is Windows and you are using SSH and WSL a lot as I do.

Stanley Meng provides a condensed instruction set on how to get Powerline fonts on your Windows system up and running.

Once you installed the fonts, you can select them e.g. for WSL:

Update (2019-11-18)
While I was looking for the new Cascadia Code font providing Powerline glyphs, I was pointed to Delugia, which in fact is Cascadia Code extended with Powerline glyphs.

Powerline: https://github.com/powerline/powerline
Powerline on Windows: https://medium.com/@slmeng/how-to-install-powerline-fonts-in-windows-b2eedecace58
Bash on Ubuntu on WSL: https://medium.com/@jrcharney/bash-on-ubuntu-on-windows-the-almost-complete-set-up-1dd3cb89b794
Powerline Fonts: https://github.com/powerline/fonts
Delugia Font: https://github.com/adam7/delugia-code/releases

Automatically upgrading Ubuntu on WSL to the latest release

As I use multiple Windows machines, all running the identical setup of WSL (Ubunto) I wanted to keep all these instances automatically updated.

I am using Ansible scripts to set up the WSL. While all the files are hosted on the file system (\mtn\c\…) I can throw away a WSL instance and create a new one within minutes.

While many packages are not available on Ubunto 18.04 LTS, I created a small Ansible task upgrading my WSL to the latest Ubuntu version available.

  1. Start your WSL instance the very first time and run sudo apt-get update
  2. Install ansible by running sudo apt-get install ansible
  3. Make sure the Ansible scripts are located on the host system (e.g. c:\dev\…)
  4. Start your WSL instance and change e.g. to /mnt/c/dev
  5. Run your Ansible playbook as sudo

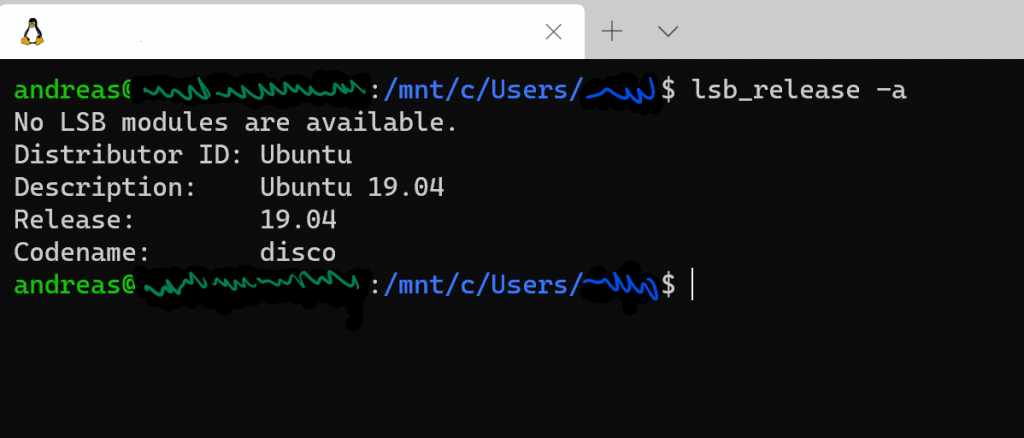
You can check your dist version with lsb_release -a:

No LSB modules are available.
Distributor ID: Ubuntu
Description:    Ubuntu 19.04
Release:        19.04
Codename:       disco

The Ansible tasks can be found here.

GitHub Gist: https://gist.github.com/aheil/6d48a77ac44c83e00666d3c49ffd7890

Change what Terminal to open in Windows Terminal (Preview)

While using Windows terminal (Preview) for quite some time, I always opened up the Terminal and then opened a second Tab with my WLS instance. Doing this multiple times a day, this ends up in many many unnecessary clicks.

To change the default behaviour open the Settings (can be found at the right drop-down arrow of the Terminal tabs).

This will open up the settings JSON file. Look up for the defaultProfile entry and search for the corresponding GUID (the string behind this setting) in your document.

Change the GUID in the defaultProfile to the one identifying your prefered terminal.

Save it, close the file and save a lot of clicks.

Windows 10 PowerToys

I loved PowerToys for Windows 95! Now they are back. To be found on GitHub. Available summer 2019.

PowerToys is a set of utilities for power users to tune and streamline their Windows experience for greater productivity.
Inspired by the Windows 95 era PowerToys project, this reboot provides power users with ways to squeeze more efficiency out of the Windows 10 shell and customize it for individual workflows. A great overview of the Windows 95 PowerToys can be found here.
The first preview of these utilities and corresponding source code will be released Summer 2019.

Link: https://github.com/Microsoft/PowerToys

Snip & Sketch

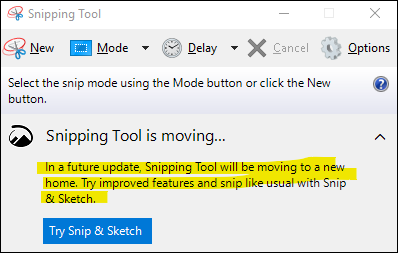
Right after I just writing about Windows Snipping Tool in my previous post, my Windows 10 notebook just surprised me by telling there will be something called Snip & Sketch in the future. Snipping Tool is moving dialog

It seems it has the same capabilities as Windows Snipping Toll while adding the possibility to annotate your screenshots directly using various pencil and sharing capabilities via Bluetooth and WiFi.

Snip & Sketch Toolbar

In case you don’t have Snip & Sketch on your Windows machine yet, you can download it from the Windows Store for free.

tl;dr

Windows Snipping Tool will be replaced by Snip & Sketch providing additional annotation capabilities.

Open Live Writer–Offline Blogging on Windows

While I worked with Microsoft, Windows LiveWriter was my favourite offline writing tool for blog posts. At one point Microsoft stopped supporting Live Writer in 2017 while the tool itself was not developed anymore since 2012. About that time I moved on to Apple and MarsEdit on macOS.

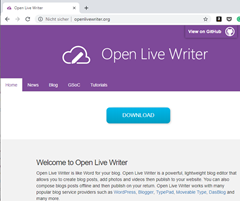
Therefore, I was very pleased when I found Open Live Writer while looking for blogging alternatives on Windows. OPen Live writer is a fork of Windows Live Writer with source code available under a MIT License on GitHub

Open Live Writer Homepage

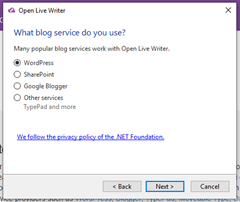
The installation file is just about 6 MB (indeed megabyte not gigabyte). It supports WordPress, SharePoint, Google Blogger and probably every other service with a proper blogging API.

Supported Blogging Services

Eventually, I set up my blog on Open Live Writer and this article became the very first article IO have written on a Windows machine for the past sever years.

tl;dr

Open Live Writer is a nice offline blogging tool for Windows, just in case you missed it like me.

Cannot connect to SMB shares on Windows 10

I recently set up a new Windows 10 machine. After eight years with only Apple devices, I finally wanted to fetch up with the PC and Windows world again.

For a day or two, I tried to connect my laptop to my NAS at home. I checked firewalls, credentials, server settings, usernames, network. I checked it double, triple, quadrupplewise. I tried almost any permutation. Eventually, I gave up.

The actual problem was, Windows 10 gave no feedback at all when trying to connect to a SMB (aka Sever Message Block Protocol) share on my server. All connection attempts just ended with a silent fail. In terms of user experience this is a violation of Grice’s maxims. Windows 10 simply chooses to opt out of the conversation.

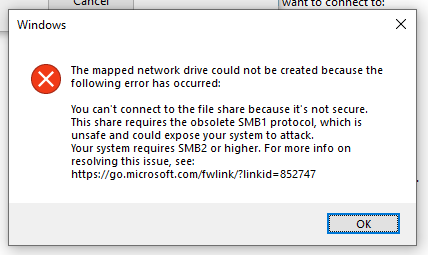
At a very last attempt, I tried the option to map a network drive. After entering user credentials again and again, finally Windows 10 came up the very first time with a useful error message.

Error while connecting SMB1 shares on Windows 10

This shares requires the obsolete SMB1 protocol…” is quite some information one can work with.

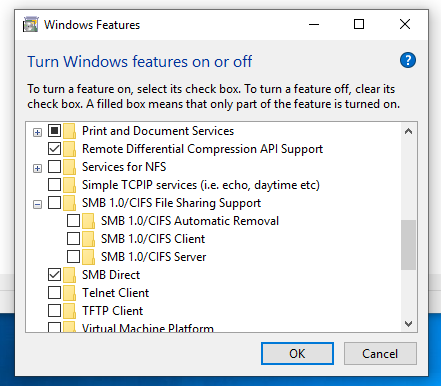
Enabling SMB1 turns out to be quite easy. Head to Turn Windows Features on or of and scroll down to SMB 1.0/CIFS File Sharing Support. There check SMA 1.0/CIFS Client to enable SMB1 support.

SMB 1.0/CIFS Support on Windows 10

Once done, connection to servers providing (only) SMB1 will work again on Windows 10.

Boot Camp Windows 8 – Me haz Drivers?

Works on my MachineYou own a MacBook Pro? You run Boot Camp? You run Mac and Windows? You want to upgrade to Windows 8 but you still hesitate because Apple has not released a new Boot Camp version supporting Windows 8? First of all: I did it. I have to admit, I haven’t spent a single though on drivers before I upgraded to Windows 8 – and still I just blog from Windows 8 on my MacBook Pro.

What happens when I upgrade?

If you upgrade, some devices will work some won’t.Even if the Microsoft Upgrade Assistant does not show any incompatibilities with any of the MacBook’s devices in its report, they probably won’t work.

Windows 8 Upgrade Assistant Report

After installing, Windows 8 will show various devices in the Devices list indicating, there are no drivers available. Other’s simply won’t be detected at all, e.g. Windows8 won’t be able to detect the MacBook Pro’s WiFi at all. Function key, keyboard backlight won’t work and the graphics chipset might reset the screen resolution between the MacBook’s native resolution and something about 800×600 from time to time.

Where to get the Windows 8 drivers for my MacBook Pro?

To solve the driver issues, you simply start the Boot Camp Assistant from your Mac OS and follow the instructions until you find yourself faced with the following dialog.
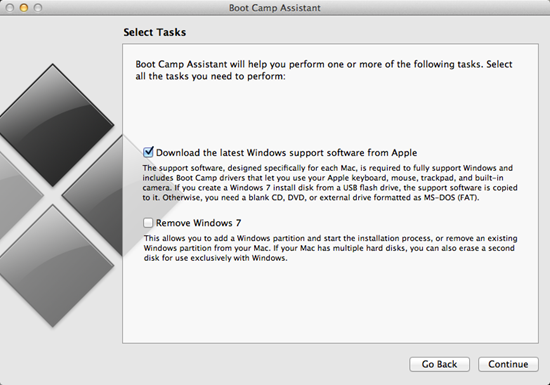
Boot Camp Assistant Task

Chose Download the latest Windows support software from Apple and continue. In the following step follow the on screen instructions either burning a DVD/CD or copying the files to a USB drive or any folder accessible from Windows (don’t drop the files to the Mac OS’s partition, though).

Will it blend work?

Restart Windows 8 and insert the disc, stick and select the setup.exe in the WindowsSupport folder. This will install a whole bunch of drivers.
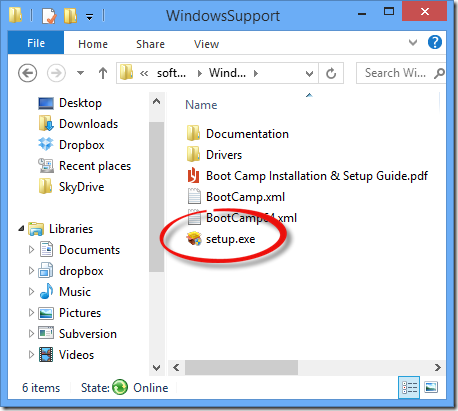
Boot Camp Windows Drivers

Based on Apple’s Boot Camp 4.0 FAQ , the Windows Support Files contain the following drivers

  • Apple Bluetooth
  • Apple Keyboard Support
  • Apple Remote Driver
  • Apple Trackpad
  • Atheros 802.11 Wireless
  • ATI Graphics
  • Boot Camp control panel for Microsoft Windows
  • Boot Camp System Task Notification item (System Tray)
  • Broadcom Wireless
  • Intel Chipset Software
  • Intel Integrated Graphics
  • iSight Camera
  • Marvel Yukon Ethernet
  • nVidia Graphics
  • Cirrus Logic Audio
  • Realtek Audio
  • SigmaTel Audio
  • Startup Disk control panel for Microsoft Windows

Once installed and the machine restarted, everything seems to work fine, the Windows Bluetooth and Boot Camp icons are shown in the notification area, light sensor, FaceTime camera and sound work perfectly and the graphics card runs smooth like butter.
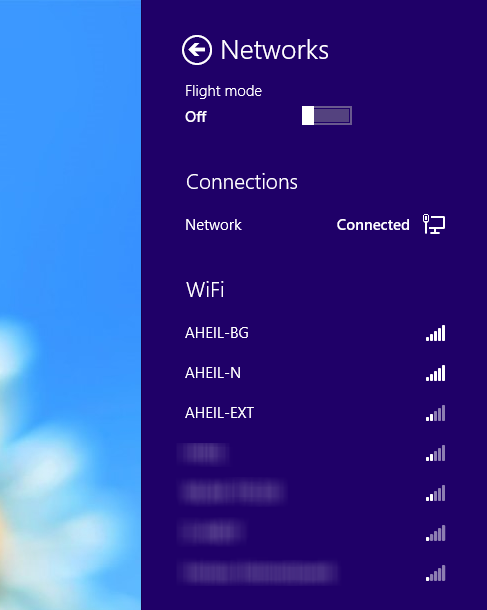
Windows Networks under Boot Camp

One last word on function keys – they won’t work out of the box. You have to start the Boot Camp Control Panel from the tray and switch to the Keyboard tab.There check the Use all F1, F2… box.
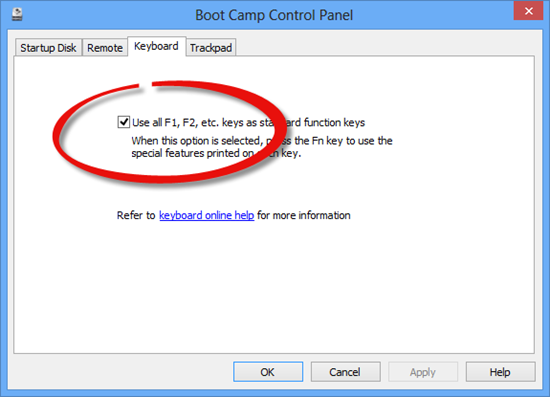
Boot Camp Control Panel

Windows 8 on the MacBook Pro is a great experience even without touch display and retina. Upgrading without checking for the drivers of course was a greenhorn mistake. However, I hoped (yes I know indeed, hope is not a strategy) during the inplace upgrade, Windows will keep the drivers. However, the fact that all drivers still work, clearly shows that the driver architecture from Windows 7 to Windows 8 did not change at all. That’s good as manufacturers do not need to update drivers in a hurry based on a new architecture, but on the other side it shows that there are not that many improvements how Windows deals with the hardware. But again, maybe this is not necessary at all.

Before you upgrade to Windows 8, run a backup! I did so using Acronis True Image 2013. Even without thinking about drivers, I was not sure whether the upgrade process with Boot Camp on the machine will maybe brick my box. Also run a backup of you Mac OS partition using Time Machine.

Said that kids, please bear in mind, that this worked fine on my machine, and might fail on yours. Also there is probably no support from Apple for Boot Camp 4.0 running Windows 8.

Because you’ve been so impatient with the Upgrade Assistant – How to get the Windows 8 ISO File

Windows 8 is there. Two days are gone and after waiting so long, you probably already purchased and downloaded Windows 8, as Microsoft came along with a time limited offer for a great price model, if you already have a PC running Windows XP, Vista or Windows 7

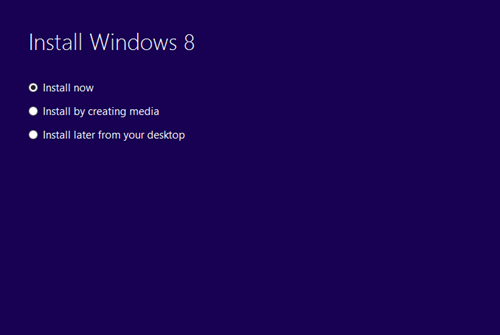
Once you run through the purchase process (they accept credit card or PayPal), at one point after the download finished, the Windows Upgrade Assistant comes up with the following dialog:Install Windows 8

Because you’ve waited for so long you are quite impatient and go straight  for the first option because you think you can create the media later one… If done so, the Upgrade Assistant will install Windows 8. Eventually, there won’t be any option to create the media later on.

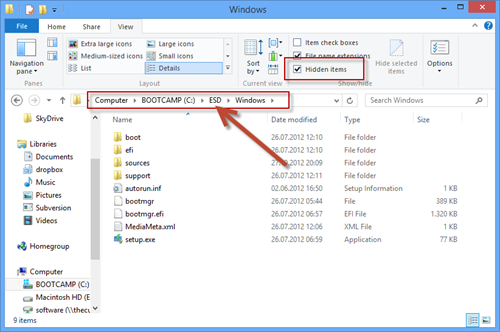
What now? If you just need the files, you can turn on hidden files in Windows Explorer (it’s now in the Ribbon). You will see a folder ESD on the root of your drive containing a Windows folder with the downloaded installation files. Go ahead and make a backup if required.

Hidden ESD Folder

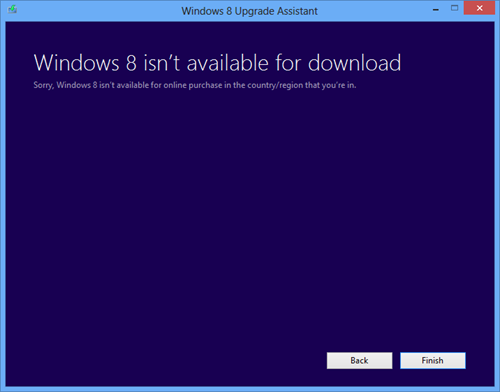
If you try to create an .iso file using the Upgrade Assistant again, you probably fail by getting the following result.

Windows 8 isn't available for download

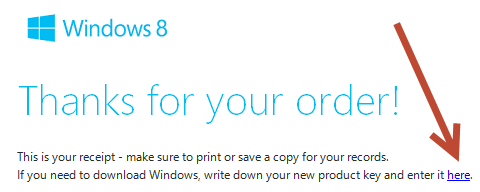
In case you still need (or just want) the .iso file, there is a way to obtain it. First of all, check your mail for the order confirmation of your Windows 8 copy. At the very top of the mail, you will find a link to download Windows again.

Thanks for your order

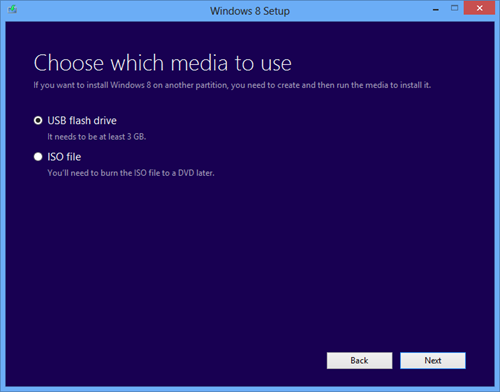
Following the link, you will download the Windows 8 Setup (windows8-setup.exe). Once started this will straight let you choose whether to install, download or to postpone the installation as seen above. Chose Install by creating a media and either choose to burn a DVD to to copy the files on a USB stick (3GB required, though).

Choose which media to use

You will be asked to choose the place where to save the .iso file, after which the download process starts immediately.

That’s all you have to do. Whether you have been impatient, clicked to fast, did not read carefully or just clicked ‘next’, ‘next’, ‘next’, there is still a way to get the .iso file afterwards.