Automated Housekeeping of your Twitter Footprint
As we discussed in our podcast, I am working on reducing my social media footprint. While I use Twitter quite a lot for communicating, it is almost not possible to find information on my Twitter feed once I am looking for it.
I was pointed to Amnesia, a small Python script using the Twitter API, deleting old tweets and likes. The goal is to run this housekeeping as automated as possible.
Setup
The setup is relatively simple:
- Use a Docker container hosting the script
- Run the script on a daily base
- Deploying the container automatically using Ansible
The Repository
Instead of cloning the repository locally and adding all files manually to the deployment process, we will clone the repository directly to be used by the container. Here we consider two aspects:
- We could clone the repository directly into the container. This will leave a minimal footprint on the host but would require to have Git in your container.
- We clone the repository to the file system of the host and bind it within the container.
The second aspect will be the source of the repository. If cloned directly from GitHub, it might appear convenient to clone the repository directly from the original master. That way you would always have an up to date version of the script. The drawback here is that you will probably not be aware of any (breaking) changes or malicious code introduced in the repository.
To avoid this, I created a fork of https://github.com/jmathai/amnesia and will use the forked and reviewed repository at https://github.com/aheil/amnesia instead for the deployment.
The Twitter API
Do use the Amnesia script you will need to sign up for a Twitter developer account.
This process might take 10 to 15 minutes as Twitter introduced a verification and review process. However, when using the personal or happy developer path you will probably end up in an automated enrollment process.
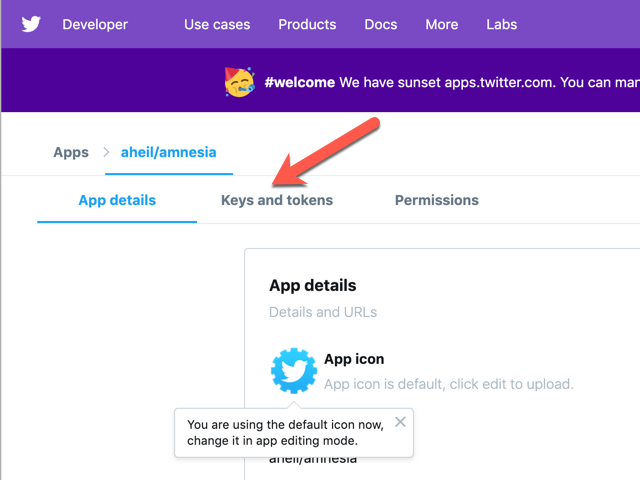
Once enrolled and logged in at the Twitter developer page, under our apps detail page at Keys and tokens you will find the information needed for the Amnesia script later on.
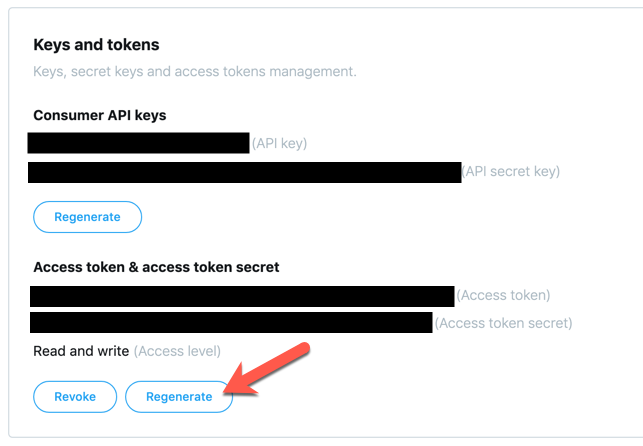
You probably need to click Generate once to obtain a valid access token ad access token secret for your app.
Scheduling the Script
Julien Dubreuil shows how to manage Docker containers using crontab. The pattern provided there can be adapted relatively easily for our needs.
Crontab
First of all, we generate a crontab file
* * 1 * * python /var/amnesia/amnesia.py >> /var/log/cron/cron.log 2>&1Make sure the file ends with a new line LF character (as required by POSIX systems). Otherwise, cron might end up in refusing to process your crontab file.
The crontab entry will cause the amnesia script to be executed once a day. Also, when executed all log entries will be added to the cron.log.
run-crond.sh
The second file we need is a shell script run-crond.sh to be executed later in the container.
#!/bin/sh
crond -L /var/log/cron/cron.log "$@" && tail -f /var/log/cron/cron.log
-L will cause crond to log into the file specified, $@ will pass additional parameters to the script (although we are not using any at the moment) and we will tail the log file so we see something in the container log.
The Docker Image
We will create a Docker image for the Amnesia script. Therefore, we have to prepare the Docker image, apply the setup steps for the script and set up the cron jobs specified before.
My first draft (probably not a perfect one) of the Dockerfile for the service looks currently like the following:
FROM alpineRUN apk --no-cache add bash python2 py-virtualenvRUN virtualenv venvRUN source venv/bin/activateCOPY repo/requirements.txt /requirements.txtRUN pip install -r /requirements.txtCOPY crontab /tmp/crontabRUN cat /tmp/crontab >> /etc/crontabs/rootCOPY run-crond.sh /run-crond.shRUN chmod -v +x /run-crond.shRUN mkdir -p /var/log/cron && touch /var/log/cron/cron.logCMD ["/run-crond.sh"]
First, we install the required packages (python2 and virtualenv) and go through the setup steps for the Amnesia script. Before running pip install I copy the requirements.txt file to be accessed in the container. Afterward all prerequisites for the script are installed. You don’t have to bother about the script itself, as it will be executed by the cron job specified above.
Similar to the requirements.txt file I copy our crontab file to be concatenated to the crontab file. To execute the script file specified before I copy this as well and make it executable.
After creating folders and files for logs the script can be started using the CMD command.
Ther might be better ways to set up the container, however, I have chosen a quite straightforward approach to get the first draft working quickly.
At this point, you could already build and run the container if you clone the Amnesia repository into a folder called repo.
The Secrets
Before we start creating the deployment scripts, we have to take care of our Twitter keys and secrets. I would not recommend to write them down in any configuration files in plain text. As we will use Ansible for the deployment, we can use Ansible Vault to encrypt the sensitive information on our local system. Keys will be then decrypted during the automated deployment process on the target system.
You end up with something similar to
> MacBook:$ ansible-vault encrypt_string h5fk43556jgGdfER4
> !vault |
>    $ANSIBLE_VAULT;1.1;AES256
>    54675433456436790545679876544567776u76535654563421000
>    38633933326565663731356524267653367632467654987654554
>    43072352520500023523523875275002035273528375235
You’ll do this with your consumer_key, consumer_secret, access_token and access_token_secret and add this into the corresponding Ansible files.
consumer_key: !vault |
    $ANSIBLE_VAULT;1.1;AES256
    54675433456436790545679876544567776u76535654563421000
    38633933326565663731356524267653367632467654987654554
    43072352520500023523523875275002035273528375235
We will use these keys later in the Ansible tasks e.g. when replacing lines in the configuration script:
line: " 'consumer_key': '{{ consumer_key }}',"When I started with Ansible, it took me quite a while to figure out how to store the encrypted data. The easiest way however is, to copy the encrypted string with all the whitespaces directly into your configuration files.
Automated Deploying
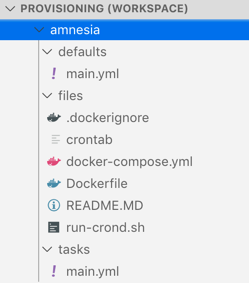
The final step is now to create your ansible script. I am using the recommended directory layout for ansible roles. Therefore, all files we have generated so far are located in a folder called files. The variables with encrypted secrets are located in a file main.yml in the folder defaults while the main.yml containing the script we are creating now lives in a folder called tasks.
The overall structure for this project looks like the following:
The Ansible Script
Usually, I start by creating the directories I need on the server
---- name: Make sure install directory is present
file:
path: "{{ amnesia_install_dir }}"
state: directory
tags:
- amnesia
The directory I use here is stored as variable in the main.yml file in my defaults folder as shown above. Each role on the server gets usually its own directory where I store all uploaded data.
amnesia_install_dir: /opt/amnesiaVery important to keep in mind: Everything in this folder will be overwritten bythe scripts and is autoamtically deployed or generated. Consequently, you shouldn’t store any persistant data in this folder. If this is the case, I use a different location on the server. However, this is nit necessary for this particular role.
- name: Copy the required filescopy:src: files/dest: "{{ amnesia_install_dir }}"force: yestags:- amnesia - name: Clone amnesia repo git: # Master GitHub Rpo: https://github.com/jmathai/amnesia # We use our own fork instead to avoid breaking changes repo: https://github.com/aheil/amnesia version: master dest: "{{ amnesia_install_dir }}/repo" clone: yes update: yes force: yes tags: - amnesia
We now copy everything from the local files director to the server. That’s the reason I also provide a .dockerignore file in this directory. Everything on the server not needed within the Docker image context can be excluded in this file. This will reduce your image’s footprint. Again, there are other (and maybe better) ways to do so, but this worked for my use case quite well.
In the second step, the GitHub repository (remember, the forked one) is cloned onto the server. As the repository is cloned into a folder called repo. That’s the reason the requirements.txt file was copied from this location in the Dockerfile.
- name: Copy files remote to remotecopy:src: "{{ amnesia_install_dir }}/repo/configs-sample.py"dest: "{{ amnesia_install_dir }}/repo/configs.py"remote_src: yestags:- amnesia#- name: turn on dry run# lineinfile:# path: "{{ amnesia_install_dir }}/repo/configs.py"# regex: "^\\s+'dry_run':"# line: " 'dry_run': True,"# state: present# tags:# - amnesia
Following the Amnesia instructions, we have to copy the configs-sample.py file for further configuration. Once the file is copied you can modify the settings using the lineinfile task in Ansible.
In the next few tasks, we finish the configuration by setting all the secrets and the duration of tweets. Once the script is executed, all the secrets will be encrypted and deployed on the server automatically.
- name: set Twitter consumer_keylineinfile:path: "{{ amnesia_install_dir }}/repo/configs.py"regex: "^\\s+'consumer_key':"line: " 'consumer_key': '{{ consumer_key }}',"state: presenttags:- amnesia - name: set Twitter consumer_secret lineinfile: path: "{{ amnesia_install_dir }}/repo/configs.py" regex: "^\\s+'consumer_secret':" line: " 'consumer_secret': '{{ consumer_secret }}'," state: present tags: - amnesia - name: set Twitter access_tokenlineinfile:path: "{{ amnesia_install_dir }}/repo/configs.py"regex: "^\\s+'access_token':"line: " 'access_token': '{{ access_token }}',"state: presenttags:- amnesia - name: set Twitter access_token_secretlineinfile:path: "{{ amnesia_install_dir }}/repo/configs.py"regex: "^\\s+'access_token_secret':"line: " 'access_token_secret': '{{ access_token_secret }}',"state: presenttags:- amnesia - name: set Twitter delete_after_dayslineinfile:path: "{{ amnesia_install_dir }}/repo/configs.py"regex: "^\\s+'delete_after_days':"line: " 'delete_after_days': 7,"state: presenttags:- amnesia
Compose
The very last task in the Ansible script is to create and start the containers.
- name: Start containerdocker_service:project_src: "{{ amnesia_install_dir }}"build: yesremove_orphans: yesstate: presentrestarted: yesregister: outputtags:- amnesia
To make this task succeed we need a docker-compose.yml file as below:
---version: '3' services:amnesia:container_name: amnesiabuild: .restart: alwaysvolumes:- ./repo:/var/amnesia
To make all the script above work we have to bin the directory repo on the host to /var/amnesia as this is used in the container several times to make the files accessible within the container. You can choose any other layout based on your preference, though.
Given you have a Ansible playbook and a host file, you now can deploy the service using
ansible-playbook playbook.yml -i hosts --tags amnesiaConclusion
It turned out to be one evening of work to get the container and script done. I had to do some research on some details as well but was able to base on some of my previous Ansible projects.
As long as the Twitter API is not changed (or the developer tokens have benn revoked), this is a quite nice solution to keep my Twitter footprint on a minimal level.
The usage of Docker and Ansible adds a not to undererstimated level of complexity to the overall solution. Without (i.e. you install and run the script on your host) the Amnesia script is installed within a few minutes. However, with the solution provided here, it can be deployed on any of your servers (locally, hosted, virtual etc.) again and again.