Time to Switch off SSLv3

You probably have heard of the SSL 3.0 vulnerability aka Poodle. So if you haven’t or if you have and haven’t done anything about it, it’s definitely time to switch it off.

I simply went though my browsers and turned it of, as nowadays it should not be used anymore. To check if your browser is vulnerable, just check out the Poddle Test. If it does look like below, follow the instructions to make it look different.

Poodle TestFirefox

In Firefox you simply type in

about:config

in the address bar of the browser. In the configurations settings you now need to set the value for security.tls.version.min to 1.

Firefox TLS 1
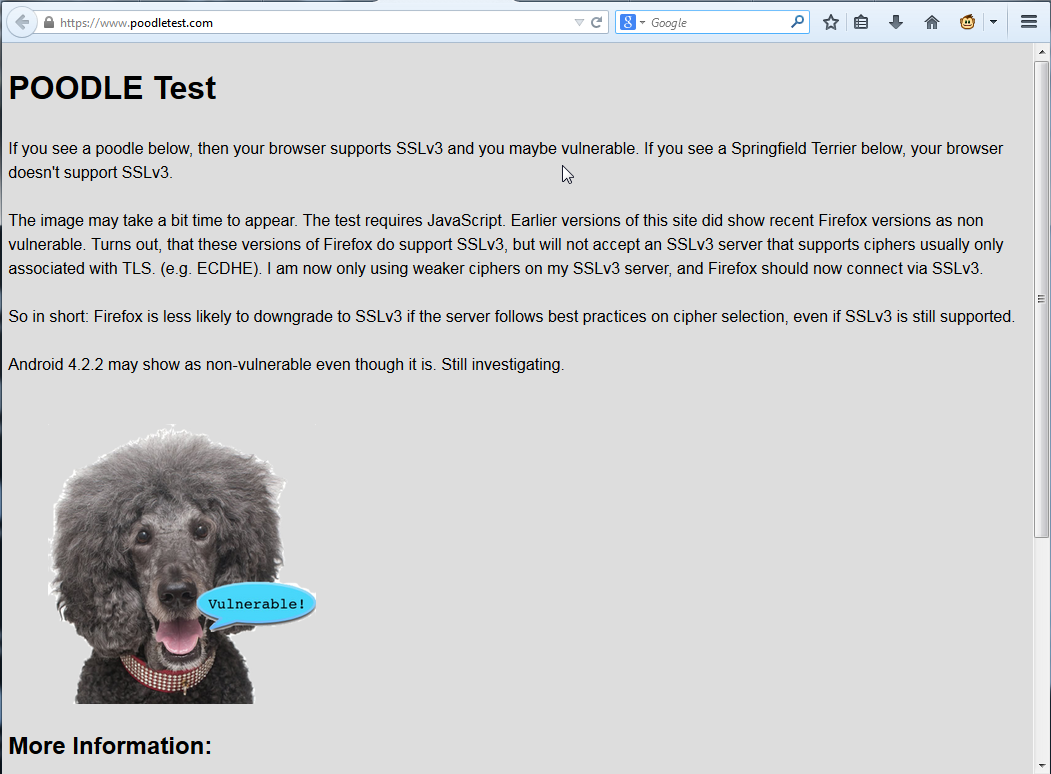
Once done, you should be safe, I was told. However, using Firefox ESR 31.1.1, the Poodle Test above still indicates vulnerability.
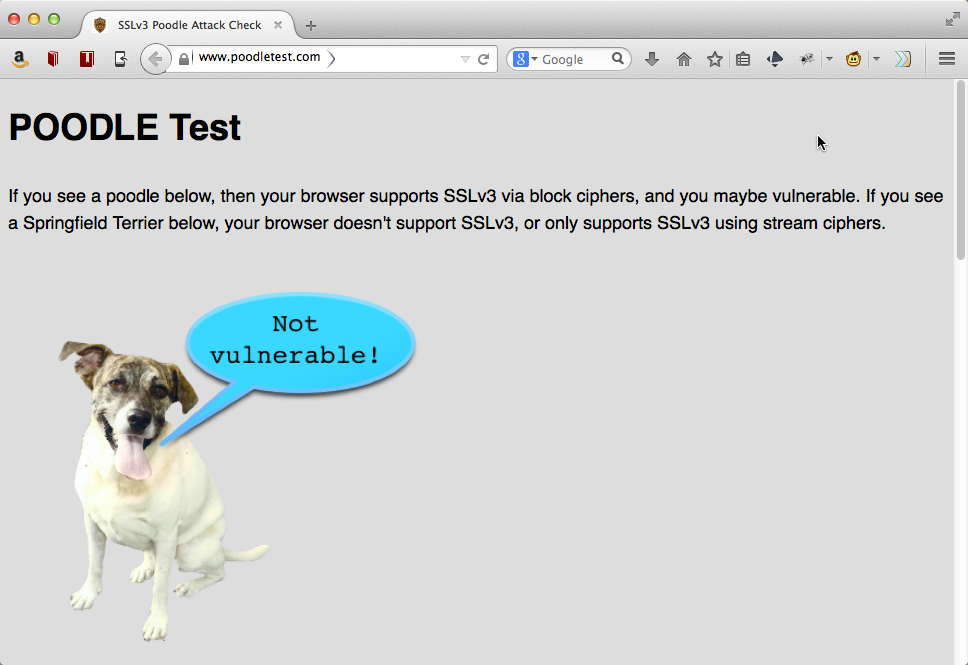
However, with version 32.0.3 on Mac OS X, setting the minimum TLS version works as a charme.

Poodle TestInternet Explorer

For IE, you should check out Microsoft Security Advisory 3009008 giving a workaround how to turn SSL 3.0 off.

Tools / Internet Options / Advanced got ot the Security category and uncheck Use SSL 3.0 and check Use TLS 1.0, Use TLS 1.1, and Use TLS 1.2.

IE TLS SettingsAgain this should at least give you the feeling of security.

Do not forget about your Crosscable when updating an EZControl XS1

No SEO friendly title in my mind, there was nothing better to describe tonight’s uproar while upgrading some part of my home automation environment.

I don’t always change a running system. But when I do, I break it for sure. And of course, when I change something, I always change literally everything at once.

While following some rules strictly during my work day, such as

  • never change a running system ,
  • change one thing at a time and
  • don’t use beta software in a production environment

I definitely forget about those rules once I am at home. Therefore, I fiddle around with my home WiFi for days, upgrading everything to IEEE 802.11n including a new full duplex repeater and new access points with exotic chipsets requiring very specific build of DD-WRT.

Still debugging slow pings, lags and randomly missing segments of my network, I also decided to upgrade my EZControl XS1 to the very latest available (beta) firmware.

Once I shut down the device in its bootloader mode, and tried to uploaded the latest firmware (via browser), the HTTP request failed and every single browser on any OS told me the page wasn’t able to be displayed. Once back to the bootloader, it told me the uploaded firmware check failed. Hitting the browsers refresh button did not help a lot either. That’s the way how you brick a $300 gadget in seconds like a boss.

Crossover CableAs anybody would do in such a moment, I dug into my box with long forgotten network cables and picked the very only crossover cable probably exiting within the range of two hours driving. Hail to me, still owning one.

No kidding, most of todays kids won’t even know such a thing did exist. Actually, it’s the sort of cable one used long time before wireless. Before the age of switches, routers and hubs at a time when one tried to connect to machines via ethernet directly.

Connected to the XS1 via the crossover cable, there is absolutely no problem uploading the firmware. When performing the same operation via wireless, there goes something wrong in layer 2 or 3 or maybe 4 – or not. We eventually will never know.
Next time you are going to upgrade the firmware of any device via network, keep your crosscable in reach, you are probably going to need it.
Next time, I won’t change a running system, always change one thing at a time and I will never use betas in production environment… I don’t think so.

openHAB EZControl Integration

For quite a time, I monitored the openHAB project. Eventually, I found some time to test it out and tried to set up some of my existing home automation hardware with openHAB.

Therefore, I decided to set up my EZControl XS1 as a very first testbed.

Learning it the Hard Way

Before digging into the details, I’d like to share some of my experience during my very first hours with openHAB.

First of all, the contributors (currently counting 38) have done a great job in documenting the project. Installation and configuration does work quite well. The same for the basic setup of the development environment (e.g. in the case you want to implement an own binding).

Unfortunately, there are many details you need to know to get the system up and running, not being offered at a glance. You have to dig into groups, the wiki, demo files and perform a lot of trying, experience a lot of frustrating errors. Once you figured out how it works, it is not hard to remember. Done once, some of the issues are that simple, that it is clear why they are not mentioned in the wiki at all. Unfortunately, if you haven’t dealt with openHAB before, you have to learn it the hard way.

Not to forget, here’s a list of sources you definitely need to check in case you stuck with your very first setup:

Definitely, do not miss the last one. Many of your questions will be answered in the examples wiki, though. Still, some details might be missing, but that’s the place to check first.

Said that, there’s no critics about the documentation. It’s great, you just see it’s written by those who implemented it. And as such, one sometimes forgets about the trivial bits and bytes one need to know to start.

Setting up the EZControl XS1

Most devices I run on my EZControl are sensors from the ELV FHZ 1×00 System and intertechno wireless receivers.

For my convenience, I uploaded the configuration app to my internal web server though.

XS1 Setup

For now, I am only interested in the sensors available at the sensors tab.

Sensors

Iwanted to be independent from the data structure to set up the XS1 with openHAB. Therefore, the only thing you need to know, is how you named the sensors, though.

Switches

Before starting, make sure the HTTP binding is installed as it is used both, for switches as well as for sensors.

To address switches, you can use the REST interface of the XS and address the switches directly, you simply need to know the number of the switch being used within the query parameters such as number=2 within your *.items configuration file..

Switch Switch_Balcony_gBalcony "Balkon" (gBalcony) {http=">[ON:GET:http://192.168.0.242/control?cmd=set_state_actuator&number=2&function=1] >[OFF:GET:http://192.168.0.242/control?cmd=set_state_actuator&number=2&function=2]" }

Sensors

Sensors can be fetched from the ES1 using HTTP binding as well. Therefore, I pick up the XML output from the ESZ, in my case provided at http://192.168.0.242/xml.

XS1 XML

To pick a corresponding value of a sensor, I’ve created a XSL transformation

<?xml version="1.0" encoding="UTF-8" standalone="no"?>
<xsl:stylesheet xmlns:xsl="http://www.w3.org/1999/XSL/Transform" version="1.0">
    <xsl:output indent="yes" method="xml" encoding="UTF-8" omit-xml-declaration="yes"/>
    <xsl:template match="/">
        <xsl:value-of select="xml/data/*[text()='Arbeitszimmer_Temp']/following-sibling::node()"/>
    </xsl:template>
</xsl:stylesheet>

The XSL is quite simple, picking up he value from the next node after the node with the given sensor name. That way, structural changes in the XS1 setup or even a replacement of a sensor do not affect the openHAB configuration.

Create a XSL for each sensor value, you plan to use within openHAB and place them into the transform folder under configurations in the openHAB folder structure.

XSLT Transformations

Again in the *.items configuration file, using the HTTP binding, I pick up the XML for each node and apply the transformation provided, resulting in a single value.

Number Temp_gOffice "Temperatur [%.1f °C]" (gOffice) { http="%lt;[http://192.168.0.242/xml:10000:XSLT(Arbeitszimmer_Temp.xsl)]"}
Number Hum_gOffice "Feuchtigkeit [%.1f %%]" (gOffice) { http="<[http://192.168.0.242/xml:10000:XSLT(Arbeitszimmer_Hum.xsl)]"}

While this works quite well, the XML is fetched from the XS1 for each value node. Looking forward for version 1.3 of openHAB, there is planned to provide a cache, so the XML would be fetched only once while the binding would fetch the data from the cache.

Sensor Values using the HTTP Binding

Done once, adding new sensors or switched using the XS1 takes just a few minutes. Changing the .*items configuration by adding new HTP bindings, copying and modifying the XSLT and adding of course adding the sensors and switches to the XS1.

Hack-The-Planet Architectural Draft

After prototyping quite a lot, I finally came up with a simple architectural draft of the software for the first version of my home automation project.

As this is a 10,000 feet view, I do not bother about the technical details for right now. I thought of two main components TheWeb and TheHub.

Architectural Draft

TheHub would be the one application, collecting data all the time from an arbitrary number of local sensors and controlling various actuators. At the same time it would push data to TheWeb to make it accessible to the outer space. I have thought of pros and cons about a push, a pull or even a pub/sub mechanism. For now pushing data will be much easier. Also, as this won’t be my main interface for interacting with the environment, there is no need to be up to date by the second.

The second component, TheWeb, will be a REST-architectural style Web service I will push the data from TheHub to, and which will provide data to the actual Web application. Also, the service will chat with various external services out there in the wild.

I was recently asked which notation I am using to draw my sketches: It’s called WebComposotion Architectur Model or simply WAM. It’s quite a simple notation for outlining architectural designs and dependencies in distributed and federated systems which include organizational boundaries. There is a series of publications, introducing the concepts behind WAM (my my book deals quite a lot with WAM as well):

In a nutshell, it is supposed to be a very easy to draw language to communicate architectural decisions. Maybe that’s something for another post, though.

With this basic design, I am ready to come up with some bits soon.

Hack-The-Hub Prototype

These days, I ordered the first bunch of hardware for my recent home automation project. However, beside all the sensors and actors I want to put into my home, I also would like to monitor and control as much devices as possible. Therefore, I came up with a little prototype to check whether some of my devices are online or not.

Candidates for my prototype where my

  • Thecus N4200PRO  (NAS)
  • Lexmark Optra S 1255 (LAN-enabled laser printer)
  • Canon PIXMA MG3150 (WLAN enabled inkjet printer/scanner)

My first thought was about using a tool such as Icinga for monitoring purposes. The tool is open source, well supported and used by many IT Pros in large companies. Icinga is based on NAGIOS, providing a REST API and a AddOn mechanism. However, the overhead to learn everything from the scratch was to much.

For now, I just wanted a prototype to verify whether my ideas work or not or if there are maybe any showstoppers.

While implementing the prototype, programmatically checking the availability using a simple ping was quite easy as the NAS and the laser printer both use a static IP address. However, the Wi-Fi-enabled inkjet printer uses dynamic assigned IP addresses from the DHCP server.

For the inkjet printer, only the MAC address is known. Chris Pietschmann wrote quite a nice post how to wrap arp.exe in a small .NET class, though.

For those not familiar with ARP, ARP is the acronym for Ethernet Address Resolution Protocol and was originally specified in the RFC 826arp.exe is a small Windows command line tool, allowing you to view the address translation tables.

“Displays and modifies the IP-to-Physical address translation tables used by address resolution protocol (ARP).”

Based on this, I wrote a small client capable of checking whether any device talking over TCP/IP is available or not if either the IP or the MAC is known.

Hack-The-Hub Prototype

A Pi’s Home

A few weeks ago, I ordered my very personal Raspberry Pi. I ordered mine with element14 from the UK. Actually element14 is Farnell, which in turn is well known in the UK. In fact, we ordered many times with Farnell during my time at Microsoft Research in Cambridge when we needed sensors and stuff for our projects.

The Case

I also picked a case for 6 Euro from RS Components which is available in white, black and sort of transparent plastic.

Raspberry Pi and Case

The board firs perfectly into the case, even with a little bit of fiddling. To fit the board into the bottom part of the case you need to bend the circuit board quite a bit so it moves under the clips.

Fitted Board

At bottom side the case provides quite good rubber stands with a quite good friction. Even with all the cables in the Raspberry Pi, the case should be relatively stable – considering the weight.

Raspberry Pi Case Bottom

Once assembled, the case look pretty nice – all ports and slots easily accessible.

Assembled Raspberry Pi Case

Still working through the Raspberry Pi’s possibilities, it now looks at least much more like  something you can put on your desk.

Initiating Hacking The Planet

After several years spending time (including writing a book) in the field of intelligent environments, ubiquitous and pervasive computing, I decided to brings some digital life in our home. As winter is coming, I am looking forward to finally start some home automation project called Hack The Planet.

The project itself has two goals, at first it should be fun. Being a computer scientist, geek, nerd, developer gadgeteer this is obvious. Second, I want to document how to deal with a project, abut the artifacts, the process, pans, restrictions, chances and threats hat might occur. In this article, I am going to discuss the very first thoughts of this project as part of the project initiation.

First of all there needs to be a vision. I am not talking about the business case, yet, just a very first vision statement.

“For me and my family, I want to set up our home in a way, I can remotely monitor and control most of the electronic and mechanical devices any time during the day, at any place where I am currently located as long as I have a decent internet access.”

Let’s have a look and revise this vision so it passes Moore’s elevator test:

“For me and my family who want to monitor and control our home remotely, Hack The Planet is a home automation system that is easy to use and extensible. Unlike available off the shelf products our product integrates hard- and software components from various vendors and can be easily extended with new techologies.”

That’s basically a very broad statement, however, for the near future this will lead the direction. I have seen many projects failing, because of the project management keeping the vision under any circumstances.

Second, I invested several hours if the project as I have it in mind is feasible at all wich is a major constraint. Are the devices I have roughly in mind available as off the shelf components, will they be within the project budget (i.e. can I afford them?), can I connect/hack the available hardware, are the serious technologies compatible or can I at least connect them in any way?

Beside creating a business case, drilling down the vision into scopes should be the next step before continuing with the project.

Project Initiation