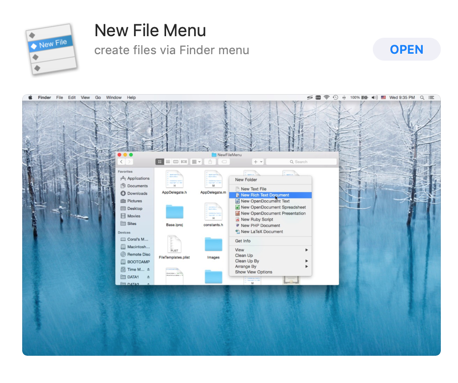
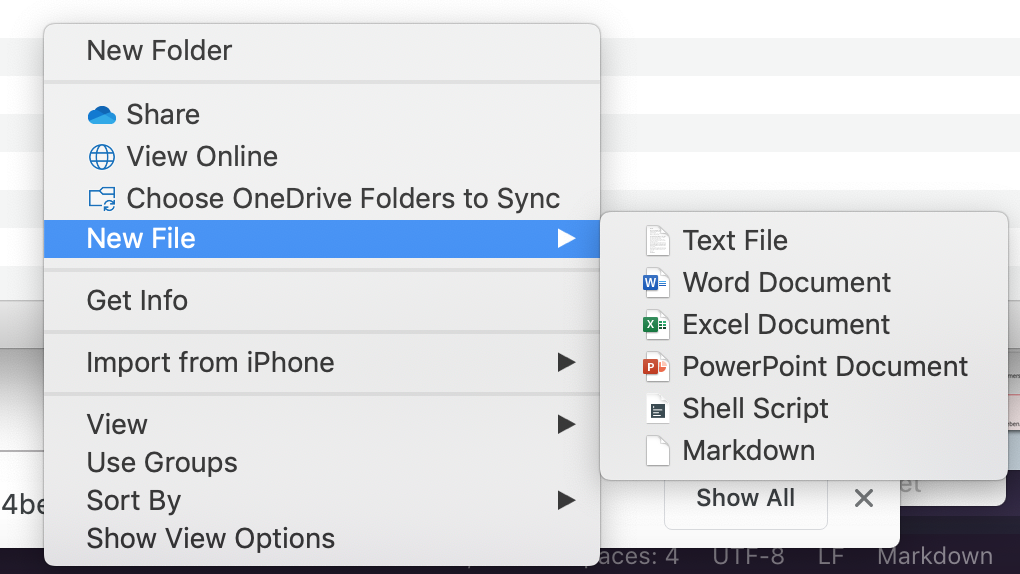
There is one step working with macOS driving me mad: to create a new document you either have to do it manually in the terminal or from within an application such as Microsoft Excel. However, to create documents not withing the application was one of the features being introduced with the Xerox Star in the 1980s. This was a fundamental change for workflows moving away from application-centric towards document-centric thinking of workflows. Actually, this is one of the few features I do really like on Windows – likewise, I miss it on macOS.
New File Menu from the app store fixes this issue in macOS. There are various tools out there as well as many guidelines on how to fiddle with you macOS to get this done. But this is a very simple and quite cheap out-of-the-box solution.
After using the free version for a while, supporting only one kind of files, I finally bought the full version. You can add additional file types by providing your own templates and tweak some of the settings.
App Store Link: https://apps.apple.com/de/app/new-file-menu/id1064959555?l=en&mt=12
There are literally no good reasons to start Visual Studio Code on macOS with leveraged rights. Applications on macOS are not designed to run sudoed in general. If you would do so, this can have unintended sided effects. So much for the disclaimer.
If you want to start Visual Studio Code on macOS sudoed, just run
If you master your Terminal it always looks like you are a superhero. Therefore, I always try to present a lot using terminal during my lecture, just to provide some smoke and mirrors.
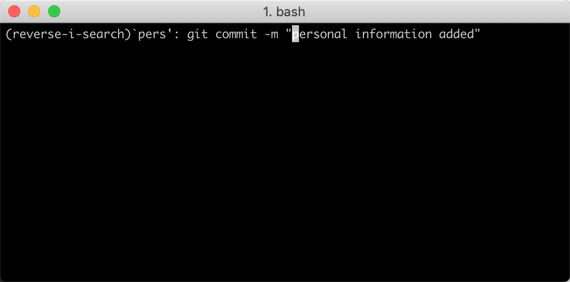
However, I am far away from mastering Terminal truly. Therefore, it comes in handy that one of my students pointed me to reverse-i-search which is available on Terminal.
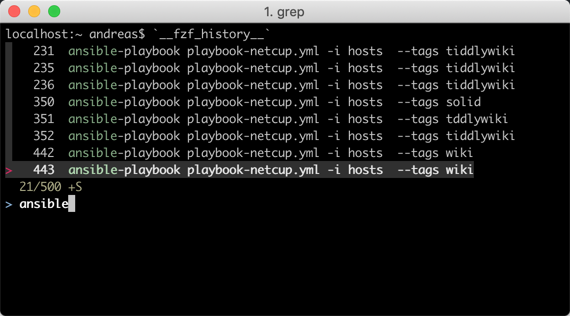
Wich this reverse lookup you can search through previous commands used in Terminal before. While this is an awesome feature you can activate by control-r on macOS, it does not allow you to search for similar commands used before. It always shows just exact matches of what you typed.
To search through similar typed commands, you can use fzf, a command-line fuzzy finder available at GitHub.
It’s an interactive Unix filter for command-line that can be used with any list; files, command history, processes, hostnames, bookmarks, git commits, etc.
Installing on macOS using Homebrew
For your convenience you can install fzf using Homebrew using the command
brew install fzf
For me, the bash integration was not available after the installation. After some investigation (I might haven’t read the instruction well enough), I realized the installation script needs to be run:
/usr/local/opt/fzf/install
Eventually, the installation routines put [ -f ~/.fzf.bash ] && source ~/.fzf.bash into .bashrc. I run into this issue some time before. Reading through this article on Scripting OS X might give you an idea why it does not run.
When you open a terminal application, it does not ask for login. You will just get a command prompt. In other versions of Unix or Linux, this will not run the .bash_profile but a different file .bashrc. The underlying idea is that the .bash_profile should be run only once when you login, and the .bashrc for every new interactive shell.
However, Terminal.app on macOS, does not follow this convention. When Terminal.app opens a new window, it will run .bash_profile. Not, as users familiar with other Unix systems would expect, .bashrc.
Moving the line mentioned above into .bash_profile and deleting .bashrc eventually solved the issue. After restarting Terminal the key bindings CTRL-R and CTRL-T have been available as expected.
With this little trick the installations of fzf works quite well on macOS X Mojave.
tl;dr
Use reverse-i-search by pressing control-r on macOS to search previous commands typed in Terminal. In addition, you can use fzf, a command-line fuzzy finder to find similar commands and all other kinds of stuff.
To install run
brew install fzf
/usr/local/opt/fzf/install
copy [ -f ~/.fzf.bash ] && source ~/.fzf.bash from .bashrc into ~/.bash_profile (and remove .bashrc if not needed) or source .basrc from .bash_profile
Since WordPress cam up with the new editor, actually, writing does not spark fun anymore. Actually, I do not know why I do not like the new editor. Therefore, I recalled MarsEdit, which I used quite some time ago.
I am still not disappointed by the editor. Connection the WorPress installation worked like a charm. Looks like I can start writing blog articles again in a “traditional” manner.
Said that, this is going to be the first article written with MarsEdit for a long time.
If you are connecting a lot from via SSH to remote servers, entering passphrases over and over might be a pain. As long as your hardware is secured, you might consider enabling the macOS keychain also for your SSH connections.
Go to ~/.ssh and open or create the config file. Now just enter the following entry to the file.
Host *
    UseKeychain yes
In the case you want to enable the keychain only for a certain server, simply replace * with your hostname such as foo.com.
Prior to macOS Sierra, macOS offered a dialog to enter the passphrase where you were able to select the passphrase to be remembered. For some reason, this dialog was removed. On the other hand, the keychain option has been introduced with macOS 10.12.2.