As you might now, I use Pretzel as the source for music during my streams. What you probably don’t know, for whatever reason, the player windows seem to disappear from time to time without any possibility to get it back on any of my screens.
Pretzl App Window as it should be
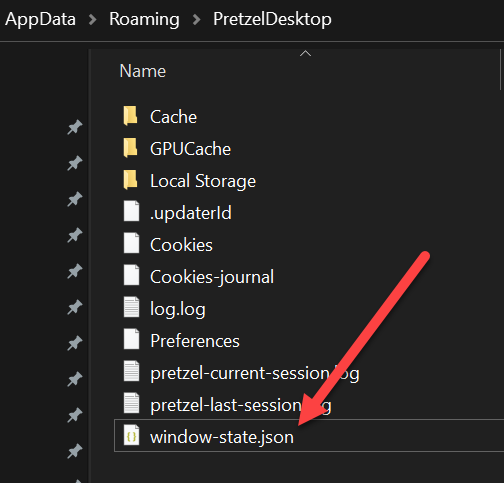
Actually, there is no way to get the window back on your screen(s). The easiest way to restore the default windows position is to jump into %APPDATA%/PretzelDesktop where you delete the window-state.json file.
This one has to go…
Make sure Pretzel is closed while deleting the JSON-file. Once you start Pretzel App again, it should reset its position.
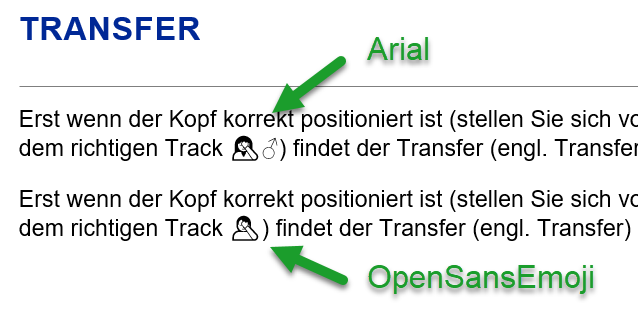
It is a font made of three other fonts, providing all most of the emojis you need.
This is basically a mashup font which consists of three fonts. The aim of OpenSansEmoji is to include the whole iOS (currently 6.1) Emoji set while keeping the file size as low as possible. Most of the symbols listed on the “Emoji” Wikipedia page are supported. All symbols are in monochrome.
Also, it is licensed under Apache 2.0 and therefore free to use.
A problem you might have as well: how to turn off the screen of your laptop without changing the battery settings and without using any tools? Probably using a hotkey? Did you realize, this is not part of Windows at all?
Basically, here is the batch file you have to create for it. Yes, someone wrote a batch file for this. Create a shortcut to the batch file, assign a hotkey and be happy. You also can download the batch file from TechNet. Works on my machine (with Windows 10).
powershell (Add-Type '[DllImport(\"user32.dll\")]^public static extern int SendMessage(int hWnd, int hMsg, int wParam, int lParam);' -Name a -Pas)::SendMessage(-1,0x0112,0xF170,2)
During today’s recording of our podcast, I talked about not getting the glow effect for the SynthWave’84 theme working. Right after doing so, I figured out how to solve the issue.
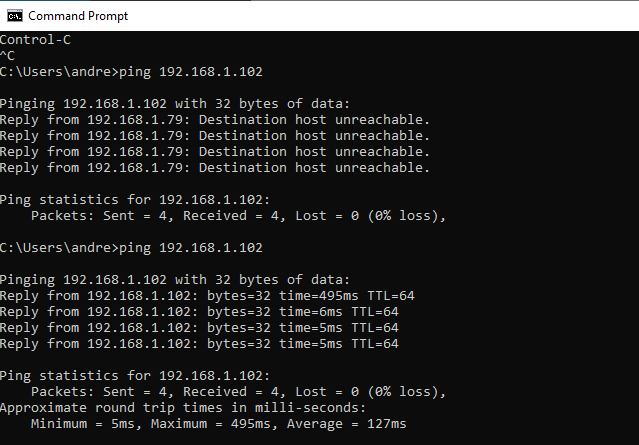
It run me mad, as I tried to change the IP address of my Raspberry to a static one. I changed literally everything in /etc/network/interfaces and reloaded, restarted and reboot the device over and over.
As the above configuration did not help a lot, I figured out that based on the Raspberry model, you need to change settings on various places.
First run
cat /proc/cpuinfo
to determine you model. While getting something like
pi@raspberrypi:~ $ cat /proc/cpuinfo
processor    : 0
model name    : ARMv6-compatible processor rev 7 (v6l)
BogoMIPS    : 2.00
Features    : half thumb fastmult vfp edsp java tls
CPU implementer    : 0x41
CPU architecture: 7
CPU variant    : 0x0
CPU part    : 0xb76
CPU revision    : 7

Hardware    : BCM2708
Revision    : 0004
Serial        : 000000004715b608
you need to use the hardware revision and
Model and Pi Revision
256MB
Hardware Revision Code from cpuinfo
Model B Revision 1.0
256MB
0002
Model B Revision 1.0 + ECN0001 (no fuses, D14 removed)
256MB
0003
Model B Revision 2.0
Mounting holes
256MB
0004
0005
0006
Model A
Mounting holes
256MB
0007
0008
0009
Model B Revision 2.0
Mounting holes
512MB
000d
000e
000f
Model B+
512MB
0010
Compute Module
512MB
0011
Model A+
256MB
0012
Pi 2 Model B
1GB
a01041 (Sony, UK)
a21041 (Embest, China)
PiZero
512MB
900092
Based on this information you need
Model a
Static IP addresses in /etc/network/interfaces is not the “prefered” way,as it is an old way and DHCPCD5 is installed.
Model b
Static IP addresses are configured in the /etc/dhcpcd.conf and it is required that /etc/network/interfaces is set to manually.
There are literally no good reasons to start Visual Studio Code on macOS with leveraged rights. Applications on macOS are not designed to run sudoed in general. If you would do so, this can have unintended sided effects. So much for the disclaimer.
If you want to start Visual Studio Code on macOS sudoed, just run
Recently, I was in the need of retrieving the favicon.ico file from a website. As I had to process the file programmatically and render it on a website, it would have been quite a lot of manual work to get the .ico file and make sure the browser does render it in the correct way. After digging around, I learned about a secret URI probably provided once by Google’s social bookmarking service Google Shared Stuff. While Google Shared Stuff was launched in 2007, it was already discontinued in 2009. However, this one URI seems to work perfectly maybe because it is still used within Google extensively.
The Secret
To get the favicon.ico file from any arbitrary page you simply have to use an URI using the following pattern:
Eventually, this URI will provide you the following image:
How it Works
Some More examples to see how it works:
Facebook
TechChrunch
aheil blog
Google
dotnetpro Magazine
heise.de
Google+
As most of the sites do keep their favicon.ico file right in the root of the web site, others like Google don’t. Actually, you might find Google’s plus icon located at
While this is probably not a problem retrieving the favicon.ico file using the standard URI at all, the secret URI provides one major advantage: you’ll get the icon as a nice 16×16 PNG file, ready to be rendered in any <img> tag right away.
I am probably the last person in the .NET community who figured out how to disable the Visual Studio 2012 Metro design upper case menus. I haven’t had a chance to work a lot with Dev11 yet, so I was not bothered too much by the new design. After working a couple of hours with the new IDE, I was quite annoyed by the new upper case menus.
It seems that Richard Blanks was the first who figured out how to disable the upper case menus in VS 2012, looking nice and capitalized.
As I love to do things automatically when possible and hate to fiddle with the Registry Editor, I set up the registry key to change in a small script. Just rename it to .reg and double click the file.
Windows Registry Editor Version 5.00
[HKEY_CURRENT_USER\Software\Microsoft\VisualStudio\11.0\General]
"SuppressUppercaseConversion"=dword:1
If you create the file manually, keep mind to save it in ANSI encoding, as Unicode scripts are not merged at all.
Windows Live Writer dürfte auf der Windows Plattform derzeit eines der beliebtesten Blogging-Tools sein. Mit Anbindung an die meisten Blogging-Plattformen und zahlreichen Plug-Ins lässt das Tool kaum wünsche offen. Allerdings ist bisher keine deutsche Rechtschreibprüfung vorhanden. Anstelle dessen konnten unterschiedlichste English-Derivate (es gibt eben Englisch und Englisch) ausgewählt werden. Die Möglichkeit die deutsche Rechtschreibkorrektur zu aktivieren oder eine zusätzliche Sprache hinzuzufügen fehlt bisher gänzlich.
Die Lösung ist recht jedoch einfach. Vorausgesetz auf der betreffenden Maschine ist Office 2010 (32-bit) mit deutscher Rechtschreibkorrektur installiert. Ein Blick in den Ordner