Quickstart with AWStats and IIS 7

AWStats is a free, Perl-based analyzer for log files. To get results quickly on a Windows Server 2008 with IIS 7 you only have to follow a few steps. These are not well documented in the AWStats documentation and require some time of research. This post will show you how to set up AWStats with IIS7 in only a few minutes.

  1. Install Perl, e.g. ActivePerl. There are 32-bit and 64-bit versions available. Make sure that Perl is added to your PATH environmental variable. The ActivePerl installer usually provides this option during the installation.
  2. Install AWStats. Remember the path AWStats is installed. Paths used below are based on the installation folder of AWStats. In this example we use c:awstats.
  3. Run the configuration script at c:\awstatstoolsawstats_configration.pl. Follow the on screen instructions. This will create a default configuration file in c:\awstatswwwrootcgi-bin e.g. called awstats.www.example.org.config. The site name www.example.org depends on whatever site name was provided while running the script. When asked for the Apache Web server path type in none.AWStats Configuration File
  4. Open the configuration file awstats.www.example.org.config with any text editor of your choice.
  5. AWStats already supports IIS, however, it is required to tweak the config file. First change the entry for LogFile. Log files for IIS might be found at c:inetpublogsLogFilesW3SVCNNN where NNN is a different number for each web site, IIS creates log files for. Change the entry toLogFile=”c:awstatstoolslogresolvemerge.pl c:inetpublogsLogFilesW3SVC1*.log |”

    This will merge all log files for a site provided by IIS. Adjust the paths corresponding to your installations and desired log file folders.

  6. The AWStats configuration file offers the possibility to set the LogFormat to IIS (LogFormat=2), however, the log entries provided by a standard installation of IIS 7 won’t match. The AWStats documentation recommends to change the settings of IIS. The change will take effect only after restarting the Web site and is only valid for entries after that particular moment. Consequently, this is not an option if you are going to analyze the logs of the last 12 months where the original settings were used. To make AWStats work with the standard log format of IIS 7 change the LogFormattoLogFormat=”%time2 %other %method %url %other %query %other %host %other %code % %other %other %bytesd”
  7. Change SiteDomain and HostAliases to meet the settings of your site.
  8. Change to c:awstatswwwrootcgi-binand runawstats.pl -config=www.example.org

    This will build the statistics database for AWStats.

  9. To create output runawstats.pl -config=www.example.org –output –staticlinks > …example_org_stats.html
  10. Not that example_org_stats.html is created one folder up. In case you do miss this, the output will not work correctly until you adapt the entries for DirCgi and DirIcons in the configuration file.
  11. The output file is now located in c:awstatswwwroot. You might want to create a Virtual Directory or set up a Web site to view the reports via the Web or your Intranet.AWStats Output

Repeat steps 3-7 fore each site you want to create reports for. Repeat step 8 and 9 every time you want to create a new report.
External Applications in MWPSK

My Web Page Starter Kit is a lightweight content management system, entirely written in ASP.NET 2.0. It comes with a wide range of components that can be easily arranged and set up. However, it seems there is no possibility to include external application into the navigation structure of MWPSK.

In the following example you will learn how to integrate a application using the URI http://blog.example.org into a website using MWPSK at http://www.example.org.

Log into the site and navigate to select Administration / Pages and Navigation. Select New Page to create a new

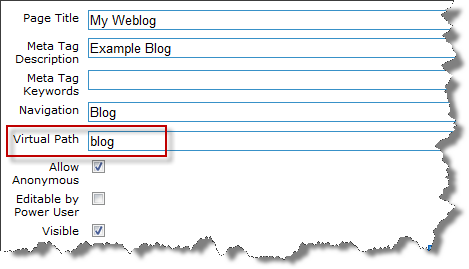
My Web Page Starer Kit - New Page

Choose a virtual path such as blog. This will allow you to use a new URI in the form of http://www.example.org/blog.aspx.

Now open the global.asax file located in the root folder of your MWPSK installation and add the following method.

void Application_BeginRequest(object sender, EventArgs e)
{
    if (HttpContext.Current.Request.Url.ToString().ToLower().Contains
         ("www.example.org/blog.aspx"))
    {
        HttpContext.Current.Response.Status = "301 Moved Permanently";
        HttpContext.Current.Response.AddHeader("Location",
            Request.Url.ToString().ToLower().Replace(
                "www.example.org/blog.aspx",
                "blog.example.org/"));
    }
}

This will cause an URL rewrite of the HTTP-request, which is then sent to the external application at http://blog.example.org.

Broken VMware Workstation Network Adapter

After upgrading Windows Vista to Windows 7 you might encounter an issue with VMware Workstation and its network adapter.

VMware Workstation Error Message


When setting up a NAT or bridged network connection in VMware Workstation it shows a message telling

The virtual network drivers on the host are incompatible with the installed VMware application. Expected version 5. Please reinstall the product. Failed to connect virtual device Ethernet0.

Make sure all your virtual machines are powered off and quit VMware Workstation. Open a command shell as administrator and follow the steps below.

First cd %windir%system32drivers, check for the file vmnetadapter.sys, right-click it, select Details and check its version. It should be 4.0.2.0. If the file is not there,

cd “%ProgramFiles(x86)%VMwareVMware Workstation”

rundll32 setupapi,InstallHinfSection VMnetAdapter1.Install 128 %CD%netadapter.inf

vnetlib — install devices

This will install the required adapters and devices. Do again a cd %windir%system32drivers and check for the First cd %windir%system32drivers, check for the file vmnetadapter.sys file.

vmnetadapter.sys

After a reboot of the host system, the NAT settings for the VMware network adapters should work again. Switching to bridged mode will probably result in another message.

VMware Workstation Error Message

Reason for the message saying

The network bridge on device VMnet0 is not running. The virtual machine will not be able to communicate with the host or with other machines on your network.
Failed to connect virtual device Ethernet0.

might be the missing VMware Bridge Protocol on the according host network adapter.

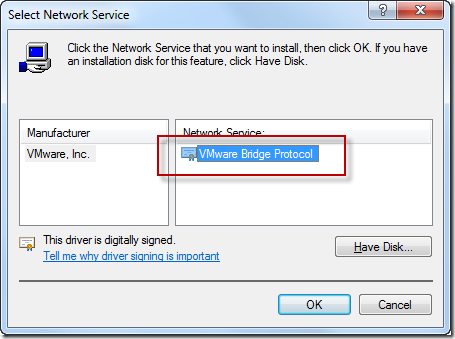
Got to Network and Sharing Center and select Change adapter settings. Choose the network connection you want to use with your VMware network adapter, right-click, select Properties, Install, Service and finally Add. This will allow you to select the VMware Bridge Protocol. In case the entry is not listed, select Have Disk… and navigate to %ProgramFiles(x86)%VMwareVMware Workstation.

VMware Bridge Protocol

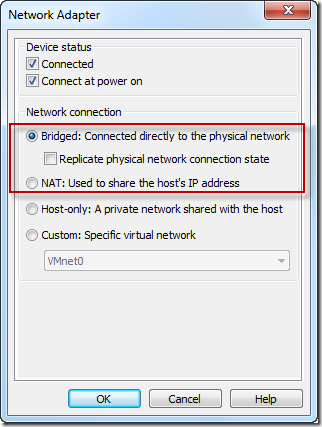
After installing the VMware Bridge Protocol restart the VMware Workstation and choose the bridged mode for the network adapter.

VMware Network Adapter