The Ultimate Windows Server 2003 Media Hack

Doh, if you are going to use your Windows Server 2003 as a streaming server for your Xbox 360, you might be in trouble. For a while I went with a rather sophisticated solution, running a Windows XP Media Center within a Virtual Server on my Windows Server 2003. The solution is not the desired one and as Windows Media Center and the Media Center Extender within Xbox 360 have some trouble in streaming h.264 encoded movies files, I had to dig a bit deeper.

Before you go one, please be aware of the following disclaimer:

The following is given under a “works on my machine” premise. The proposed approach is based on my very personal attempts and comes a”as is”. If you try to attempt the following steps, you do it on your own risk. It is not supported by Microsoft, and hey, in case you brick your box don’t expect any support from Microsoft. Don’t blame it to me either as you did it on your own risk, but let me know as it could be fun, tough.

There are several ways to share media with your Xbox 360. The easiest ways is to check out http://www.xbox.com/pcsetup/. After determining your OS, you will be guided through the best way to share media. Bad luck if you work on a Windows Server 2003, though. Not supported, you will be told.

The easiest way is to share media over Windows Media Player 11. Windows Server 2003 comes with Windows Media Player 10. But as we know the core of Windows Server 2003 is somehow Windows XP and therefore there must be away to install WMP 11 on Windows Server 2003. If you google for it, you will come along a dozen hacks and workarounds and most of them won’t work.  Recently, this guy called C:Amie posted some awesome hack C:Amie provided a new link to install Windows Media player 11 on Windows Server 2003. If you have time, go through it, if you are in a hurry, do it that way:

  1. Make sure your box is fully patched and Service Pack 2 is installed.
  2. Download Windows the Windows Media Player 11 installer for Windows XP.
  3. Download the automatic installer from C:Amie’s website.
  4. Run the automatic installer and extract it to any folder on your Windows Server 2003 box.
  5. Copy the previously downloaded wmp11-windowsxp-x86-enu.exe into the same directory.
  6. Go to the folder and run the INSTALL.CMD file.
  7. Follow the onscreen instructions.INSTALLER.CMDThe script creates a temporary folder on your C: drive called C:wmp11. There you have to change the compatibility mode of two files to Windows XP. Go to C:wmp11update1. and right click the update.exe file. Chose the Compatibility tab and check the Compatibility mode for Windows XP. Make the same for the update.exe file in c:wmp11update2.
    update.exe Properties Dialog
  8. Now go back to the command line window and press a key to continue and the simply wait.
  9. The software updater wills start after some time and after some more time you will end up with the UPnP for Windows Server 2003 dialog.UPnP for Windows Server 2003
    Check the Universal Plug and Play checkbox and select Next and then Finish.
  10. If everything went well, you will end up with Windows Media Player 11 on a Windows Server 2003. Hurray.Everything OK

But you remember that we want to stream h.264 encoded files to our Xbox 360, right? The good news is that Windows 7 will support h.264 natively. The bad news is that we work on a Windows Server 2003 right now.  With some work however, we can teach our Windows Server 2003 also to deal with h.264 encoded .mp4 files. All we have to do is to install some codecs and to apply some registry hacks.

  1. For the sake of simplicity, I took the K-Lite Mega Codec pack. It took the mega pack instead of the standard pack because Dirty Harry is using a .44 and not a .375. This might be reason enough.
  2. During installation select Profile 2. It’s the default profile without the players (you remember we want to stream anyway). Feel free to experiment with other profiles and custom settings.K-Lite Mega Codec Pack Setup Dialog
  3. When you come along the Select Additional Task step, don’t forget to scroll down and to check Make thumbnail generation possible for the following types. This will create the thumbnails in the Windows explorer and within the Windows Media Player 11.
    K-Lite Mega Code Pack Setup Dialog - Additional Tasks

At this point your Windows Media Player can play h.264 encoded files but your server is still not capable to share any kind of .mp4 files. They won’t show up in the folders monitored by Media Player until we apply some tweaks to the registry.

On my crusade I came along two registry patches. It seems that they did not work for everybody, however, nobody tried on Windows Server 2003. It worked for me after I installed bot
h of them.

  1. Download the first registry patch, rename to .reg and install it.
  2. Download the second registry patch, rename to .reg and install it.
  3. Reboot to apply the registry changes.

Now, out Windows Server 2003 is capable to stream h.264 encoded media files. The previous patches will now cause that Windows Media Player 11 will add all kinds of .mp4 or .m4a files within the monitored folders. Adding these folders to be streamed is straight forward.

  1. Go to  Libary /Add to Library…Windows Media Player 11 - Library Menu
  2. Add all kinds of folders that should be streamed to your Xbox 360. The media types will be organized automatically, so movies, music files and images will be shown in the corresponding tabs in the NXE.Add to Library Dialog
  3. In some rare cases (and I know what I am talking about as I encountered this rare case) all your mp4 files won’t show up in the movie folders. In this case select Library / Other and check if the files are shown there.Windows Media Player 11 - Other  MediaIf you find all your files here, something went terrible wrong with your media library. Calm down, there is a easy workaround (FWIW: if you already share media, stop sharing as the following won’t work).Go to C:Documents and Settings[YouProfileName]Local SettingsApplication DataMicrosoft and delete the Media Player folder. This will wipe out the whole media library for this computer. Restart from 1. and everything should be green now.Media Player Library

Now, where everything is nicely organized, indexed and monitored, we are ready to share our media with the Xbox 360.

  1. Turn on your Xbox 360.No kidding, you won’t be able to turn on sharing if the 360 is not on at that point of time.
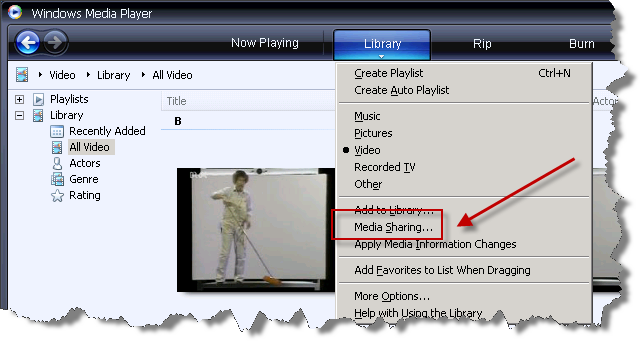
  2. Go to Library / Media Sharing…Media Sharing
  3. Now it’s straight forward:a) Check Share my media to b) Select your Xbox 360c) Click AllowMedia Sharing Dialog
  4. Finally, don’t forget to check out the Customize button which will open a dialog for some more fine tuning (what kinds of media to share, what ratings to share, etc.)

Now got to your Xbox 360 and enjoy your h.264 streamed media.

There are a few point’s I haven’t found out how to resolve, yet.

  1. The registry hacks don’t include .mkv file extensions. Also both hacks could be combined into one. I simply haven’t spend time in this yet.
  2. The 360 won’t show any thumbnails for the h.264 encoded files. Not sure if this is related to the XNE or the Media Player. This might worth some more investigation.
  3. The 360 does not show the length of the media file. It does so for .avi files, so this might be automatically answered once 2. is answered.

f.lux Compensator

Not really a productivity tool, but apparently some tool that makes working all day long on the screen much more convenient.

“f.lux makes your computer screen look like the room you’re in, all the time. When the sun sets, it makes your computer look like your indoor lights. In the morning, it makes things look like sunlight again”

f.lux adjusts the color temperature of your display to the time of the day. It ranges from 6500 Kelvin during daylight to 3400 Kelvin during the night. Give it a try, downloads are available for Windows XP/Vista, Mac OS X and Linux (glibc6).

f.lux

ZoomIt

ZoomIt (by Mark Russinovich), a classic tool for presenting. Quite lightweight with few but good options. The zoom capability allows you to zoom into the area of the screen where the mouse points to. The draw and type capability allows to draw and type on your screen. Way cool if you are using a Tablet PC, though. Finally, the Break function is a countdown. Nice for speakers this one comes with a few nifty functions such as playing a sound and displaying a custom background image.

ZoomIt

And no, it’s not a tool only for evangelists giving talks in large lecture theaters. It also comes quite handy in meetings and presentations within the team and in front of customers.

Engineering Windows 7

Jon DeVaan and Steven Sinofsky, both senior managers for the upcoming Windows 7, are hosting a blog called Engineering Windows 7, inviting everybody to comment about the future development of the new Windows platform. Actually, they only request to follow a few guidelines that however should be self-evident following a certain netiquette.

“We’re excited about this blog. As active bloggers on Microsoft’s intranet we are both looking forward to turning our attention and blogging energies towards the community outside Microsoft. We know the ins and outs of blogging and expect to have fun, provide great information, and also make a few mistakes. We know we’ll misspeak or what we say will be heard differently than we intended. We’re not worried. All we ask is that we have a dialog based on mutual respect and the shared goal of making a great release of Windows 7.”

Got Root #3

In this article I provide the final steps how to virtualize a Windows Server 2008 installation.

Install Windows Server 2008

You probably run into the same problem that Windows Server 2008 won’t be able to recognize the virtual hard disk you have planned to installed it on. Get the corresponding SCSI drivers as floppy image from the VMware site. Select the image and connect the drive.

Mounted SCSI Drivers

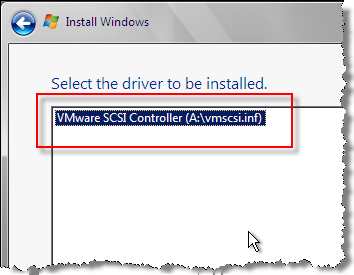
Now say ‘Browse‘ and choose drive ‘A:‘ – don’t forget: After selecting the .flp image you also have to connect the drive. Otherwise Windows cannot read the device.

VMware SCSI Drivers

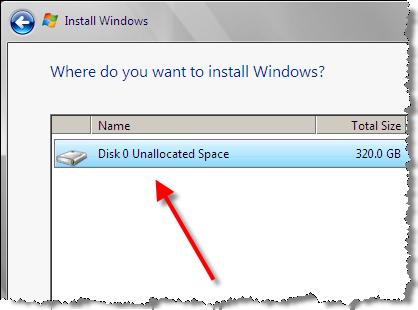
Click on ‘Next‘ and after a few seconds the hard disk will be found. The currently available drivers for Windows Server 2003 seem to work fine also for Windows Server 2008.

Virtual HDD for Windows Server 2008

Installing the VMware Tools might be a good idea. You can find the image at /usr/lib/vmware/isoimages/windows.iso or just install them from the VMware management console’s menu. While the image is mounted go to ‘Device Manager‘ and install the drivers for the network adapter which probably does not work yet.

Installed Network Drivers

Got Root #2

In a previous post, I told about he first steps in virtualizing a Windows Server 2008. In this article I describe how to proceed after, the request for my own RIPE subnet was approved. Now I can concentrate on the next point: Installing VMware. Since I want to set up this machine for visualization, I have to perform a few steps first. That way, this post will be mostly about my fight with Debian Linux which is the host system.

After logging in, I just realize that updating the package database might be not the worst idea. Consequently, I do so and install some Norton Commander like tool for real men

apt-get update
apt-get install mc

This actually makes things much easier.

Now, I have to activate IP forwarding in /etc/sysctl.conf by the adding

net.ipv4.ip_forward=1

and bringing the additional IP on the host system by adding

up ip add 192.168.1.1/29 dev eth0

to /etc/network/interfaces. Additionally, I have to add some host-route (by using my gateway 192.168.0.1) so my new subnet is reachable by adding

pointopoint 192.168.0.1 

to eth0 in /etc/network/interfaces. Installing iproute by a

apt-get install iproute 

restarting the interface by calling

/etc/init.d/network restart

finally makes my IP ping-able. Quite a fight so far if you don’t do this on a regular base. Additionally I installed the powersave package and reconfigured several settings to increase the performance in /etc/powersave.

I just got the tip to put my virtual machines to the separate disc. Since I have one spare 400GB disc. I have to create some partition and to format it.

cfdisk /dev/sdb mkfs -t ext3 /dev/sdb1

Let’s create some directory for the virtual machines and mount the disc

mkdir VMs
mount -t ext3 /dev/sdb1 /Vms

Now some final tweak at /etc/fstab by adding

/dev/sdb1 /VMs et3 defaults 0 0 

and I am done.

Finally I start installing the VM. I was pointed to some German How-To written by Till Brehm which is includes quite detailed instructions.

Some prerequisites are required before I start. I do the required 220 MB update by

apt-get install linux-headers-`uname -r` libx11-6 libx11-dev x-window-system-core x-window-system xspecs libxtst6 psmisc build-essential

VMware can be downloaded from http://www.vmware.com/download/server/. I skip the management console since I will use it on my Windows workstation and focus only on the server and management interface binaries using:

wget http://download3.vmware.com/... tar xvz VMware-server-*.tar.gz cd vmware-server-distrib ./vmware-install.pl

Now, I simply accept the defaults for the following installation. only at one point I had to tell the script that my virtual machines will be located at /VMs. No I have to continuing with the management interface

tar xvfz VMware-mui-*.tar.gz
cd vmware-mui-distrib
./vmware-install.pl

The Web-based management interface seems to work perfectly after installing.

VMware Management Interface

After installing the management console on Windows I run into some trouble. During compilation of the corresponding modules, the VMware script was not able to start the inetd service. Therefore, I was not able to connect to the VMware server. After restarting the service manually it worked perfectly and I set up my virtual machine.

VMware Management Console

Now, I have to copy the installation files for the Windows Server 2008.


Got Root #1

Today, I finally got my root server. this article will be the first one in a series of articles showing how to virtualize a Windows Server 2008 on a remote system.

Got Root

My very first action was to request a new RIPE subnet. Unlike in your private LAN, you cannot simply assign randomly some IP to any machine. Nothing else I can do until the subnet is assigned.

Vista Flickr Uploader

Vista Flickr Uploader is a small tool, I found at CodePlex to quickly push a whole bunch of pictures to your Flickr account.

Vista Flickr Uploader

Pros: Allows you to select a whole bunch of images at once, allows to assign the images to a previously created set and remembers the folder you picked pictures from the last time.

Cons: Takes some time to start since it validates the verifies application requirements every time, does not allow you to create title or description of the photos and finally the code is under LGLP – no way that I touch it.

Nice, but some room for improvements.

Windows Search 4.0 Preview

Nick White recently announced the Windows Search 4.0 Preview. The description of the Remote Index Discovery seems to be promising.

The first positive improvement after the installation I realized is a ‘Pause’ button at the ‘Indexing options’. A tray icon, for convenient pausing the indexing, as I did know from the early versions of MSN Desktop Search or Microsoft Research’s Stuff I’ve Seen, is not provided.

WS4 Indexing Options

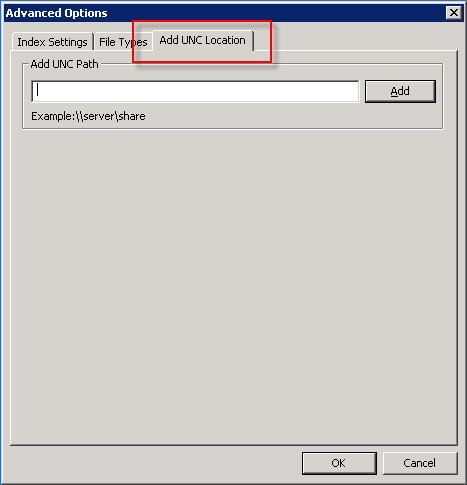
On the Windows Server 2003 installation, I find a tab at the ‘Advanced Options’ allowing me to add UNC locations. Since I had no Desktop Search running on my server before I am not sure if this is some new feature.

WS4 Advanced Option at Windows Server 2K3

So far, I haven’t found anything about the Remote Index Discovery, yet. However, I will follow up the development of the Desktop Search in the future.