Restoring NT Backups using Windows 7

After a recent data loss, I had to restore several backups from various sources. Unfortunately, some of these backups were made on a Windows Server 2003 machine. However, it seems that Windows 7 does not come with any possibility to restore these backups out of the box, though.

The Windows NT Backup – Restore Utility seems to be the solution for this issue. During installation you might get the notification to turn on Removable Storage Management – on Windows Vista.

Enable Removable Storage Management Dialog

However, this is one of the features not available in Windows 7 anymore. Fortunately, Microsoft did release another version of this tool for Windows 7. Even the tool itself is now called Windows NT Backup Restore Utility for Windows 7 and for Windows Server 2008 R2 you will find it only as Update for Windows 7 x64-based Systems (KB974674) on the Web – of course this would be the exactly what you are going to look for, yes?

Once downloaded the right bits and installed, you will see the familiar UI of the former backup tool.

Windows NT Backup Restore Utility for Windows 7 and for Windows Server 2008 R2

Simply follow the Restore Wizard to access your old backups.

DropBox with TrueCrypt on Lion and Windows

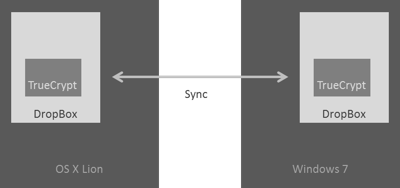
After receiving my new MacBook, I wanted to sync a whole set of files between both systems. For convenience, I decided to use DropBox instead of a thumb drive and for security reasons, I decided to use TrueCrypt to encrypt some of my confidential data within the DropBox folders.

Using a TrueCrypt container within DropBox is quite convenient as I am syncing my DropBox folders with various machines (e.g. at work). However, I do not want to access these file there nor do I want that an admin might check out my “oooh so secret” files (not saying they would, though).

DroppBox with TrueCrypt on Lion and Windows

With my rusty Mac OS kung-fu, I had to install TrueCrypt first. Of course, this failed and being the first app I did install on Lion, this was somewhat demotivating. Before you have install a version from MACFuse. It seems that the official version is not up to date, however, there are rumors you might use the latest version provided at Tuxera.com.

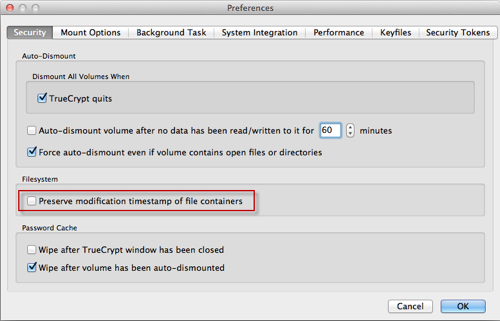
Once MACFuse and TrueCrypt are set up and the machine is rebooted, create a TrueCrypt container within DropBox. When creating on OS X Lion, you might want choose FAT for the containers file system so you can mount it on the Windows system as well. However, any change within this container will synchronize the container as a whole. Not being very efficient if this is a 256 MB file, it seems that one can turn of the timestamp of the TrueCrypt container to avoid syncing it. This will prevent that the container gets synced after files within the container are changes, however, the itself files are still updated. To turn it of, open TrueCrypt and select Settings / Preferences… chose the Security tab and uncheck the Preserve modifications timestamp of file container checkbox.

TrueCrypt Settings on OS X Lion

Of course, the same has to be done on your Windows system.

TrueCrypt Settings on Windows 7

Once both settings are applied, only the initial sync of the container will take some time. Thereafter, only the files within the container are updated. for me this seems to be a quite good solution to keep my boxes in sync and to avoid rubbernecks seeking through my private stuff. The setup is done quite easily, only the hassle with MACFuse was quite annoying.

The GPHWStatus Hack for the WWAN 5520 on a Dell D830

I just got a new (old) WWAN 5520 3G/UMTS card/modem for my Dell D830. Eventually, the card did not work out of the box without a hack. In the following  I will show what you need to do, if you want to get the card running in your Dell D830 (or maybe also any other older Dell Latitude or XPS machines).

WWAN 5520 First you need the card of course. Your Dell Latitude D830 (and many other older Dells) already has an empty slot for this card. Opening the cover (i.e. removing the keyboard) will reveal the slot for the card on the lower left of the case. The antenna cables should be already there, probably with a small protection on their end. It took me a few moments to realize which cable to plug where. One is marked white and the other is marked black, and the connectors show a large white and black arrow (actually, this was so obvious that I haven’t realized this right away).

Plug it in, close the lid and turn the computer on again (hopefully you did shut it down before). After starting Windows (if you read this blog you know we area talking about Windows 7 64-bit), Windows Update will take over – or at least it will try and glorious fail in finding any drivers.

Driver Software Installation

Never give up, never surrender as we are talking about Dell here. And as I learned recently about the missing touchpad driver, there might be a driver for everything else as well. Once again we go for a 64-bit driver for Windows Vista. In this case the Wireless Mobile Broadband MiniCard driver for Windows Vista 64-bit will do the job.

SNAGHTML7fabea

At Dell’s download site for communication drivers, there is a whole bunch of carrier specific drivers (Vodafone, Cingular, Telus and other carriers, I have never heard about before). It is not related to any carrier, so ignore anything with a carrier name in it.  Just to be sure, the driver we are looking for here is R159896.EXE.

The SIM card lives directly in the battery slot as you can see at Dell’s D830 Service Manual. Make sure the cut off corner goes the correct orientation and if you are using a contact (pay monthly) card, make sure the card is protected by a PIN. The battery slot is not secured, and if you don’t watch your laptop all the time… well, you never know. Maybe worth to know, the SIM in your Dell does not support hot-swapping, i.e. unlike e.g. the iPhone 3GS, you have to shut down your laptop before you insert the card.

Once built in, installed and inserted every bits and pieces, the Dell Mobile Broadband Card Utility will let you know:

No Service
SIM Not Found – Check Orientation

No, don’t turn off the laptop again, the orientation probably is right. There is a (not so obvious) solution to that.
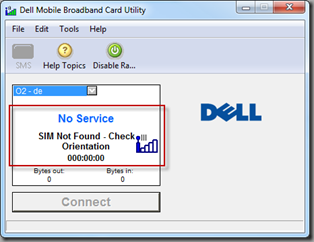
No Service

Start the Registry Editor (regedit.exe) and navigate to

ComputerHK_LOKAL_MACHINESOFTWAREWow6432NodeNovatel WirelessNextGenCommon

and change GPSHWStatus to 1. This means, the GPS chip on the card gets activated. For whatever reason, the chip is deactivated by the Dell drivers by default. However, if you activate the GPS chip, the entire card will be activated. It might be interesting to dig a bit deeper here, but for now it’s enough to know that it works.

GPSHWStatus Hack

Either reboot, or just quite and start the Broadband Card Utility again.
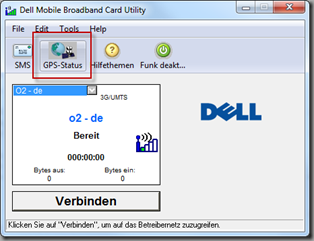
GPS-Status

By applying this GPHWStatus hack, not only the 3G card/model will now work, also the GPS hardware will be enabled and should available from the tool.

Dell D830 – The Missing Touchpad Driver

Since moving forward to Windows 7 x64 on my Dell Latitude D830, I had to live with the default behavior of the Touchpad and Pointing Stick of the D830 as there are no 64-bit drivers for Windows 7.

Finally, I found the right drivers for my system. You can pick it up at the Dell drivers and download page for the Dell Latitude D430. The is no explicit Windows 7 driver, however, the 64-bit driver for Windows Vista worked fine for me.

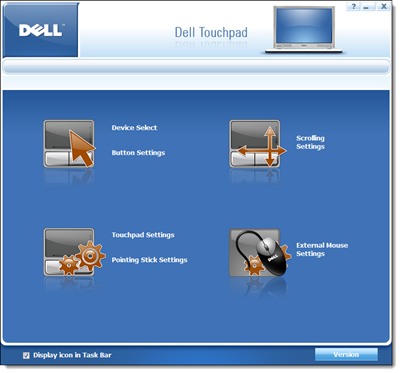
Dell Touchpad on D830 with  Windows 7 x64

To make sure you oick up the right driver, the file name is R157047. The driver gives you full access to the Touchpad and Pointing Stick functionality, including the click feature of the stick.

R157047.exe - 64-bit Driver working on Windows 7

Download: Drivers & Downloads for Latitude D430

Cleaning Up the Explorer ‘New’ Menu

If you are using your Windows machine for a while, it is inevitable that you install a whole bunch of Software. Especially a developer machine might end up with a lot of application and tools, you use for work or evaluation. This is the first article in a series of steps how to clean up your Windows machine, and to optimize your personal workflow.

Some tool that come with support for a particular file extension might extend the Windows Explorer ‘New’ sub menu. In my case I currently ended up with about 20 entries, while I regularly use only two or three of them. Most if them I barely touch. To minimize noise and to speed up your personal workflow you might want to get rid of some of them and renaming others. E.g. all Office documents are usually prefixed with ‘Microsoft’ while you might just want to see them as ‘Word Document’  or ‘Excel Document’.

Insert New Menu


To modify these entries, you eventually would use the Registry Editor. Each entry is located in the registry using its own key at:

HKEY_CLASSES_ROOT.[fileExtension]ShellNew

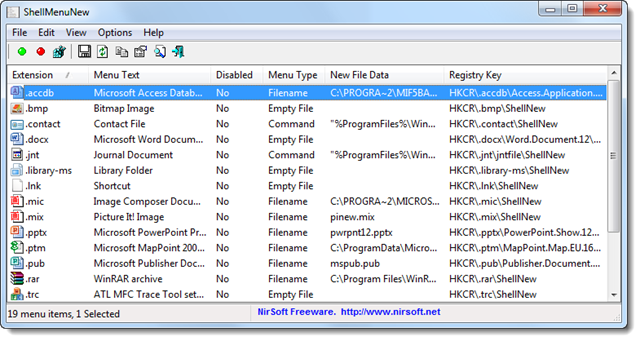
However, maintaining this list is rather time-consuming task and no fun at all.  After some investigation I found a very nice freeware tool called ShellMenuNew from NirSoft that eventually does the job for you. It’ is a small tool which does not need to be installed and can be used straight away.

ShellMenuNew

By right-clicking any of the entries you can select ‘Disable Selected Menu Items’. Once you open up the ‘New’ submenu in Windows Explorer the menu should be look much tidier.

In case you change your mind, you can always start ShellMenuNew again and enable the file extensions again. The tool worked nicely on my x64 Windows 7. Regarding the author’s website it should also work on Windows 2000, Windows XP, Windows Server 2003/2008, and Windows Vista. Solved this task,  the renaming of the entries is still pending.

Modified Windows Explorer 'New' File Menu

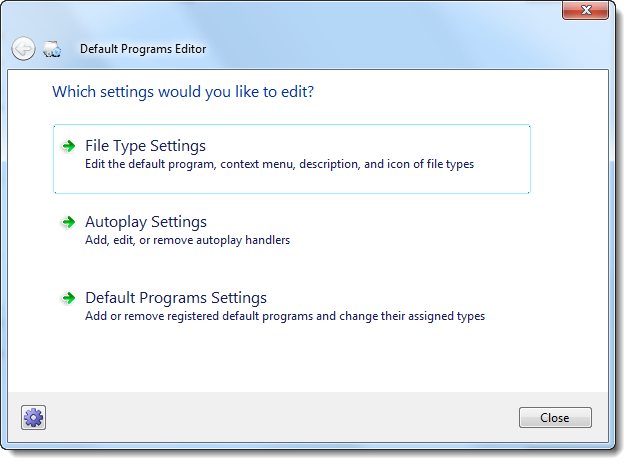
Also here a small freeware tool comes in handy. Default Programs Editor provides a set of functionality to edit file type settings, autoplay settings and default programs settings. Also this tool can be sued straight away and does not need any installation.

Default Programs Editor

Default Programs Editor lets you easily change any kinds of associations with respect to files extension. Using the ‘File Type Settings’ you can select the ‘Description’, search for the file type you want to rename and finally change the file type description.

Using those two tools it is possible to minimize noise in your working environment without hacking the registry manually.

KB967723 vs Windows Server 2008

I recently experienced issue installing security update KB967723 for Windows Update on a Windows Server 2008 (32-bit). This seems to be a very common issue with Windows Server 2008 resulting in a error code 80070490.

KB967723 important update was not installed

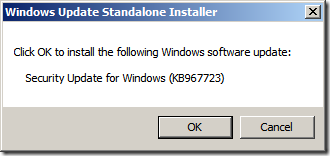
The easiest way is getting the update from the Microsoft Download Center for 32-bit or for 64-bit directly. Once you get the update you can execute the standalone installer to install the security update manually. This should do the job.

KB967723 Standalone Installer

Once installed you can start Windows Update again, it should now show Windows being up to date. Let me know if this worked for you.

Windows up to date

Fixing Wrong USB Devices in Windows 7

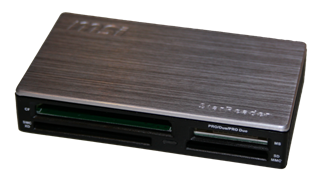
If you experience issues with a USB device not being recognized under Windows 7, there might be a simple solution to solve this. For example the MSI USB 2.0 All IN 1 Card Reader aka MSI StarReader is recognized as eHome Infrared Receiver (USBCIR) using Windows 7. The device works great using Windows Vista or even the Windows 7 pre-release versions. Unfortunately, with the final Windows 7 the device just won’t work.

MSI USB 2.0 All IN 1 Card Reader A quick look into the Device Manager will show that the device is recognized as eHome Infrared Receiver (USBCIR). When connecting the first time Windows 7 won’t give any notice that the installation of the driver failed or that the device is not ready to use. It will simply not work.
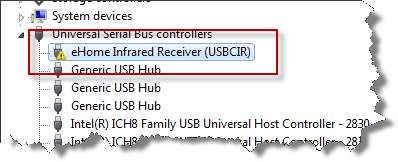
Device Manager

This seems to be known problem, however, there is no need to wait for a Software Update from Microsoft. The solution is to manually choose the device.

  1. Start Device Manager
  2. Right-click the eHome Infrared Receiver (USBCIR) entry
  3. Select Update Driver Software
  4. Choose Browse my computer for driver software
  5. Choose Let me pick from a list of device drivers on my computer
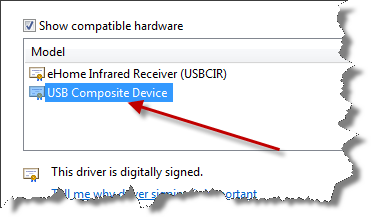
  6. Make sure the Show compatible hardware box is checked
  7. Select the USB Composite Device and you are done

Show compatible hardware

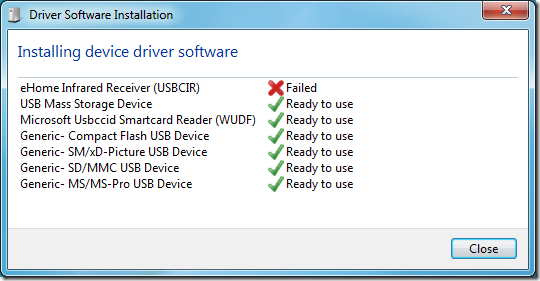
After a few seconds the driver should be installed and the device should be ready.

Driver Software Installation

Quickstart with AWStats and IIS 7

AWStats is a free, Perl-based analyzer for log files. To get results quickly on a Windows Server 2008 with IIS 7 you only have to follow a few steps. These are not well documented in the AWStats documentation and require some time of research. This post will show you how to set up AWStats with IIS7 in only a few minutes.

  1. Install Perl, e.g. ActivePerl. There are 32-bit and 64-bit versions available. Make sure that Perl is added to your PATH environmental variable. The ActivePerl installer usually provides this option during the installation.
  2. Install AWStats. Remember the path AWStats is installed. Paths used below are based on the installation folder of AWStats. In this example we use c:awstats.
  3. Run the configuration script at c:\awstatstoolsawstats_configration.pl. Follow the on screen instructions. This will create a default configuration file in c:\awstatswwwrootcgi-bin e.g. called awstats.www.example.org.config. The site name www.example.org depends on whatever site name was provided while running the script. When asked for the Apache Web server path type in none.AWStats Configuration File
  4. Open the configuration file awstats.www.example.org.config with any text editor of your choice.
  5. AWStats already supports IIS, however, it is required to tweak the config file. First change the entry for LogFile. Log files for IIS might be found at c:inetpublogsLogFilesW3SVCNNN where NNN is a different number for each web site, IIS creates log files for. Change the entry toLogFile=”c:awstatstoolslogresolvemerge.pl c:inetpublogsLogFilesW3SVC1*.log |”

    This will merge all log files for a site provided by IIS. Adjust the paths corresponding to your installations and desired log file folders.

  6. The AWStats configuration file offers the possibility to set the LogFormat to IIS (LogFormat=2), however, the log entries provided by a standard installation of IIS 7 won’t match. The AWStats documentation recommends to change the settings of IIS. The change will take effect only after restarting the Web site and is only valid for entries after that particular moment. Consequently, this is not an option if you are going to analyze the logs of the last 12 months where the original settings were used. To make AWStats work with the standard log format of IIS 7 change the LogFormattoLogFormat=”%time2 %other %method %url %other %query %other %host %other %code % %other %other %bytesd”
  7. Change SiteDomain and HostAliases to meet the settings of your site.
  8. Change to c:awstatswwwrootcgi-binand runawstats.pl -config=www.example.org

    This will build the statistics database for AWStats.

  9. To create output runawstats.pl -config=www.example.org –output –staticlinks > …example_org_stats.html
  10. Not that example_org_stats.html is created one folder up. In case you do miss this, the output will not work correctly until you adapt the entries for DirCgi and DirIcons in the configuration file.
  11. The output file is now located in c:awstatswwwroot. You might want to create a Virtual Directory or set up a Web site to view the reports via the Web or your Intranet.AWStats Output

Repeat steps 3-7 fore each site you want to create reports for. Repeat step 8 and 9 every time you want to create a new report.

Broken VMware Workstation Network Adapter

After upgrading Windows Vista to Windows 7 you might encounter an issue with VMware Workstation and its network adapter.

VMware Workstation Error Message


When setting up a NAT or bridged network connection in VMware Workstation it shows a message telling

The virtual network drivers on the host are incompatible with the installed VMware application. Expected version 5. Please reinstall the product. Failed to connect virtual device Ethernet0.

Make sure all your virtual machines are powered off and quit VMware Workstation. Open a command shell as administrator and follow the steps below.

First cd %windir%system32drivers, check for the file vmnetadapter.sys, right-click it, select Details and check its version. It should be 4.0.2.0. If the file is not there,

cd “%ProgramFiles(x86)%VMwareVMware Workstation”

rundll32 setupapi,InstallHinfSection VMnetAdapter1.Install 128 %CD%netadapter.inf

vnetlib — install devices

This will install the required adapters and devices. Do again a cd %windir%system32drivers and check for the First cd %windir%system32drivers, check for the file vmnetadapter.sys file.

vmnetadapter.sys

After a reboot of the host system, the NAT settings for the VMware network adapters should work again. Switching to bridged mode will probably result in another message.

VMware Workstation Error Message

Reason for the message saying

The network bridge on device VMnet0 is not running. The virtual machine will not be able to communicate with the host or with other machines on your network.
Failed to connect virtual device Ethernet0.

might be the missing VMware Bridge Protocol on the according host network adapter.

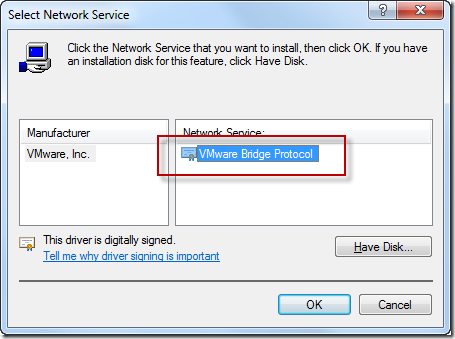
Got to Network and Sharing Center and select Change adapter settings. Choose the network connection you want to use with your VMware network adapter, right-click, select Properties, Install, Service and finally Add. This will allow you to select the VMware Bridge Protocol. In case the entry is not listed, select Have Disk… and navigate to %ProgramFiles(x86)%VMwareVMware Workstation.

VMware Bridge Protocol

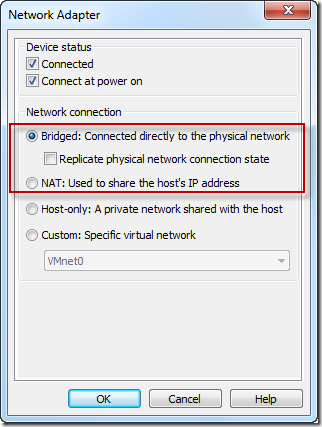
After installing the VMware Bridge Protocol restart the VMware Workstation and choose the bridged mode for the network adapter.

VMware Network Adapter