Simplifying Shortcuts using Windows Snipping Tool

At my current company laptop, I am very limited when it comes to installing additional tools to improve my productivity. From a company view understandable, it is very frustrating to me. One of the tasks I do several times a day, is creating a screenshot. Unfortunately, I am not able to install tool such as my beloved SnagIt.

I use Windows Snipping Tool instead a lot. However, pressing Ctrl + Esc, typing Snip and then pressing New gets annoying over time. So I decided to create an Instant Snip instead when.

So head to the Snipping Tool and right click it to navigate to its location on the disc.

Snipping Tool Context Menu in the Windows Start Menu

Copy the shortcut in this folder and rename it. In my case, I copied the shortcut to a Prg folder in my Home directory where I save programs, batch files and shortcuts.

Copying the Windows Snipping Tool Shortcut from its original location to another folder

Now right click the shortcut and do the following small changes:

  1. Add the parameter /clip to the command line in the shortcut
  2. Optional: Add a keyboard shortcut in case you are not happy with the Windows default (in my case Windows+Shift+I)

Properties of the Snipping Tool Properties UI

At the very end, I have put this shortcut to my taskbar to create instant clips with a single mouse click.

That way you can use the shortcut to create a clip directly. Using the /clip patemter you can use Snipping Tool in semi-automated processes but also the keyboard shortcut you have just defined.

In case you are only looking for the default keyboard shortcut you can use Windows+Shift+S to start the clip mode of Snipping Tool.

One point to bear in mind is the fact, when using the /clip mode, the clip is directly saved to the Windows clipboard and the Snipping Tool UI cannot be accessed right after the screenshot is made.

tl;dr

Windows Snipping Tool has a parameter /clip to create a instant clip from the command line without starting the UI dialog but also can be started using Windows+Shift+S to create such a clip.

Open Live Writer–Offline Blogging on Windows

While I worked with Microsoft, Windows LiveWriter was my favourite offline writing tool for blog posts. At one point Microsoft stopped supporting Live Writer in 2017 while the tool itself was not developed anymore since 2012. About that time I moved on to Apple and MarsEdit on macOS.

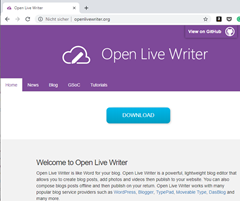
Therefore, I was very pleased when I found Open Live Writer while looking for blogging alternatives on Windows. OPen Live writer is a fork of Windows Live Writer with source code available under a MIT License on GitHub

Open Live Writer Homepage

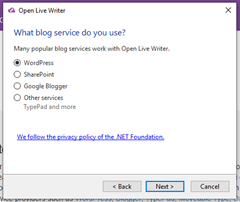
The installation file is just about 6 MB (indeed megabyte not gigabyte). It supports WordPress, SharePoint, Google Blogger and probably every other service with a proper blogging API.

Supported Blogging Services

Eventually, I set up my blog on Open Live Writer and this article became the very first article IO have written on a Windows machine for the past sever years.

tl;dr

Open Live Writer is a nice offline blogging tool for Windows, just in case you missed it like me.

Cannot connect to SMB shares on Windows 10

I recently set up a new Windows 10 machine. After eight years with only Apple devices, I finally wanted to fetch up with the PC and Windows world again.

For a day or two, I tried to connect my laptop to my NAS at home. I checked firewalls, credentials, server settings, usernames, network. I checked it double, triple, quadrupplewise. I tried almost any permutation. Eventually, I gave up.

The actual problem was, Windows 10 gave no feedback at all when trying to connect to a SMB (aka Sever Message Block Protocol) share on my server. All connection attempts just ended with a silent fail. In terms of user experience this is a violation of Grice’s maxims. Windows 10 simply chooses to opt out of the conversation.

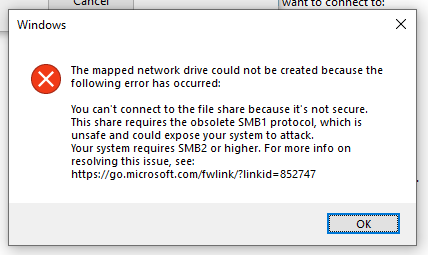
At a very last attempt, I tried the option to map a network drive. After entering user credentials again and again, finally Windows 10 came up the very first time with a useful error message.

Error while connecting SMB1 shares on Windows 10

This shares requires the obsolete SMB1 protocol…” is quite some information one can work with.

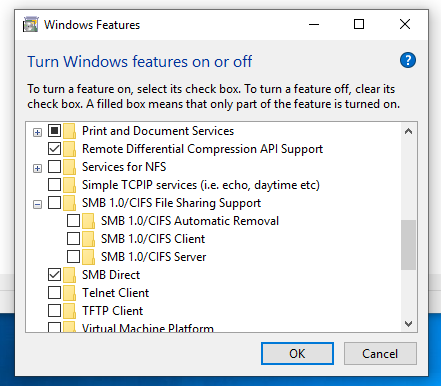
Enabling SMB1 turns out to be quite easy. Head to Turn Windows Features on or of and scroll down to SMB 1.0/CIFS File Sharing Support. There check SMA 1.0/CIFS Client to enable SMB1 support.

SMB 1.0/CIFS Support on Windows 10

Once done, connection to servers providing (only) SMB1 will work again on Windows 10.

Ditto Clipboard Manager

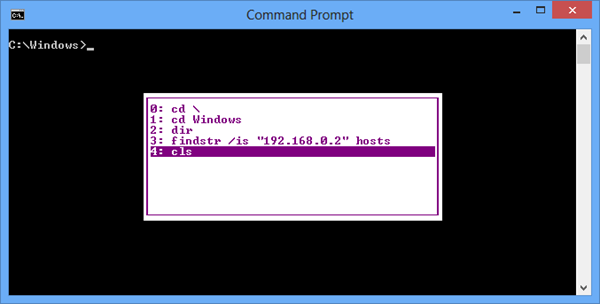
One of the most annoying limitations using any version of Windows, is the clipboard and its limited capacity of one entry. Even Microsoft’s DOS supported sort of a clipboard striking the F7 key to choose from the last ten commands.

Command Prompt Clipboard

However, using Windows only one single item can be placed into the clipboard. Using multiple tools, documents over time one would speed up work significantly if it would be possible to keep many things in the clipboard at once.

Quite a while ago, Microsoft introduced the Clipboard Ring for Visual Studio to cycle through the most recent copied code snippets as especially developers often need different fragments of code over and over again (said that kids, please remember, copied code is never good at all).

Anyway, how great would be the experience using Windows if one could access such a clipboard ring or similar outside of Visual Studio? Ditto Clipboard Manager is a small open source project, providing especially this functionality:

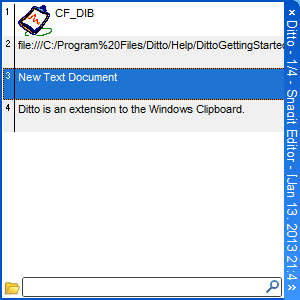
“Ditto is an extension to the standard windows clipboard. It saves each item placed on the clipboard allowing you access to any of those items at a later time. Ditto allows you to save any type of information that can be put on the clipboard, text, images, html, custom formats, …..”

It does keep anything in your clipboard, is easy accessible and does even provide a preview for many things copied during your work day.

Ditto

There is a whole bunch of shortcuts and  if you don’t like its appearance go ahead and theme it differently. I haven’t tried all the options Ditto does provide, however, I am already using it on all my machines at work as well as home. So go and give it a try.

Make it cozy – MacBook Pro and the third Monitor

A couple months ago, we got a second 24” monitor for each developer at the company I worked for. At that particular time, some of the developers still used some old 15” monitors as a second monitor. I spend quite some time to explain why it is important for companies to provide a good great work experience. You should aim at making your employees feel comfortable at work.  Following Starbuck’s a third place between work and home employers should try to keep the workspace as attractive as possible to their folks. Starbuck’s would not succeed with over 17,000 stores if the place where you can stay would not be attractive, though.

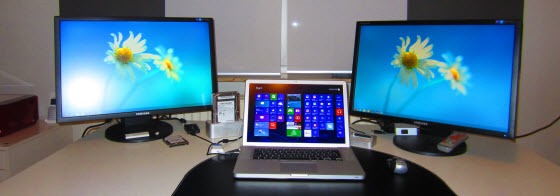
Said that, below is what my current home office workplace looks like right now. My Almost-Retina-But-Then-Again-Bought-To-Early-MacBook Pro, two external monitors with a total resolution of 1920×1200 + 1680×1050 + 1920×1200 and an Icy Box for easy swapping external 2.5” and 3.5” HDD drives and the  ElevationLab low friction iPhone dock, I backed at Kickstarter.

I run both, Windows 8 and MacOS Mountain Lion on my MacBook, depending what I need to do, I switch between both operating systems, all peripheral devices fully supported.

MacBook Pro Three Monitor Support Windows 8

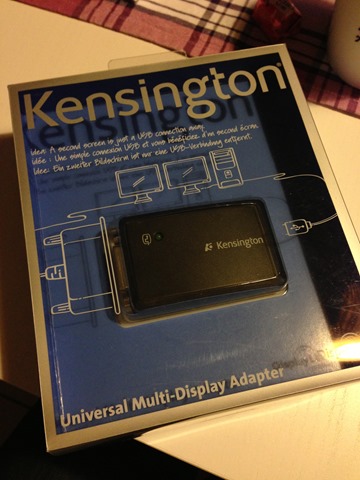
To get the third monitor working, I recently got a Kensington Universal Multi-Display Adapter from Amazon.de. Before attaching the device, make sure to download and install the latest drivers (both, for Windows 8 and Mountain Lion) from the DisplayLink website. If you do not install these drivers on Windows 8 beforehand, you might experience problems as there are already drivers offered by Windows Update. DisplayLink already provides support in case you experience any issues here.

Kensignton Univeral Multi-Diplay Adapter

I was quite surprised, DisplayLink already offers Windows 8 drivers. Quite skeptical about the external graphics card using USB as I read a lot about latency and quality, both, the quality of the device as well as the support for Windows 8 and Mountain Lion are just great. I do not experience any latency (I do not play games on the external monitor, though) so far and the quality of the output absolutely satisfying.

Boot Camp Windows 8 – Me haz Drivers?

Works on my MachineYou own a MacBook Pro? You run Boot Camp? You run Mac and Windows? You want to upgrade to Windows 8 but you still hesitate because Apple has not released a new Boot Camp version supporting Windows 8? First of all: I did it. I have to admit, I haven’t spent a single though on drivers before I upgraded to Windows 8 – and still I just blog from Windows 8 on my MacBook Pro.

What happens when I upgrade?

If you upgrade, some devices will work some won’t.Even if the Microsoft Upgrade Assistant does not show any incompatibilities with any of the MacBook’s devices in its report, they probably won’t work.

Windows 8 Upgrade Assistant Report

After installing, Windows 8 will show various devices in the Devices list indicating, there are no drivers available. Other’s simply won’t be detected at all, e.g. Windows8 won’t be able to detect the MacBook Pro’s WiFi at all. Function key, keyboard backlight won’t work and the graphics chipset might reset the screen resolution between the MacBook’s native resolution and something about 800×600 from time to time.

Where to get the Windows 8 drivers for my MacBook Pro?

To solve the driver issues, you simply start the Boot Camp Assistant from your Mac OS and follow the instructions until you find yourself faced with the following dialog.
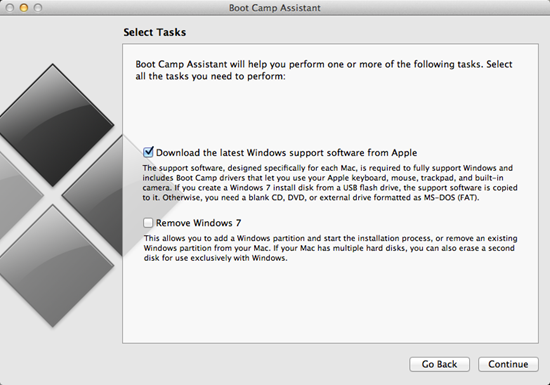
Boot Camp Assistant Task

Chose Download the latest Windows support software from Apple and continue. In the following step follow the on screen instructions either burning a DVD/CD or copying the files to a USB drive or any folder accessible from Windows (don’t drop the files to the Mac OS’s partition, though).

Will it blend work?

Restart Windows 8 and insert the disc, stick and select the setup.exe in the WindowsSupport folder. This will install a whole bunch of drivers.
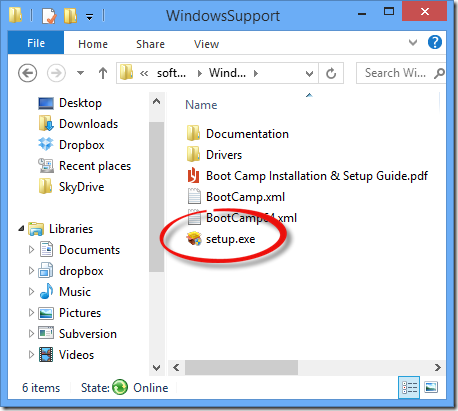
Boot Camp Windows Drivers

Based on Apple’s Boot Camp 4.0 FAQ , the Windows Support Files contain the following drivers

  • Apple Bluetooth
  • Apple Keyboard Support
  • Apple Remote Driver
  • Apple Trackpad
  • Atheros 802.11 Wireless
  • ATI Graphics
  • Boot Camp control panel for Microsoft Windows
  • Boot Camp System Task Notification item (System Tray)
  • Broadcom Wireless
  • Intel Chipset Software
  • Intel Integrated Graphics
  • iSight Camera
  • Marvel Yukon Ethernet
  • nVidia Graphics
  • Cirrus Logic Audio
  • Realtek Audio
  • SigmaTel Audio
  • Startup Disk control panel for Microsoft Windows

Once installed and the machine restarted, everything seems to work fine, the Windows Bluetooth and Boot Camp icons are shown in the notification area, light sensor, FaceTime camera and sound work perfectly and the graphics card runs smooth like butter.
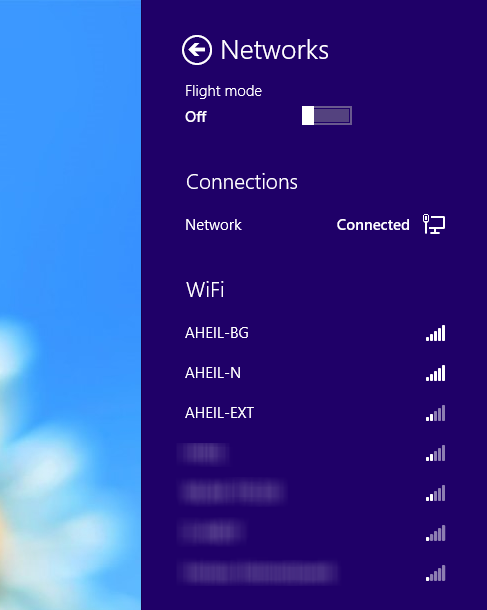
Windows Networks under Boot Camp

One last word on function keys – they won’t work out of the box. You have to start the Boot Camp Control Panel from the tray and switch to the Keyboard tab.There check the Use all F1, F2… box.
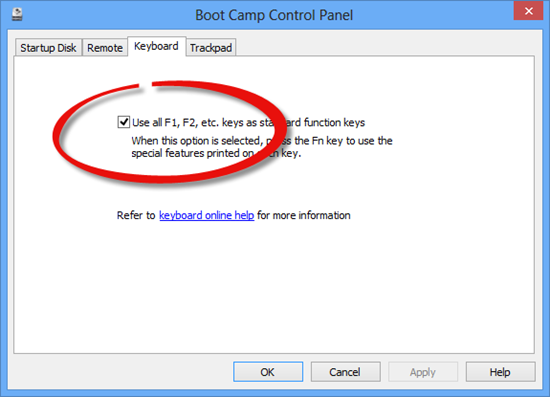
Boot Camp Control Panel

Windows 8 on the MacBook Pro is a great experience even without touch display and retina. Upgrading without checking for the drivers of course was a greenhorn mistake. However, I hoped (yes I know indeed, hope is not a strategy) during the inplace upgrade, Windows will keep the drivers. However, the fact that all drivers still work, clearly shows that the driver architecture from Windows 7 to Windows 8 did not change at all. That’s good as manufacturers do not need to update drivers in a hurry based on a new architecture, but on the other side it shows that there are not that many improvements how Windows deals with the hardware. But again, maybe this is not necessary at all.

Before you upgrade to Windows 8, run a backup! I did so using Acronis True Image 2013. Even without thinking about drivers, I was not sure whether the upgrade process with Boot Camp on the machine will maybe brick my box. Also run a backup of you Mac OS partition using Time Machine.

Said that kids, please bear in mind, that this worked fine on my machine, and might fail on yours. Also there is probably no support from Apple for Boot Camp 4.0 running Windows 8.

Because you’ve been so impatient with the Upgrade Assistant – How to get the Windows 8 ISO File

Windows 8 is there. Two days are gone and after waiting so long, you probably already purchased and downloaded Windows 8, as Microsoft came along with a time limited offer for a great price model, if you already have a PC running Windows XP, Vista or Windows 7

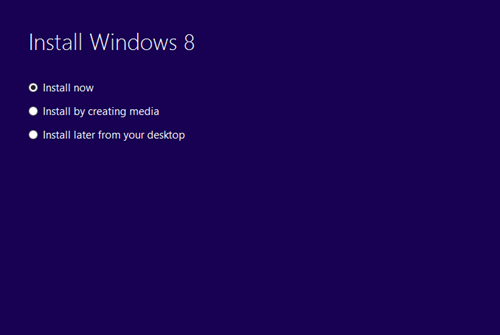
Once you run through the purchase process (they accept credit card or PayPal), at one point after the download finished, the Windows Upgrade Assistant comes up with the following dialog:Install Windows 8

Because you’ve waited for so long you are quite impatient and go straight  for the first option because you think you can create the media later one… If done so, the Upgrade Assistant will install Windows 8. Eventually, there won’t be any option to create the media later on.

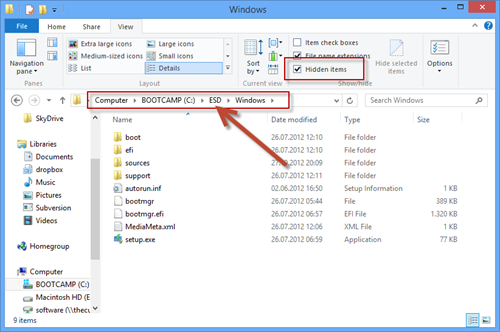
What now? If you just need the files, you can turn on hidden files in Windows Explorer (it’s now in the Ribbon). You will see a folder ESD on the root of your drive containing a Windows folder with the downloaded installation files. Go ahead and make a backup if required.

Hidden ESD Folder

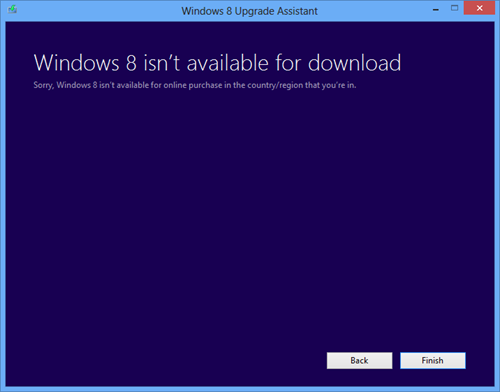
If you try to create an .iso file using the Upgrade Assistant again, you probably fail by getting the following result.

Windows 8 isn't available for download

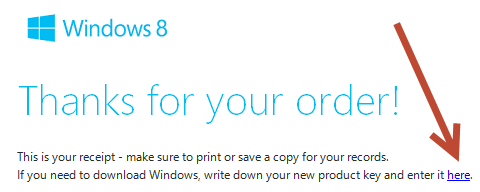
In case you still need (or just want) the .iso file, there is a way to obtain it. First of all, check your mail for the order confirmation of your Windows 8 copy. At the very top of the mail, you will find a link to download Windows again.

Thanks for your order

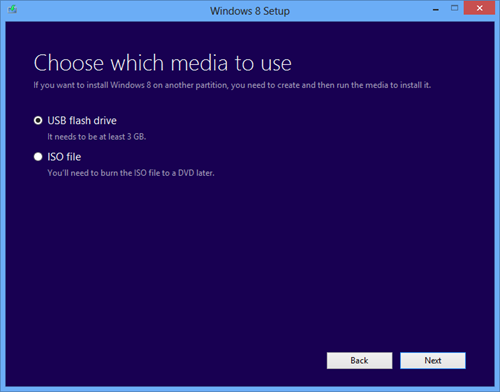
Following the link, you will download the Windows 8 Setup (windows8-setup.exe). Once started this will straight let you choose whether to install, download or to postpone the installation as seen above. Chose Install by creating a media and either choose to burn a DVD to to copy the files on a USB stick (3GB required, though).

Choose which media to use

You will be asked to choose the place where to save the .iso file, after which the download process starts immediately.

That’s all you have to do. Whether you have been impatient, clicked to fast, did not read carefully or just clicked ‘next’, ‘next’, ‘next’, there is still a way to get the .iso file afterwards.

Restore Desktop Layout on Windows

Works on my machine!I continually move between different office places using different setups for monitors with my laptop. Sizes, numbers and orders of the monitors vary from place to place. As a consequence, you either deal with a complete mess on your desktop or you spend several hours per week in rearranging icons on your desktop.
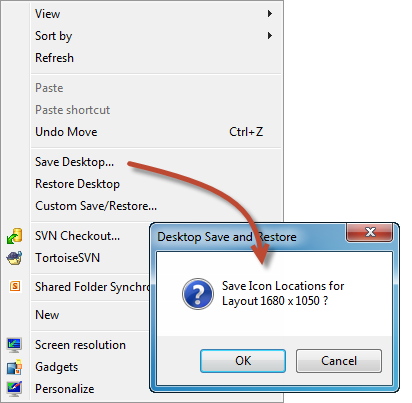
Tired of doing so, I was looking for a nice tool for Windows, easy to use. Desktop Restore by Jamie O’Connell is such a tool available for Windows x86 and x64 systems and it is free to use (while he appreciate donations). For me, it works fine on a Windows 7 64-bit machine.

It integrates well with the Windows Explorer  context menu where you can save and restore layouts for different resolutions. This even allows you to set up your desktop for different locations and restore them with a single mouse click.

Desktop Restore

I have used it for ages, however, I have not really realized how great this tools until I set up my machine from the scratch recently. 

Windows Metafile Preview on Windows 7

Works on my machine!The visual preview of files in Windows Explorer is one of the great features of Windows when looking for a certain file. Unfortunately, with Windows Vista Microsoft disabled the preview for Windows Metafile Format (.WMF) and Enhanced Metafile Format (.EMF) files. As I needed t work a lot with EMF files during my latest book project with Springer, I was looking for some way to enable the preview of the file types mentioned above in Windows Explorer.

Windows 7 without EMF/WMF preview

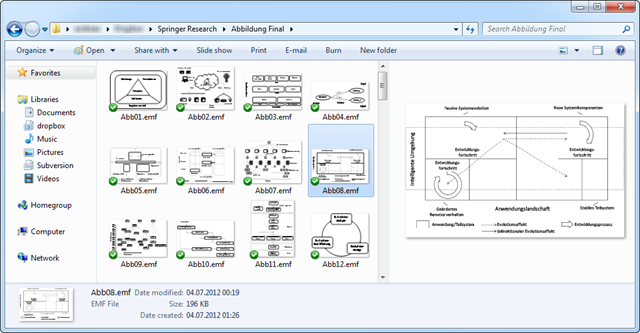
Fortunately, there is a great plugin called emfplugin written by Daniel Gehringer to enable the preview. The plugin is available for x32 and x64 machines and should work on both, Windows Vista and Windows 7. Once installed (and rebooted) the Windows Explorer is capable of displaying EMF and WMF files.

Windows Explorer EMF and WMF thumbnail preview plug-in

The plugin is licensed under the MIT license, so its safe to go with it. At the very end this raises the question why Microsoft did actually disable the preview for two formats developed by Microsoft itself and whether they might work with Windows 8 again.

Windows 8 Pricing

Windows 8 LogoBased on the blog entry from Brandon LeBlanc the Windows 8 Upgrade (via Windows.com) will probably be available for $39.99. This is quite a smart move by Microsoft as you get Apple’s Mac OS X Snow Leopard from their store for about $29.00.

If the upgrade really works from Windows XP up to Windows 7, Microsoft might be possible to shift many users to the next generation of Windows. While the price for previous Windows upgrades was quite high, many users kept their former version of Windows until they bought a new personal computer, obtaining a new OEM version of Windows.

Nowadays, computers used at homes definitely last longer than the average Windows life cycle and quite a lot personal computers outside in the wild might see at least two version of Windows until being replaced.

Therefore, personally I welcome this move by Microsoft, considering to upgrade even more than one of my licenses to the new Windows version. Even though, this might be a strategic move by Microsoft to keep market share, existing customers definitely gain by the relatively low prices by upgrading even from previous Windows version. This might be quite an advantage as one has to buy each and every Mac OS version on the way upgrading from previous versions.