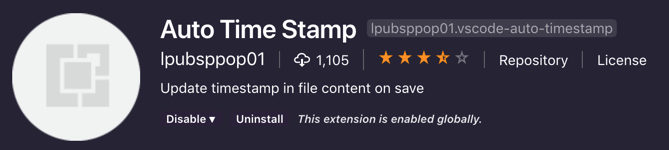
While organizing most of my information in Markdown files meanwhile, I like to have some metadata in each file to see e.g. when files have been created and/or updated.
The Auto Time Stamp extension is a small extension that doe exactly this for you. By adding Created: and/or Last modified: the extension will update these fields automatically when the file is saved.
// Created: 2018/02/04 12:24:41
// Last modified: 2018/02/09 11:41:41
This extension is going into my must-have toolbox for VS Code.
It run me mad, as I tried to change the IP address of my Raspberry to a static one. I changed literally everything in /etc/network/interfaces and reloaded, restarted and reboot the device over and over.
As the above configuration did not help a lot, I figured out that based on the Raspberry model, you need to change settings on various places.
First run
cat /proc/cpuinfo
to determine you model. While getting something like
pi@raspberrypi:~ $ cat /proc/cpuinfo
processor    : 0
model name    : ARMv6-compatible processor rev 7 (v6l)
BogoMIPS    : 2.00
Features    : half thumb fastmult vfp edsp java tls
CPU implementer    : 0x41
CPU architecture: 7
CPU variant    : 0x0
CPU part    : 0xb76
CPU revision    : 7

Hardware    : BCM2708
Revision    : 0004
Serial        : 000000004715b608
you need to use the hardware revision and
Model and Pi Revision
256MB
Hardware Revision Code from cpuinfo
Model B Revision 1.0
256MB
0002
Model B Revision 1.0 + ECN0001 (no fuses, D14 removed)
256MB
0003
Model B Revision 2.0
Mounting holes
256MB
0004
0005
0006
Model A
Mounting holes
256MB
0007
0008
0009
Model B Revision 2.0
Mounting holes
512MB
000d
000e
000f
Model B+
512MB
0010
Compute Module
512MB
0011
Model A+
256MB
0012
Pi 2 Model B
1GB
a01041 (Sony, UK)
a21041 (Embest, China)
PiZero
512MB
900092
Based on this information you need
Model a
Static IP addresses in /etc/network/interfaces is not the “prefered” way,as it is an old way and DHCPCD5 is installed.
Model b
Static IP addresses are configured in the /etc/dhcpcd.conf and it is required that /etc/network/interfaces is set to manually.
I have been often asked about testing, how something could be tested automatically, how something could be tested at all. Especially if there is/was no testing framework. My answer has been always the same:
It doesn’t matter. As long the tests are autmated.
Testing frameworks have been created over time. They have not been there from the beginning. Eventually, there is no test framework for your problem yet. However, this does not mean you can’t test.
An error was reported in my EIP-PlantUML side project. After some analysis, I figured out it was caused by a syntax issue within a string in a definition file. The problem here, you see the particular error only once the result has been rendered as an image. How to test this?
I simply wrote a Bash script checking the definitions instead. That’s all. It passes with the exit code 0 or 1 if the test fails. That way I will be able to integrate it in a test suite later one ,even if I don’t know how this will look right now.
The test script itself is rather simple using grep in a shell script.
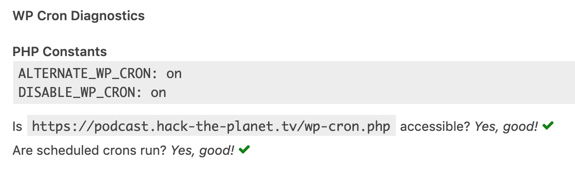
While we were publishing the first episode of our Podcast, I came across some issues with WordPress, though.
First of all: We are using the Podlove Publisher and therefore WordPress to host our Podcast.
Unfortunately, I encountered an issue with the required cron jobs. The Podlove WP Cron Diagnostics showed, that there was nothing set up.
PHP Constant ALTERNATE_WP_CRON: not definde DISABLE_WP_CRON: not defined
As a result, any attempt to connect to running cron jobs failed. After checking Google I found a helpful hint here. All you have to do is to add
define('ALTERNATE_WP_CRON', true);
in your wp-config.php.
And here the fun begins. I am using the official WordPress Docker container and Ansible to deploy it on my servers. So you need a way to add this line to a wp-config.php file on your server using an Ansible script… I think you get it. Some years ago, you would have simply logged into your server, changed the line in the file and eventually restart your webserver.
Now everything becomes more difficult. First of all I try such things manually. To do so (as well as to verify the changes on the server) I bash into the running WordPress container
docker exec -i -t {containerId} /bin/bash
just to realize there is neither vim or even vi on this container available. Also less did not work. At least I was able to read the file using more.
You can make use of the WORDPRESS_CONFIG_EXTRA environment variable to define any other config values in the wp-config.php file.
With this environmental variable, you can literally add anything to your wp-config.php file in the prebuild WordPress image without fiddling with own containers and so on.
A few weeks ago, I announced to start my personal educational project Hack-the-Planet.
I started the GitHub Project, the Twitch Stream and we already gathered a small community at Reddit and Discord.
Eventually, I wanted to start a podcast. However alone, it’s only half the fun. Said that I had a surprising phone call by an old friend who was willing to start the podcast with me. That’s not only a lot of fun but also a great honor to perform the Podcast with him.
Yesterday, we finally recorded episode 0 of the podcast and already published it. The Podcast is already available at Spotify and will be available soon at iTunes as well once the Apple site works again. More on this topic in episode 1. If you are using any other application I can also subscribe directly from our feed or head to the podcast site at https://podcast.hack-the-planet.tv.
We hope to publish an episode once a week. So stay tuned and feel free to subscribe to the podcast.
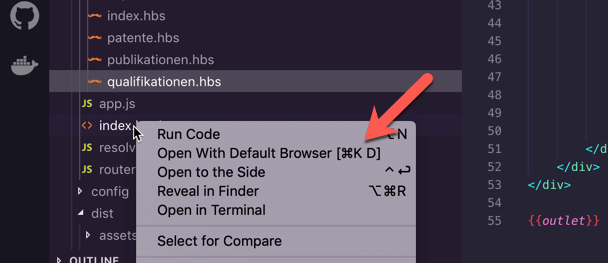
While I started using Visual Studio Code frequently for several Web development project, I got very annoyed by copying file paths and pasting them into my browser to view the file there.
Open an html file, Windows and Linux keyboard shortcut is Ctrl+Alt+O, for MacOS is Cmd+Alt+O. If you want to preview html in your default browser directly, please type Ctrl+K D.