6-axis Mini Industrial Robot Arm

Unfortunately, I don’t have time at the moment to spend on this project. But I really want to keep this for myself in my blog: Mirobot, 6-axis Mini Industrial Robot Arm.

Inspired by the ABB IRB 6700 industrial robot arm which is utilized in advanced factories around the world, we created the Mirobot robot arm – a small, affordable, and user-friendly industrial robotic arm that is accessible to everyone. Whether you are a robot expert, creative enthusiast or beginner, you can get started in the exciting world of robotics with Mirobot.

It’s currently a Kickstarter project, already funded. The robot will probably be available at a retail price of less than 1.000 €. The Kickstarter early backer price is even about less than 400 $.

If you want to know what I plan to do with it: Skip to 3:15 in the video below. I want to run a GoPro through my my sons Lego… what else.

Kickstrter project: https://www.kickstarter.com/projects/mirobot/mirobot-6-axis-mini-industrial-robot-arm

The Missing Gadget – USB Charging Port at Microsoft Surface AC Adapter

I currently work in a clean desk office space. Every evening, I pick up everything belonging to me beside the monitors. Every morning I come, I prepare the desk. Putting my laptop there, attaching the power plug, the monitors and so on.

Every morning I get all my devices out of my bag. And every morning I see the same picture.

My daily USB conneectors

And here begins the fun. I currently use a Microsoft Surface Pro – and while I truly love this device and it’s functionality, the USB capabilities are a major drawback. Similar to my MacBook which only provides one USB-C port, the Surface only has one standard USB port.

Microsoft Surface with only one USB port

Most of the devices I can switch based on the particular need (at the desk, in the meeting). However, most of the time, the USB port is occupied to load my mobile devices. Headphones, phone, one more phone, battery pack need to be charged during the day.

Why are USB power outlets on workplaces not a standard, nowadays? On my desk I find power outlets and netport ports. However, no possibility to charge my USB devices. Maybe you have this already on your working space, but here, we don’t have it.

Eventually, Microsoft Surface AC adapter comes with a very simple solution . It provides a USB power outlet allowing you to charge your devices without the need to occupy one (or the one) USB port of your laptop.

This solution is just obvious and practical. I wonder why this is not a standard on AC adapters meanwhile. I hope to see this more often in the future.

Early 2011 MacBook Pro RAM Upgrade

Since working more more in virtual machines and processing large amounts of data, I was looking to upgrade the memory of my early 2011 15” MacBook Pro currently utilizing 4GB of RAM. After digging through hardware specs and various manufacturer site, I decided to pick a 16GB kit from Crucial.

CT3327367 Crucial 16 GB Memory Upgrade

The specs of the memory chosen are 

  • Part Number CT3327367
  • Module Size: 16GB kit (8GBx2)
  • Package: 204-pin SODIMM
  •  DDR3 PC3-10600
  • CL=9
  • Unbuffered
  • NON-ECC
  • DDR3-1333
  • 1.35V
  • 1024Meg x 64

The only thing you need is a Phillips #0 screwdriver to remove the bottom of the MacBook.

Phillips #0 screwdriver for MacBook Pro

Old memory out, new in is pretty easy, both modules are on top of each other.

Crucial Memory Upgrade CT3327367

Once upgraded, I had to check the Windows Experience Index, if the new memory did change anything considering the performance, Actually the subscore for the memory went up from 5,9 to 7,6.

Windows Experience Index before memory upgrade

PerIndexNew

While I bought the MacBook, more than 4 GB was not a requirement. In addition the model is officially supported by Apple only up to 8 GB of RAM. However, the hardware can handle 16GB which now just comes in quite handy.

Halo – Luminous Gadget

Another successful project, I backed on Kickstarter this year, was the Halo LED safety belt, meanwhile available from Halo Belt Company. Some days ago, I received my reward: one of the first Halo belts manufactured.

Halo LED Belt

The makers of the halo belt put quite some effort to make the pledgers smile. The reward included a key chain, a cap, handwritten post card and an additional replacement battery. The belt uses a single CR2025 battery inserted into the belt buckle. One battery charge is supposed to last about 20 hours of continuous glowing.

We do use the belt now for roughly two weeks about one hour a day and we haven’t realized any loss in the luminosity, yet. The fabric the belt is made of is of an excellent quality and the light distribution within the fabric is equal on every inch.

Halo Belt Reward Content

The backers of the project received quite a bunch of stuff with their reward.

Halo Belt Extras

Most surprisingly, Vincent and his team put a handwritten note into the package. In fact this means they wrote about 500 cards to the project backers.

Handwritten Notes from Halo Belt

We’ve been that overwhelmed by the quality of the belt, we ordered a second one (different color) straight from the online store of the new start-up.

iPhone 5 Battery Review

Almost three weeks after receiving the new iPhone 5, I wanted to write a few words about the battery life of the new iPhone. If you check out the Apple support forums, you might find thousands of people complaining about the battery drain of the new iPhone.

Also you find dozens of tricks how to extend the battery life by turning off all kind of features (which make the phone interesting  in the fist place).

Battery Life Now

iPhone 5 Battery LifeAfter three weeks, I have an average usage similar to the following screen:

Given six and a half hours of usage and 41 hours of standby, I have to charge my phone every seconds day, which is similar to my previous iPhone 3GS and iPhone 4/4s I am aware of.

To Lithium Ion or Nothium Ion

I did not turn of any features and I did not re-install my phone from the scratch. I restored my iPhone 3GS backup and kept all the settings. I have turned on WiFi all the time and most of the time I use Bluetooth as well. Also 3G is turned on all the time. I have some calls and write several text messages during the day, but I do not switch the phone of during night (but do use the new do not disturb mode). I check Facebook and Mails a lot during the day, read tweets on a regular base and check in as often as I can using foursquare.

When I used the phone during the first few days, the battery did no last longer than eight hours (i.e. the phone turned of before a working day was over). I “calibrated” the battery in letting it drain completely and loading it up to 100% several times – which is a very questionable technique considering the underlying technology.

The lithium ion technology is a quite clean technology. There shouldn’t be any learning effect on the battery, the first charge should be as the 20th and fully draining the battery should not affect its overall capacity.  One of the few drawbacks of lithium ion batteries might be their complete failure after two or three years.

The last then percent of the battery drain quickly when being used, however, after the first three weeks the battery seems to be fine. Alexander Olma run some tests on the phone with extensive traffic usage resulting in 3h non-stop downloading bits and bytes until the phone turned off.

Due to the lack of data for comparison (i.e. data I can access), I can’t say whether there are other smartphones out in the wild with extensive longer battery life than the iPhone 5. However, a fully charged phone can make its way through a normal business day and a nice evening while still waking you up the next morning.

Elevation Dock Unboxed

Last year, I became a backer on Kickstarter. I was looking for a while how to support great ideas in a way with relatively little risk. I wasn’t looking for sort of business angel backing,  was looking how it is possible to help folks with great ideas and visions to achieve their goals. The Elevation Dock for iPhone was the first project I pledged and as plus, I received a reward, one of the first docks being produced.

Elevation Dock Package

The dock arrived via standard mail, i.e. in Germany it was not delivered with DHL as parcel it came by snail mail, though. Fair enough, as only a few dollars have been added for international delivery.

 Opening the Delivery

For international delivery the box was fairly packed. Could be better, as it seems that the box moved around in the box a lot. If it would contain breakable parts, this would be probably fatal. However, considering that some human put a lot of effort into packaging this thing for me, that’s fine. I guess there is a lot of improvement in he future.

  The Dock Box

The box of the Elevation Dock quite nice. White, sort of apple style, took me a few seconds how o open it, I tried first to push the inner box out of the sleeve before I realized that you can simply flip the box cover.

Elevation Dock Box opened

The box itself showed that it traveled some thousand miles and that several people moved the parcel from A to B before it finally arrived here. Actually, I don’t care, at this moment I am just interested in the content of the package.

Elevation Dock Content

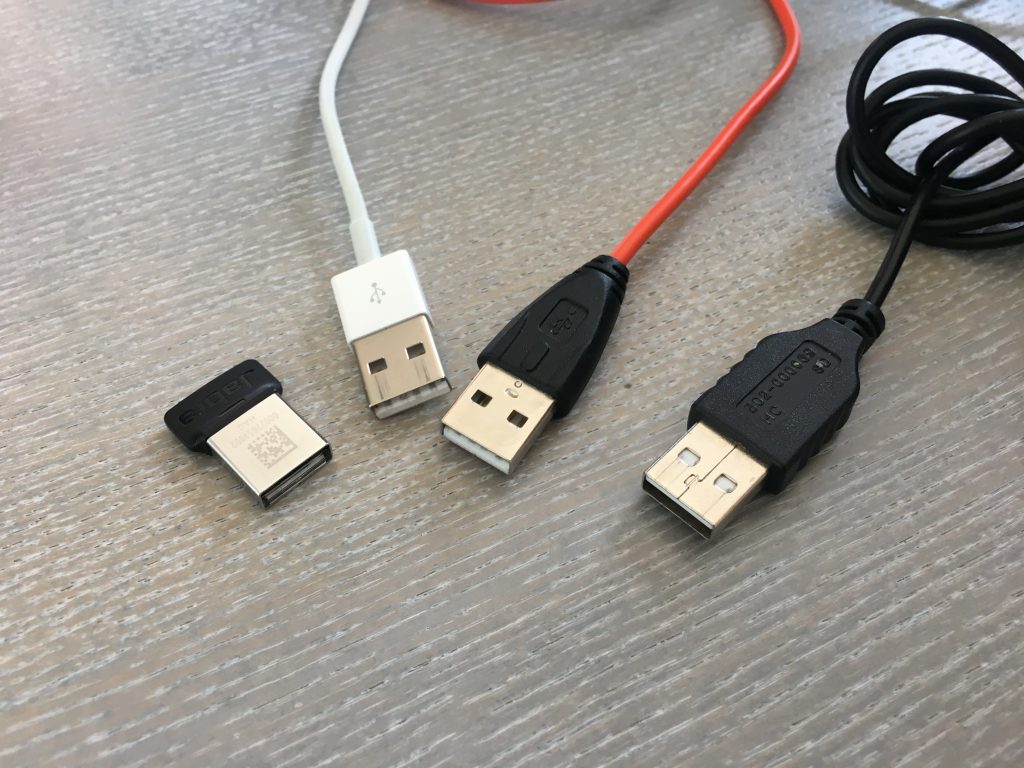
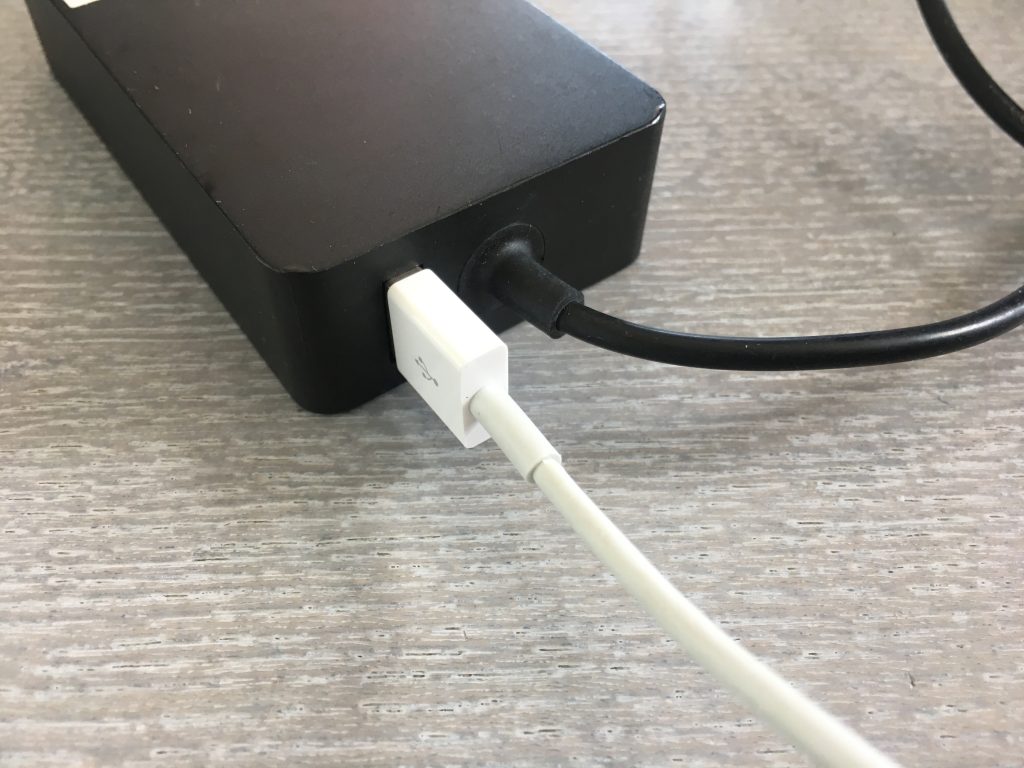
The dock, which is surprisingly heavy for being made from anodized aluminum, comes with a pre-mounded USB cord. It’s only a few inches. A longer replacement cable is provided if you want to place your dock somewhere away from your USB hub, power supply or computer. Kudos for this add-on.

Comes with Hex Wrench

Actually, I haven’t seen this in the first place, the dock comes with a hex wrench. I think this piece does not cost that much but it#s great for being included. It’s in fact the only tool you need to replace the USB cord. What it does not come with is a AC adapter. While there is a spare place in the package it seems there are no adapters in the Kickstarter rewards added. Maybe this was announced in one of the various mails send during the creation and funding process and I missed that one. However, the empty place in the box labeled AC adapter is quite an indentation there will be a adapter in the docks sold regularly in the future.

Elevation Dock Left RearElevation Dock from Above
Elevation Dock ConnectorElevation Dock Rear

The overall manufacture quality is impressive. The surface is well done and all parts fit perfectly. Turning the dock upside down, you see how well the parts fit. The black bumper within the dock can be turned to fit iPhones with cases into the dock. Also this part fits perfectly and is easy to change.

Elevation Dock Upside Down

The rubber stands are well made, on various surfaces the dock comes with quite some  friction.

iPhone 3GS fits well

As my new iPhone 5 is still on its way, I tried the dock with my not-nearly-retina-and-meanwhile-slow-like-hell iPhone 3GS. Fits perfect. In fact, it fits so well that you have to hold the dock once you want to pull the iPhone from the dock. We have tried this with the iPhone 4 as well, and as promised by Elevation Lab, the dock is a low friction dock. It is awesome how easily you can remove the iPhone 4 from the dock. No need to fix the dock at all, the iPhone 4 just slips out of the dock. Very well designed. That was the original reason I supported the dock.

Bad Luck

On the photography above you might have seen a small spot on the left edge of the dock. This is really bad luck, as the quality of the dock is so high, I really got one with a small mark on the left top edge. Maybe this happened during packaging, as I cannot imagine this happened during transportation. As most of the packaging and quality assurance process in done by hand yet, this might happen. I bet the process for controlling the quality of the devices will improve over time.

 Swapping Cords

As a very last step, I tried to exchange the cables provided with the dock. Opening the dock with the hex wrench works quite smooth. Opening the bottom of the dock, I found this surprising note. It should be obvious not just to bull on the cord how some moron, however, it is a great idea to provide such a note to the user. Many people would probably damage the connector while swapping the cords.

 Dock Connector

Finally, I had a look at the connector. Again, very high quality. The USB cables have micro USB connectors. Surprisingly, the dock connector is mounted using hex screws. Said that it should be possible to change the bolt in connector. In fact, Elevation Labs recently announced that they are currently working on a exchange connector for the new iPhone 5.

I am quite happy being a backer of this project. The quality of the device is high standard, the updates on the project by Casey Hopkins have been great and regularly, and finally receiving the reward is just awesome. Now I am looking forward for the new connector. The time Apple announced the the new connector, the design and production of the dock has been already in full progress. Also many people complaining about the dock having the old connector, one should bear in mind, the docj was designed as a low friction dock for the iPhone 4/4s. And as far as being evaluated it is as promised.

As a resume, Elevation Labs will be definitely one of the gadget providers I will keep on my favorite list for the future. As they already announced the design of a new dock with improved sound capabilities and the development of the new connector I hope that business goes well and they will supply a lot of nifty gadgets in the future.

The XBOX Blackout

After dealing with a RROD a couple of years ago, a few weeks ago, my replacement Xbox also went down to the dogs. No replacement this time. Actually, it seemed some solder joint was broken.

With a new box, this time a Xbox 250GB Slim, I was confronted with the data migration issue. Luckily, the new Xbox already has the drivers for the migration kit build in, which means you can connect your old HDD directly to the new box. Therefore I made use of my old Data Migration Kit.

XBOX 360 Data Migration Kit

To make the process of upgrading easier, first set up your new box with a temporary account. Connect the old HDD to the Data Migration Kit and plug in the kit to the new Xbox. It will recognize the kit and ask whether to copy from or to the new console.

Copy Content to XBOX

Afterwards you can select what copy. The only drawback is you cannot copy already installed games from disc. These you have to reinstall at a later point in time.

2012-08-31 14.30.19

Once started this process might take quite a while. I haven’t found anything on the Xbox site about data migration to a 250GB disc or the new boxes. However, luckily the guy in the following video pointed out how it works and that the software/drivers a re part of the new Xbox. 10 minutes worth watching.

Once accomplished, it might be necessary to transfer the rights on digital content to your new Xbox following the steps on http://www.xbx.com/drm.

Unwrapping the O2 Diamond Pro

Ordering an O2 Diamond Pro aka HTC Touch Pro one week ago, I was told that the delivery might take three to five weeks, as the device is not available yet. I was quite surprised as a parcel arrived this morning. What’s inside? The brand new O2 Diamond Pro. The packaging is done a bit Apple-style, making unveiling the phone to some kind of experience.

Xda diamond pro packaging

Opening the package will reveal the phone. In terms of style and experience, the O2 branding is quite nice, but at the end the content is more interesting.

O2 xda diamond pro revealed

For the impatient user there is a quick-manual for the phone and forth TouchFlo 3D user interface. Also you get ActiveSync 4.5 and a 60-day trial version of Microsoft Outlook on CD-ROM. For those with a lot of spare time you’ll find a 350 pages manual. Nice through for the inexperienced user.

Xda doamond pro content

The included accessories are more or less surprising USB and TV cradle, USB handset, replacement pen. The most surprising one is the USB cradle. Standard USB to mini USB, which goes directly to the charging plug.

Xda diamdon pro accessories

SIM, microSD and battery can be simply inserted by removing the back cover. There is no button to release the cover, so it works similar to the HTC TyTN II (aka HTC Kaiser).

After turning on the phone the first time, the O2 setup will take about 2 minutes install the branding and setting up the phone. This might differ for each provider. Connecting to the Exchange server took only a few steps. And that’s one of the coolest features when using a Exchange server at the back: getting all your contacts, appointments, tasks and mails to your new phone at once.

What is nice: Beside the replacement pen, you’ll get a clear screen cover that can be placed on top of the touch screen, increasing its durability. I haven’t realized any drawbacks using the touch screen with it.

What is disappointing: The case that comes in this package does not fit to the phone. It a leather-kind, slip-style case which is only half the size of the phone!? To me it feels like this is the case for the Xda diamond (without keyboard).

What is also disappointing: With a regular price of 500 £, I would expect at least some kind of microSD card within the set. In contrast, the Nokia E71 came already equipped with a 2GB microSD card.

The keyboard feels quite solid and the slide functionality behaves a bit as the one of the HTC TyTN II and not as cheap as of the HTC TyTN. If you are used typing on the TyTN or TyTN II, you’ll get used to the keyboard quite fast. The pen slides into the phone automatically as soon as you have inserted it more then 50%. That’s no magic, but quite nice.

So far, the device and its accessories are quite satisfying. As I experienced the first time with my O2 Xda, Windows Mobile Device Center displays a preview of your Xda.

Windows Mobile Device Center

O2 Upgrade for Windows Mobile 6

Oh dear, last month all my colleagues did an upgrade on their MDA aka Hermes 9600 for a newer ROM version. Unfortunately, I was not able to find any upgrade for the Xda Trion at the O2 XDA website. Also the German O2 website does not provide any information about ROM upgrades. Here I finally fond some information about O2 taking their Windows Mobile upgrade quite serious and the most importing information: All the upgrades are hosted by HTC directly. They even adapted the O2 style on the Windows Mobile 6 Update for Xda page.

Windows Mobile 6 Update for Xda

All you have to do is to enter the serial number of your Windows Mobile device (right behind the battery) and download the corresponding 52 MB bits. Before installing make sure your ActiveSync connection is set up properly and running. And that’s currently the only drawback of the whole story: I tried to perform the ROM upgrade first with my Windows Vista machine. The upgrade process seems to run up to the point where the application tries to upload the ROM files. At this point the application does not work properly with either Windows Vista or the Mobile Device Center. Therefore, I did take my Windows XP backup machine. There you simply plug-in your device and make sure that the ActiveSync connection is established.

Diffrent SPL Versions

It looks like the SPL version (whatever this is) was not updated by my first attempt. Connecting via ActiveSync showed a different version (2.03 instead of 1.04). After confirming the setup procedure on your desktop machine, the screen changes then to a progress bar. After approximately 10 minutes the ROM upgrade is complete, the device restarts and shows up the new Windows Mobile 6 screen.

Xda Trion with windows Mobile 6